How to send e-mail from your website with Amazon SES via SMTP
Amazon SES stands for ‘Simple Email Service’ and it is part of Amazon’s Web Services suite. SES is great for sending marketing e-mails, notifications or transactional messages. It is very scalable and integrates wonderfully with the whole Amazon Cloud ecosystem (AWS). It is also very cheap too - at the moment the cost is $0.10 per 1,000 emails sent/received.
You can send and receive e-mails through SES using SMTP or you can use the SDK and their API. In this tutorial I will be showing you how to configure your domain, website and your Amazon AWS account to send e-mail via SES using SMTP.
Step 1: Get an Amazon Web Services account
If you don’t yet have an Amazon Web Services (AWS) account, go and get one now. Click here to register for free. If this is your first time getting an AWS account, you get access to some other bonuses for the first year such as a free small Elastic Compute virtual machine instance and more services included in their ‘Free Tier’. But I won’t go into that here.
Step 2: Add and verify the domain name in SES
Once you’ve completed registration and are signed into the ‘AWS Management Console’, you need to access the Simple Email Service. I know the AWS Console looks daunting - they have so many services available, but no worries. Currently, the SES is under the ‘Customer Engagement’ group:
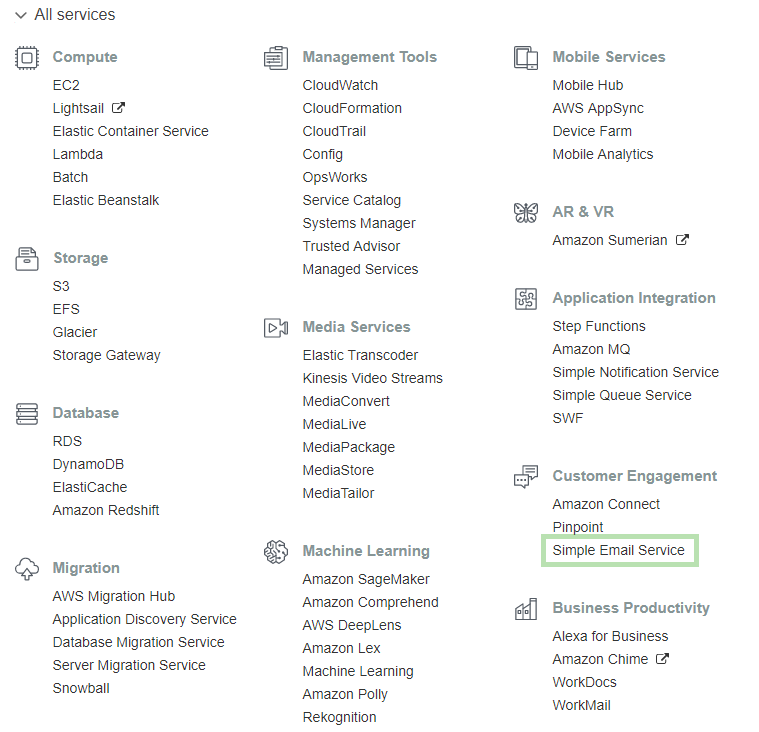
The first thing you need to do once you access the SES dashboard is to add the domain name of your website (the one you want to send e-mail from) and verify it. Amazon needs to ensure that you own the domain name before they allow you to send e-mail from it. From the menu on the left side, click ‘Domains’:
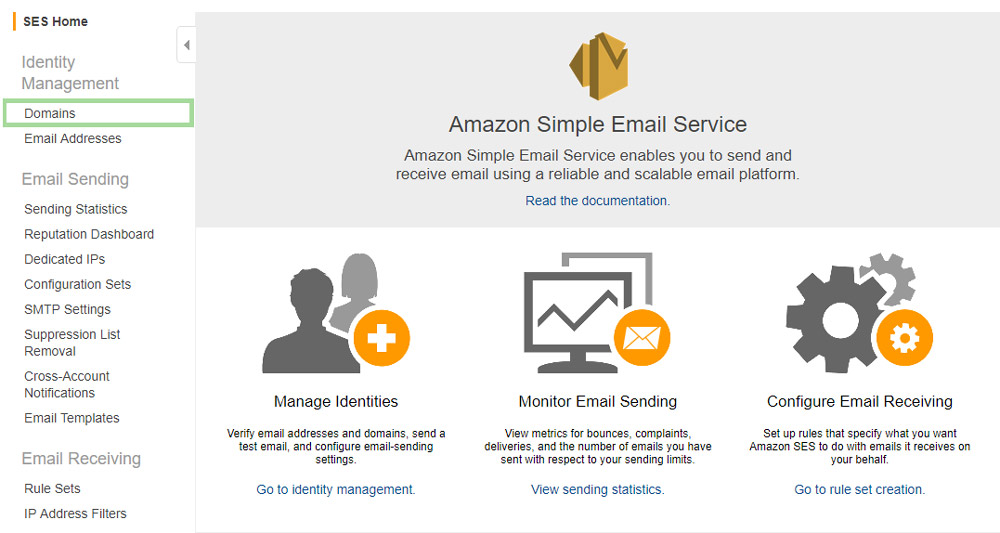
Then click on ‘Verify a new domain’:

In the pop-up box, enter your domain name and click ‘Verify domain’:
Don’t worry about ticking the boxes for DKIM right now.
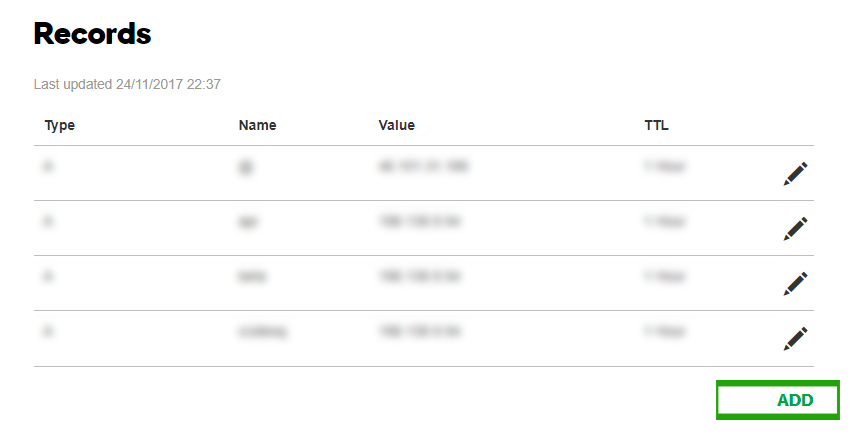
After you click the button, you will be presented with a box showing a record you need to add in your domain’s DNS in order to verify ownership of that domain. The record to add is a ‘TXT’ with the key starting with “_amazonses…” and the value a long random string (which I blurred in my screenshot below).
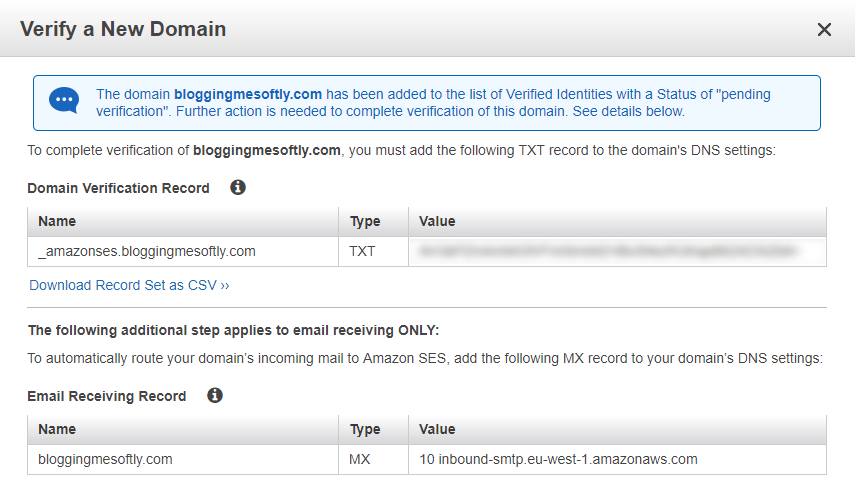
If you don’t have access to your domain’s DNS records you need to ask whoever purchased it for you to add this TXT record.
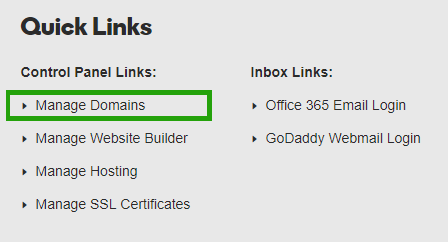
As a quick example, here’s how to add this record if your domain was purchased with GoDaddy:
a. Log in to your GoDaddy account and from the dashboard or the ‘Account’ section at the top, select ‘Manage domains’:
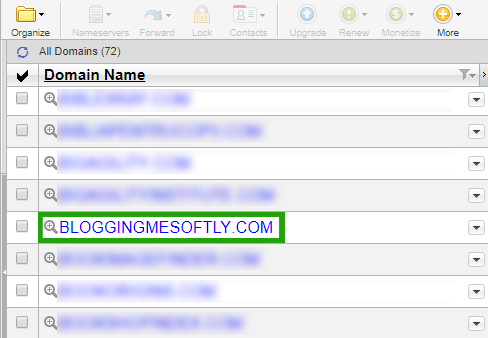
b. From your list of domains, click on the domain name you want to add the record for:
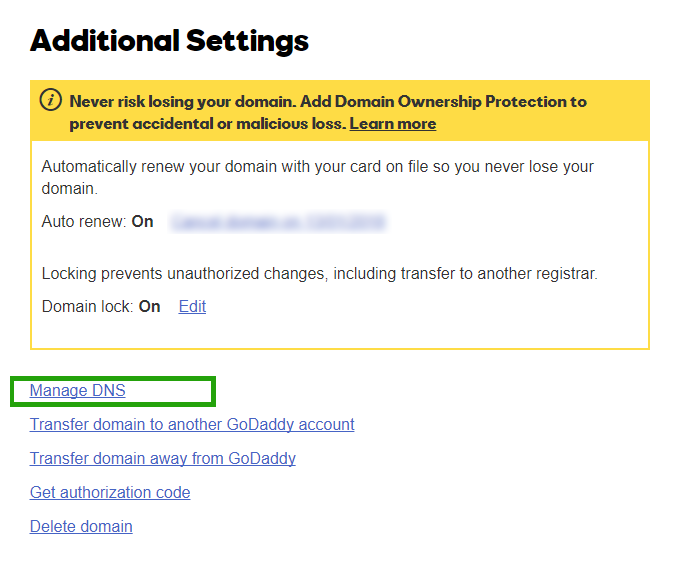
c. Scroll down to the bottom ‘Additional settings’ section and click ‘Manage DNS’
d. You should see the existing DNS records for your domain name. Scroll down to the end and click ‘Add’
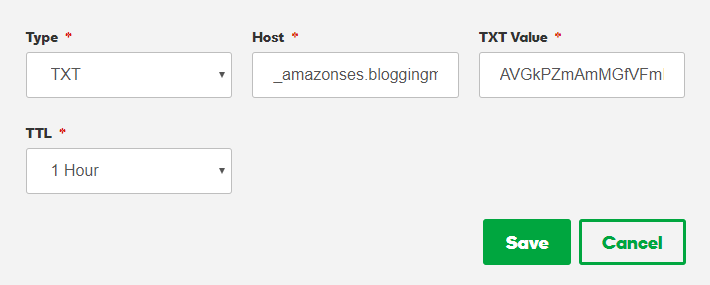
e. Fill in the new DNS record form by specifying the new record as ‘TXT’ and copy-paste the rest of the info from Amazon’s dialog.
When you’re done click ‘Save’:
If your domain was purchased with another registrar, you need to access that admin section and make those changes there.
When you are done with this step you need to wait for Amazon to verify the changes you made. In the AWS SES dashboard, next to the domain, you should see ‘Pending verification’ for a while.

Typically, when Amazon has verified the domain successfully, they will send you an e-mail notifying you of this fact. If it takes longer than a day, something is wrong - either there has been a mistake in pasting the code, or the registrar has failed to update the records in time.
Since DNS can be slow to propagate these changes at times, it could take a while. From my experience, with GoDaddy it’s quite fast.
Sure enough, in my case, half an hour later, the confirmation e-mail arrived:

And now the domain appears as ‘Verified’ in AWS:

Now, onto the next step…
Step 3: Verify the e-mail address you will send from
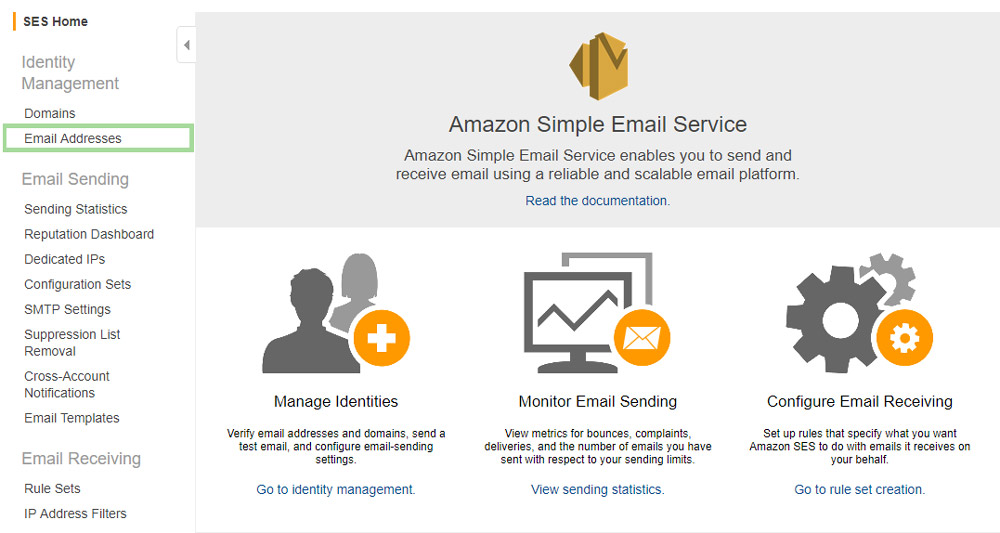
Go back to the SES dashboard and on the left-hand side menu, click on ‘Email Addresses’:
Then click on ‘Verify New Email Address’:

Type the e-mail address you want to verify and click ‘Verify This Email Address’ (make sure the e-mail is on the same domain you verified previously):

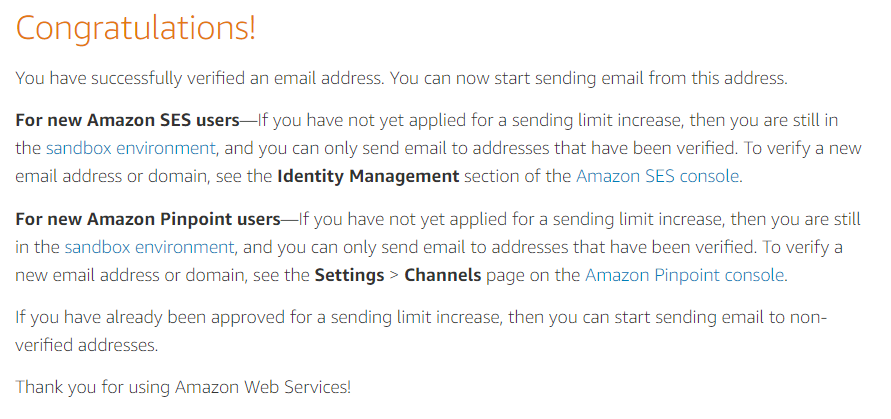
The e-mail is then added to the list with a status of ‘Pending verification’. At this time you should check your e-mail account for a message from Amazon with a verification link. Click that link to certify that you have access to this address.
One important note though: If your AWS account is new and you have never used Amazon SES before with this account, Amazon puts you in a ‘sandbox environment’ to prevent spam. While you are in this sandbox, you can only send e-mails to verified addresses you own or have access to - for testing, not to the public:
Obviously, this is useless if you’ve signed up to send e-mails through SES from your website or application, so you will have to apply for a sending limit increase. You can access this page to find out how to open a case to increase your limit.
Step 4: Create SMTP credentials for sending e-mail
Amazon SES offers more than one way to send e-mail - the SDK or SMTP. SMTP is easier to work with and doesn’t require any programming/development and you can use it in any program that supports SMTP. Here’s how you can create these credentials and use them:
Go back to the Amazon SES dashboard and from the left side menu click on ‘SMTP settings’:
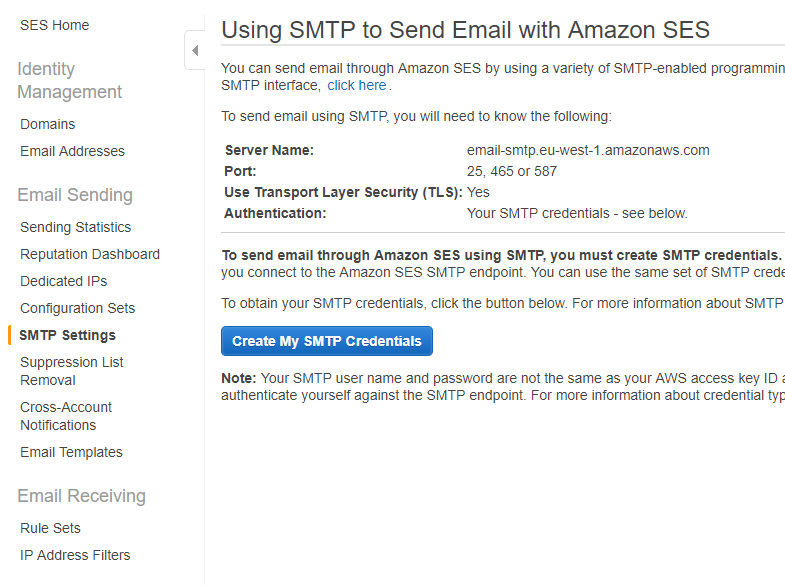
On this page you will see the SMTP settings such as server, port, TLS and a button to create the SMTP credentials. Make a note of these settings somewhere before you continue with the credentials. The SMTP credentials you create here are actually an Amazon IAM account. Click ‘Create My SMTP Credentials’.
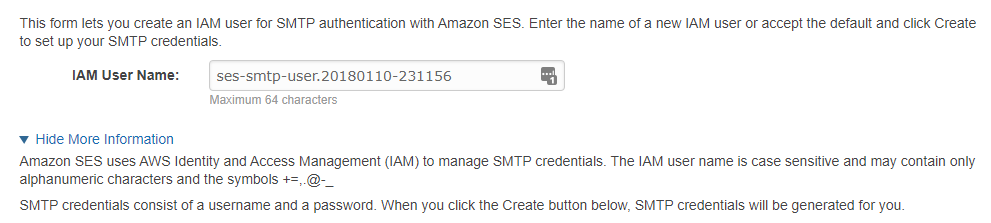
Typically, SMTP works with a username and password. At the end of this process you will have a SMTP username and password in the form of a IAM user. On the next screen you can give a name to this IAM user so you can recognise it later (this won’t be your SMTP username):
Once you click ‘Create’ on the bottom-right corner, the credentials will be created and you can save them:
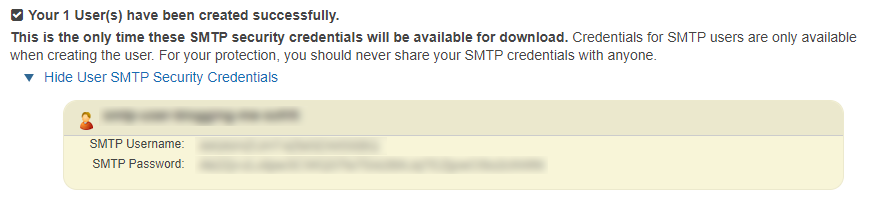
Make sure you save these somewhere now since you won’t be able to retrieve them later. On this confirmation page you can download them as a CSV file.
Step 5: Use the SMTP credentials on your website or application
Finally, with these credentials on hand and the SMTP settings above, you can set up your application or website. If you’re using Wordpress, for example, you can use the WP-SMTP plugin and put these details to enable e-mail sending from your website.

Cristian
I specialize in providing clear one-on-one training in software such as Camtasia and Descript, helping you make the most of these programs.
Whether you're interested in learning how to create training videos and tutorials for your company or for YouTube, or are hoping to create your own course or start a podcast, I'm here to help you get started and give you all the shortcuts.
Categories