
How to Use the New Layer Tab in Descript Underlord


The Descript Underlord update introduced a new Layer tab (now renamed to Properties) in the right sidebar. This is where you'll now find all the properties for whatever you have selected — whether that's your script, a shape, text, or any other element on your canvas.
In this article, I'll explain how the Layer/Properties tab works and how to use it for common tasks like adjusting volume, applying effects, and changing element properties.
What the Layer tab shows
The Layer tab reflects what you currently have selected. If you click somewhere in your canvas without selecting anything specific, the Layer tab simply lists the layers in your current scene — but doesn't show detailed properties for any of them.
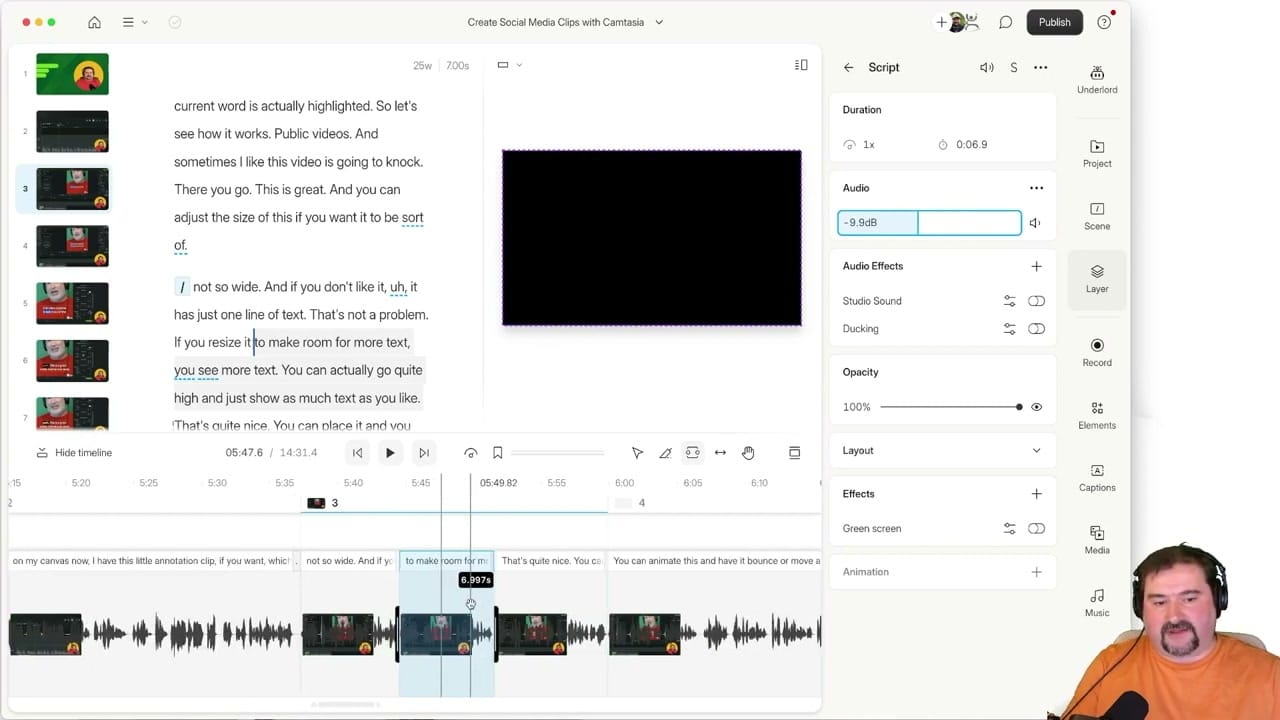
Once you click on a specific layer — for example, the Script layer — the tab expands to show all relevant controls: volume, audio effects, Studio Sound, opacity, layout, animation, and more.
Adjusting volume with the Layer tab
To change the volume of your audio, click on the Script layer in the Layer tab. The volume slider appears immediately. You can drag it to adjust the level for the entire clip (or the selection, if you made one using the Range tool).
If you only want to change the volume for a specific portion, use the Range tool in the timeline to make a selection first, then adjust the volume. You'll see the volume change applied only to that selected range — visible as a dip or boost in the timeline waveform.
You can also select text in the script editor and adjust the volume for just that sentence or paragraph.
A gotcha with scene-level selection
One confusing behavior: if you click on the scene itself (in the left panel), the Layer tab may show all layers as selected — but dragging the volume slider doesn't actually change anything. To reliably change volume, either select the Script layer directly, use the Range tool in the timeline, or select text in the script.
Working with elements
When you add elements like shapes, text, or dynamic objects from the Elements panel, each one becomes a separate layer in the scene. You can click on any element — either in the canvas or in the Layer tab list — to see and modify its properties.
For example, adding a circle to your scene creates an Ellipse layer. Clicking it reveals controls for color, opacity, position, and more — all within the Layer/Properties tab.
Layers vs. tracks
Descript uses the term "layers" for individual objects on your timeline. These are not the same as traditional tracks. In Descript, layers within a scene do not necessarily play simultaneously — they're stacked visual elements.
The only true "tracks" in Descript exist inside a Sequence, where multiple media items play in sync. Cuts made outside a sequence affect all layers, which is the track-like behavior.
Related guides


Do you need help or wish to learn Descript the right way? Join me on a one-on-one Descript coaching session. Book a call with me.
I'm here to help you with any questions you have and to guide you through the best workflows, tips, workarounds, or just answer any questions you may have!


