Master Precision Editing in Riverside: The Complete Guide


Riverside has become one of the most powerful browser-based editors for podcasters and video creators. But recording is just the beginning — the real magic happens in the edit. In this comprehensive guide, I walk through every precision editing technique available in Riverside's editor, from AI-powered cleanup to manual timeline surgery, to make your final edited episode as polished as you want it to be.
Whether you're editing a podcast interview, a multi-speaker show, or a solo video, these techniques will help you produce polished, professional results without leaving Riverside.
Watch the full tutorial
Start With a New Episode Edit
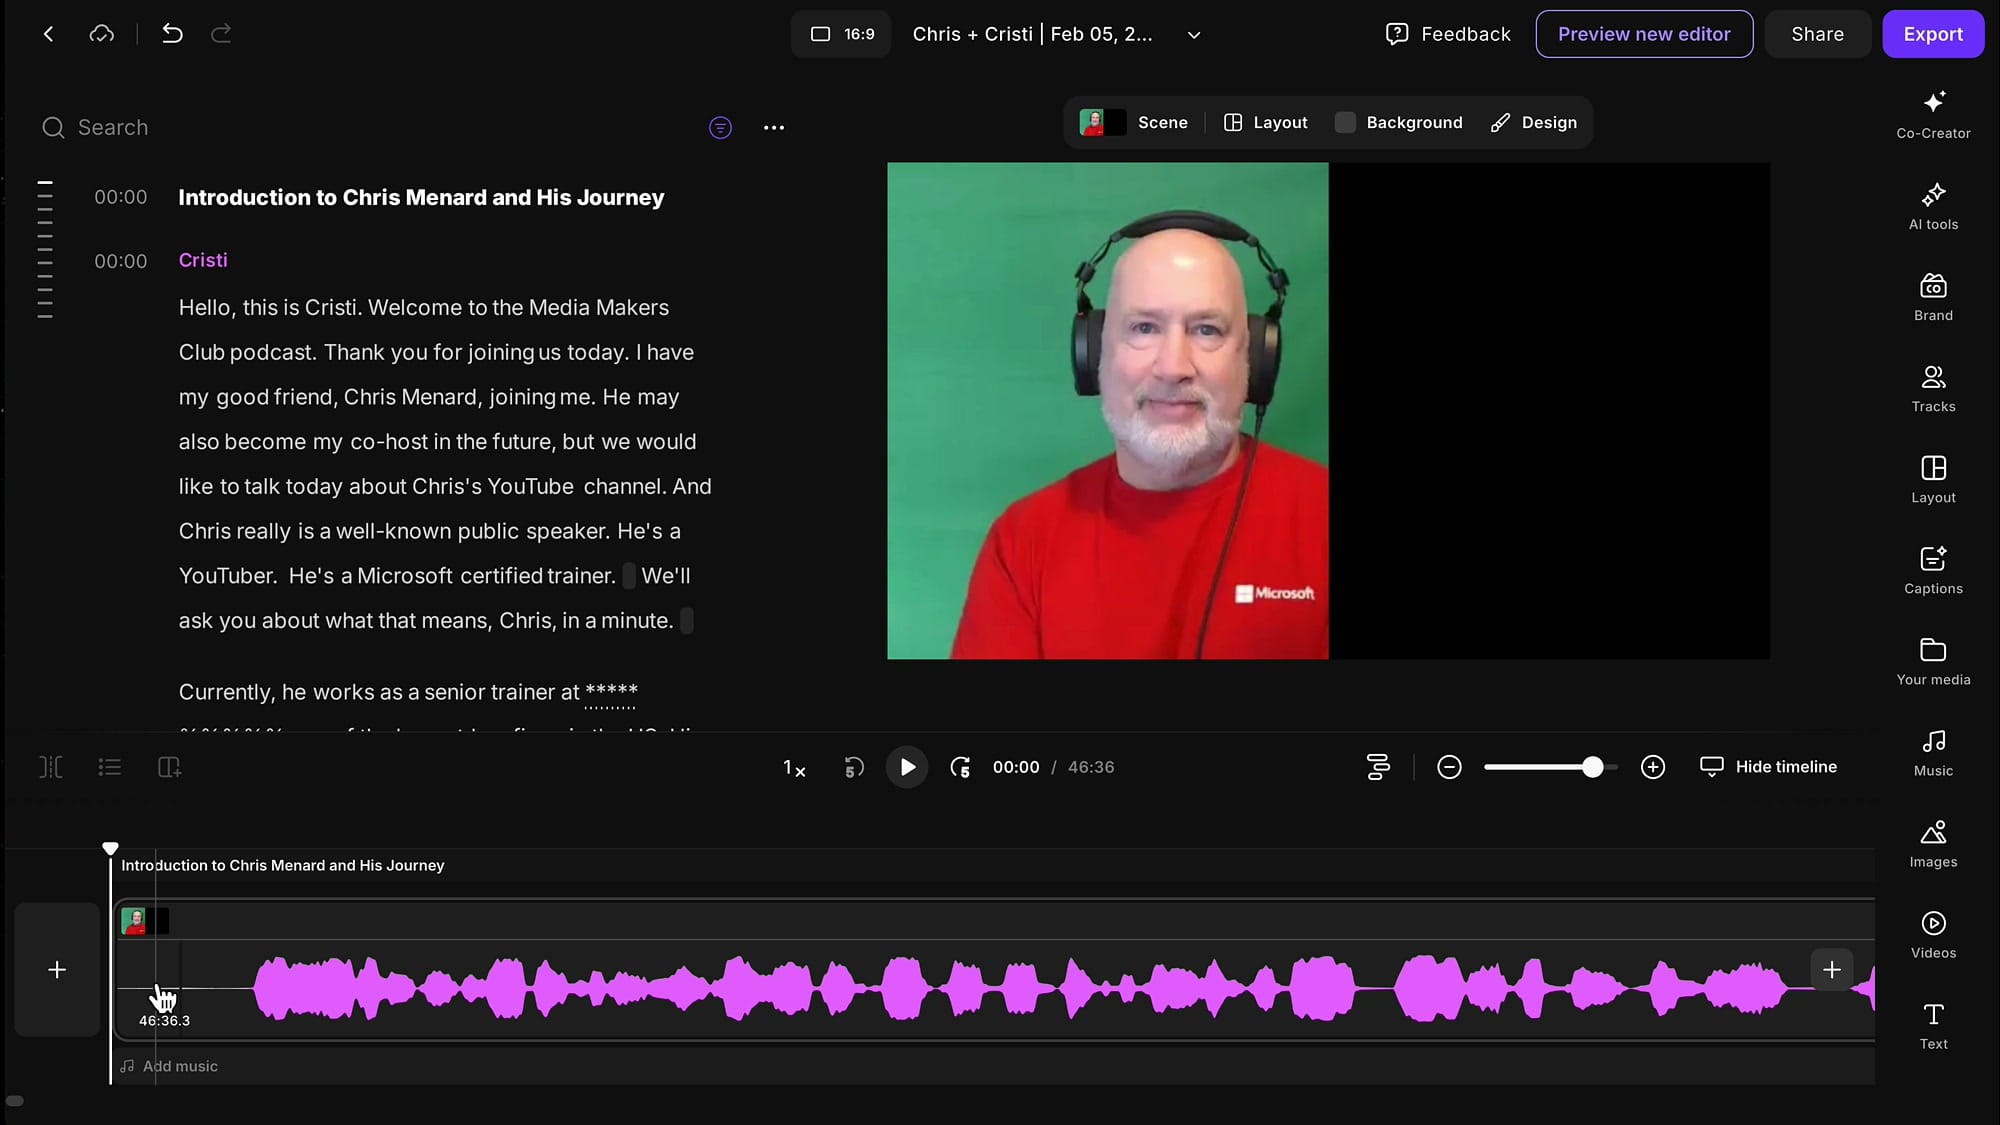
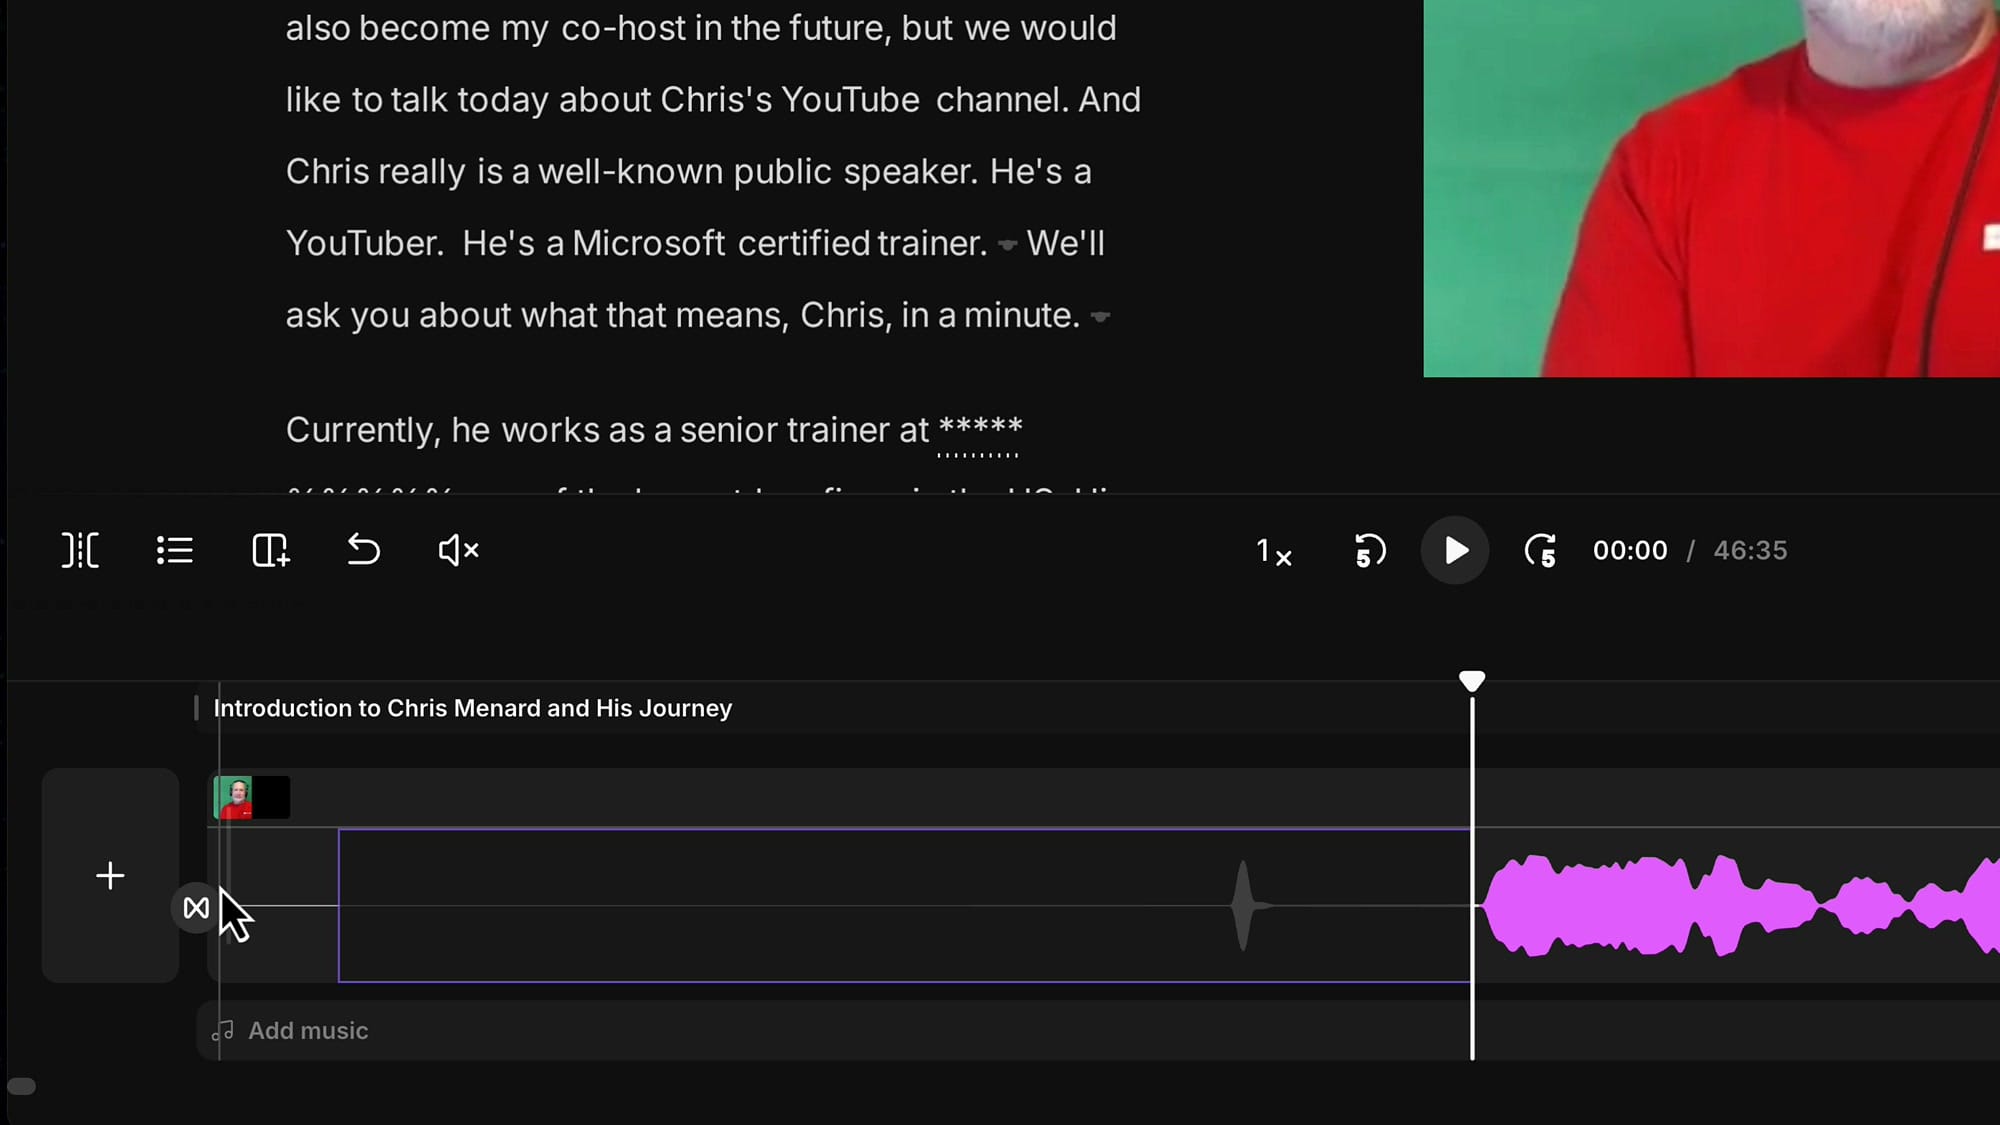
Before diving into manual edits, you need to start an edit on your recorded episode. In Riverside, navigate to your recording and click the Edit button. This opens the full editor with your transcript on the left, a video preview on the right, and the timeline at the bottom.
The editor is non-destructive — nothing you do here changes your original recording. You can always undo, restore, or start over. This is a key advantage over other editors where destructive cuts are permanent.
Apply AI Tools First
My recommended workflow is to let the AI do the heavy lifting first, then go through the entire episode manually to refine what the AI did. Riverside offers several AI tools that can save you hours of work:
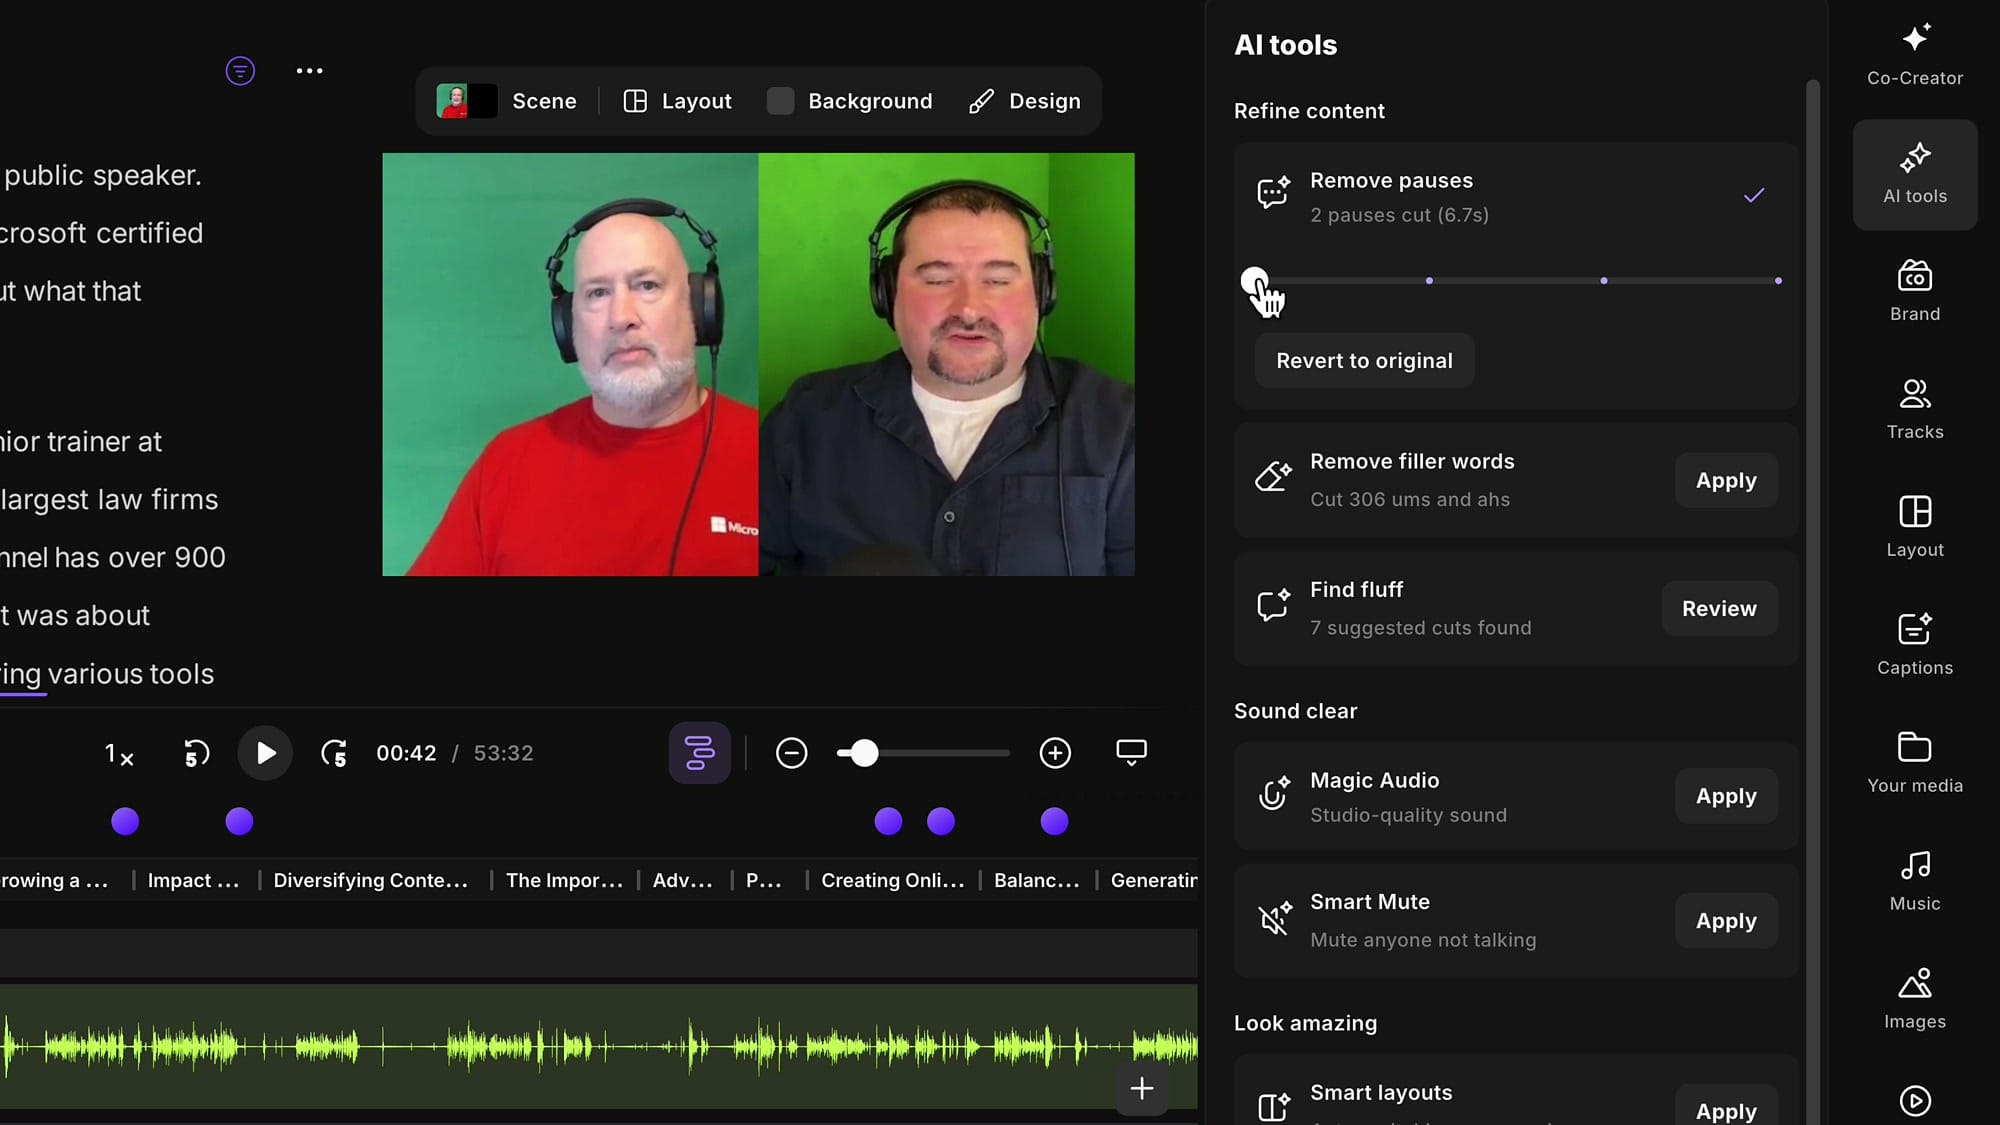
- Remove Pauses — Automatically shortens or removes dead air between speakers
- Remove Filler Words — Cuts "um," "uh," "like," and other filler words
- Find Fluff — Identifies and removes repetitive or unnecessary phrases
- Magic Audio — Enhances audio quality
- Smart Mute — Automatically mutes the non-speaking participant to reduce background noise
Important tip: Apply AI tools at the beginning of your edit, not at the end. If you apply them after making manual cuts, you can't easily check what the AI changed. By applying them first, you can then listen through the entire episode and catch any mistakes the AI made.
Navigate the Timeline and Transcript
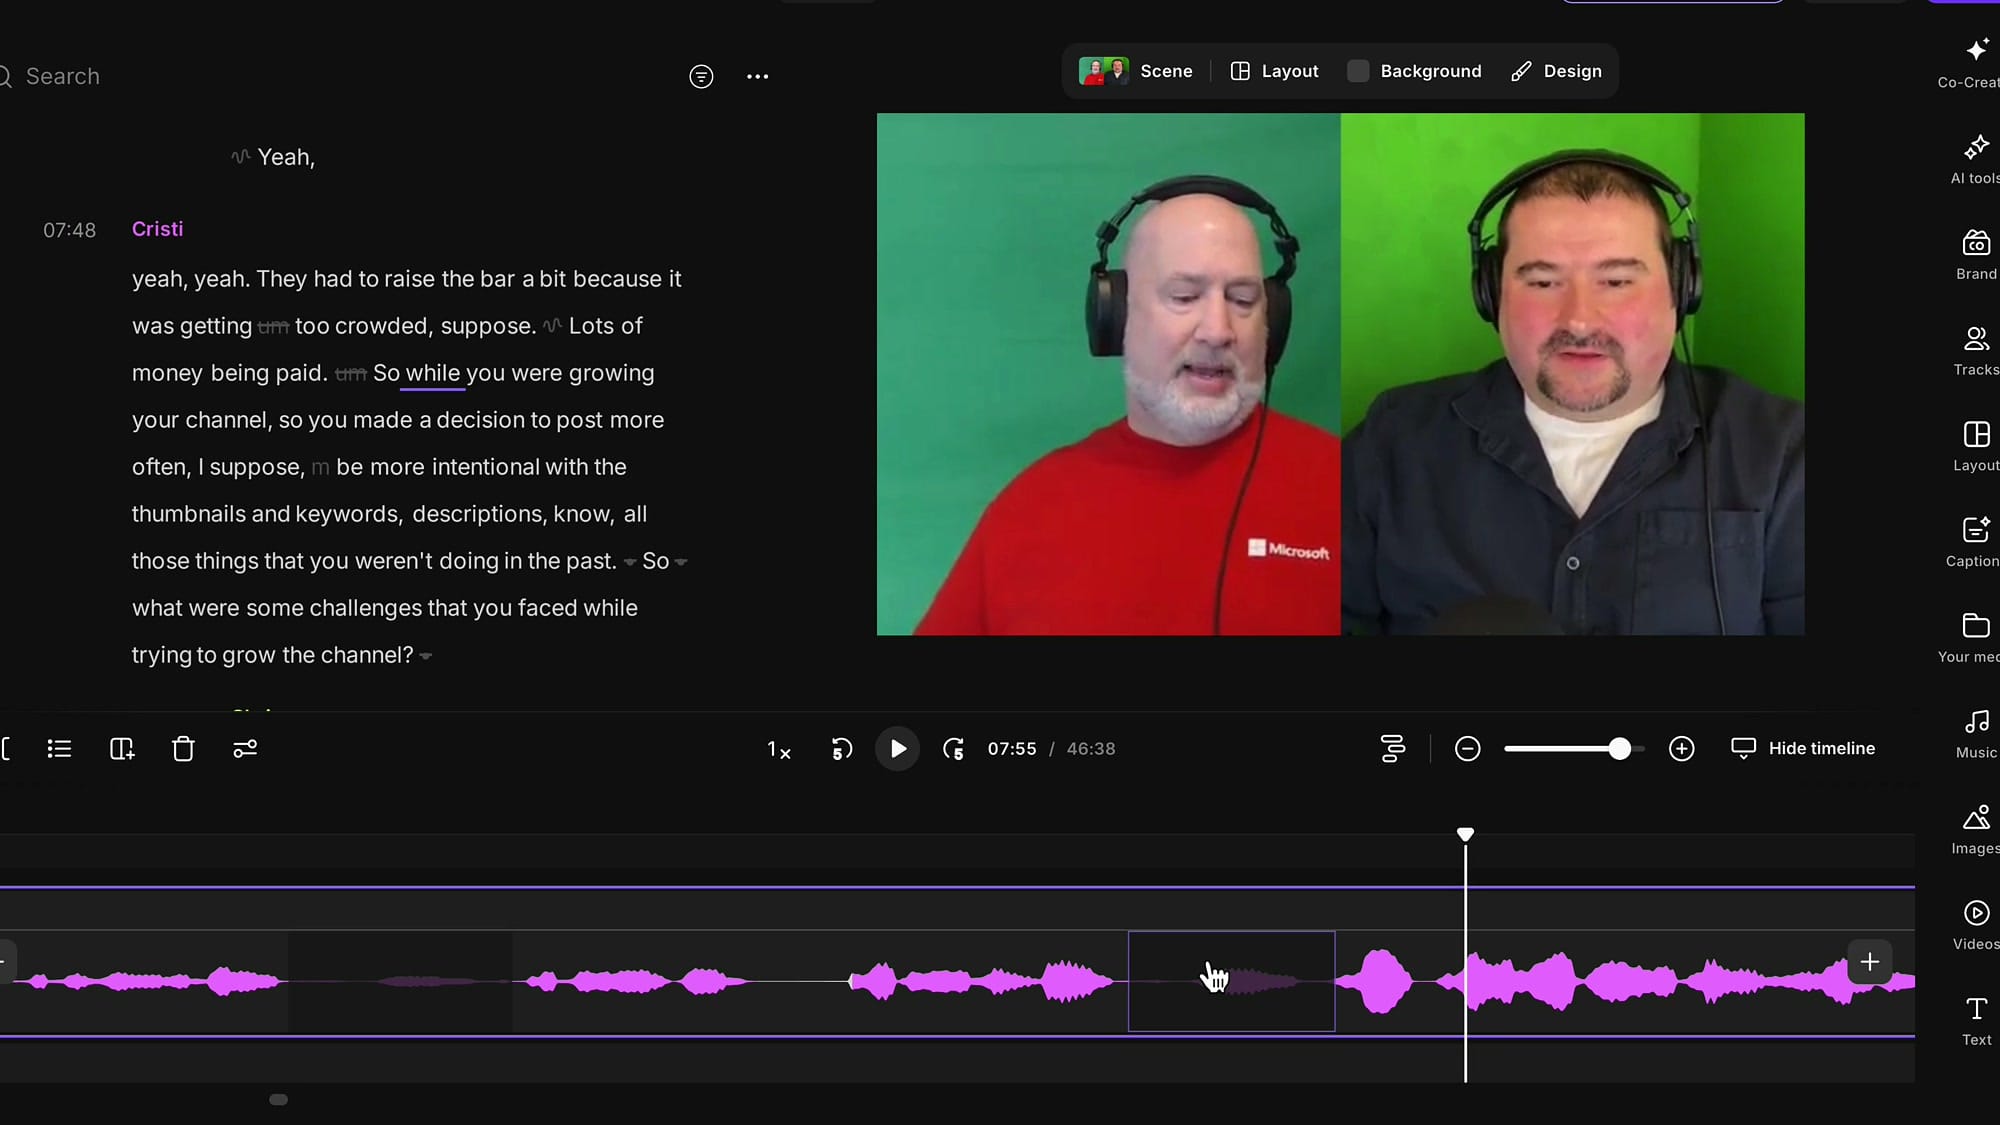
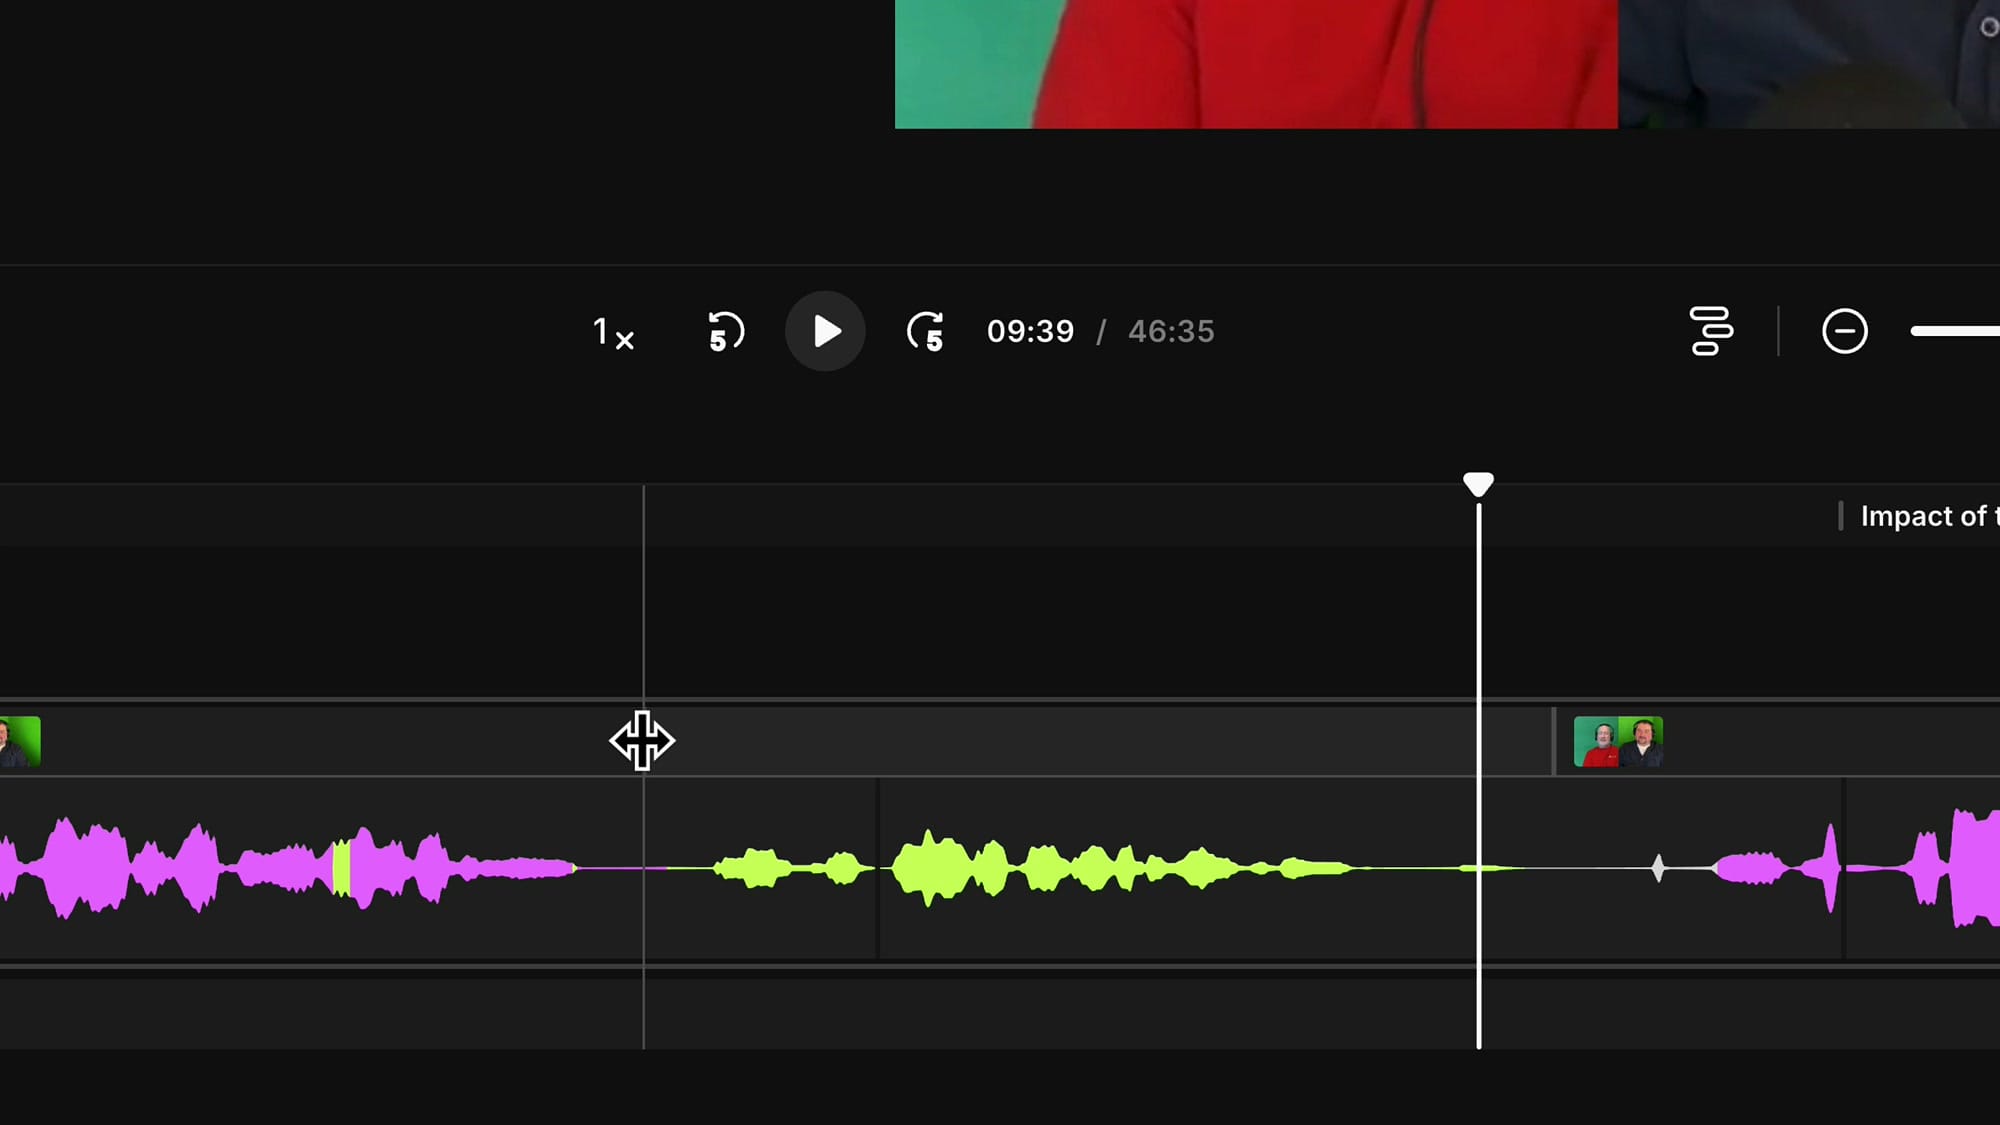
Riverside's editor gives you two ways to work: the transcript panel and the timeline. Each speaker gets a different color label, and those colors carry through to the timeline waveform — making it easy to see who's talking at any point.
I recommend editing primarily in the timeline because you can see the waveform shapes and make more precise cuts. The transcript is great for understanding what's being said, but the timeline shows you the actual audio.
Zoom, Scroll, and Navigate
Navigation shortcuts are essential for efficient editing:
- Command/Ctrl + Mouse Wheel — Zoom in/out on the timeline
- Shift + Mouse Wheel — Scroll the timeline sideways
- Navigation arrows — Jump between edits quickly
I highly recommend using a mouse for editing rather than a trackpad. The mouse wheel makes zooming and scrolling so much faster.
Show and Hide Deleted Parts
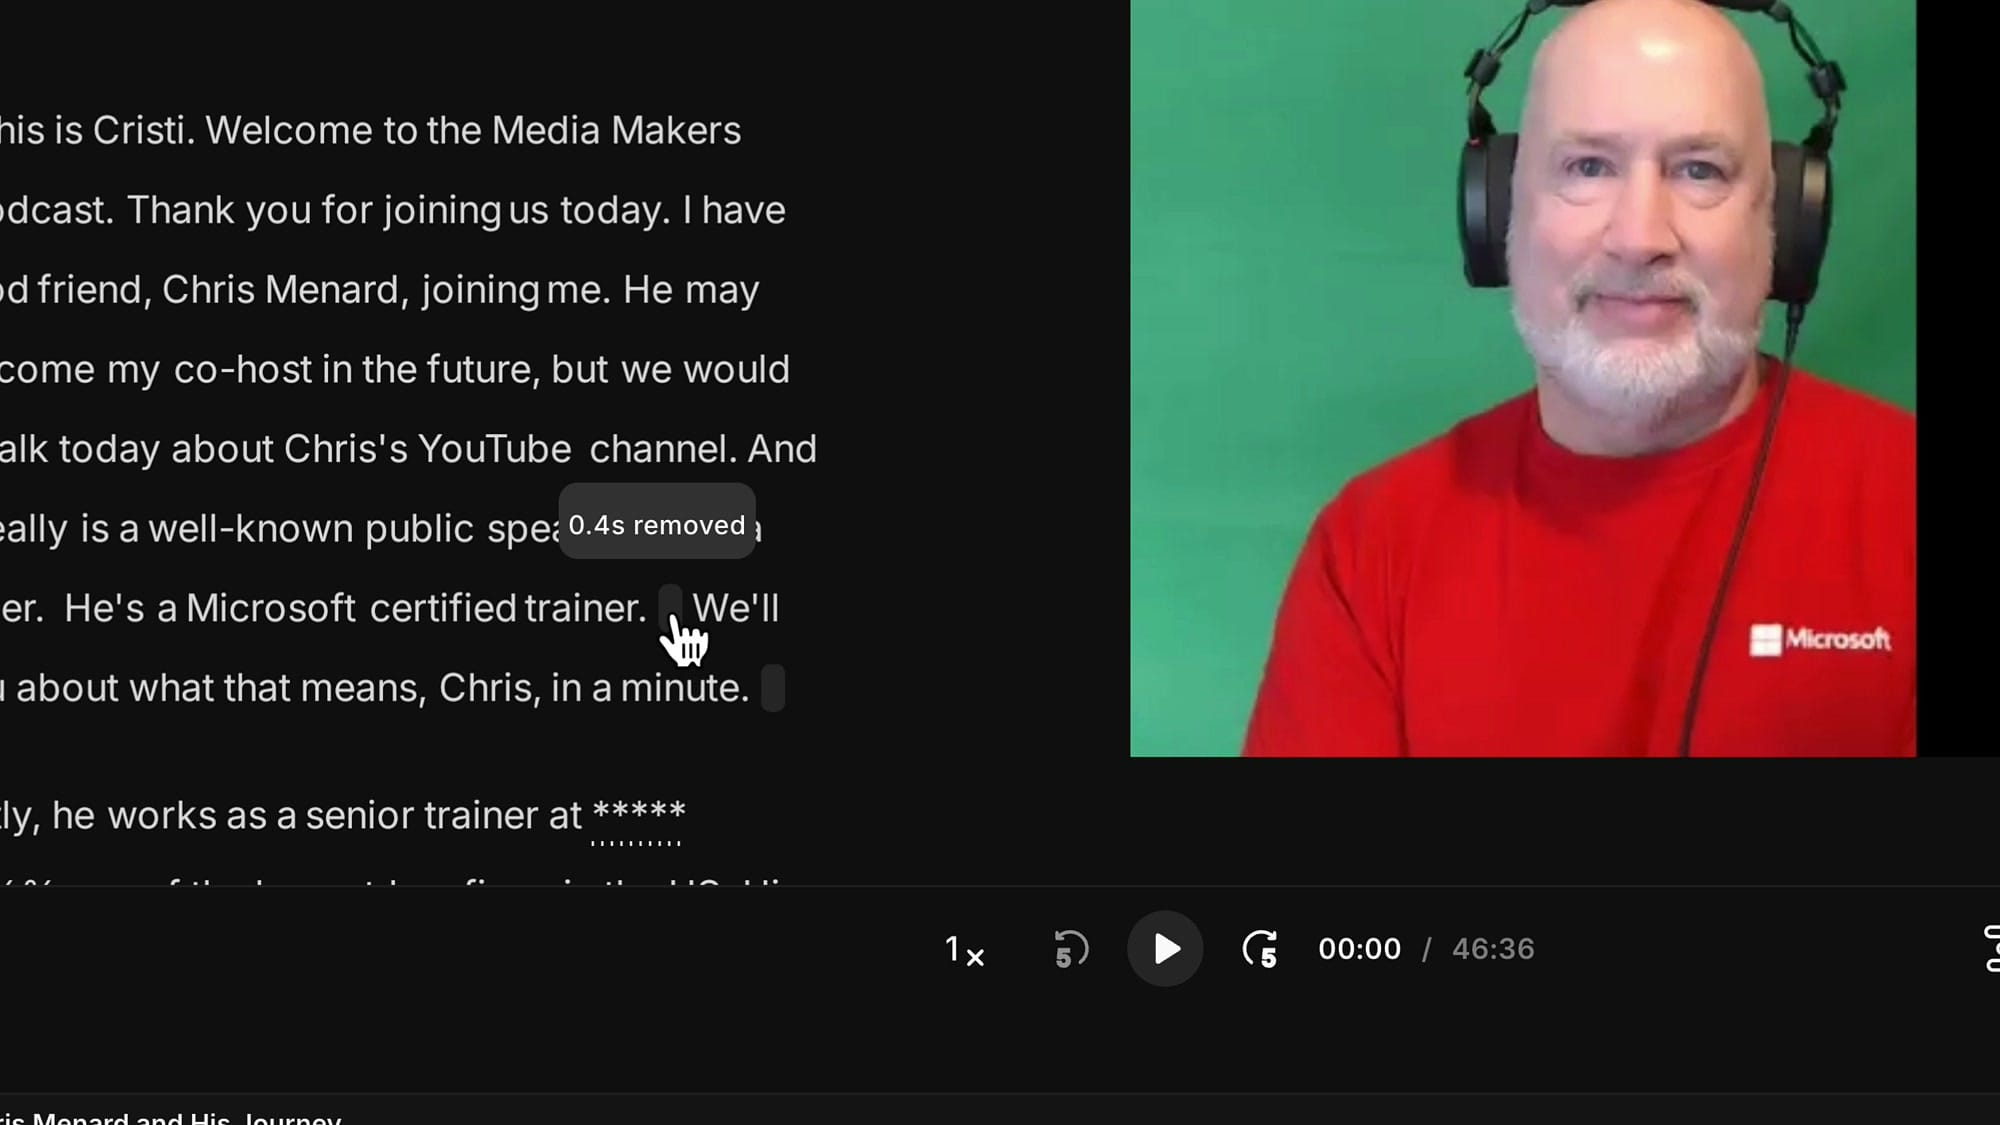
After the AI removes pauses, filler words, and fluff, those deleted sections are hidden by default. You'll see small indicators in the timeline and transcript showing something was removed, with a tooltip showing how much time was cut.
To see what was actually removed, go to the top of the editor and click Show Deleted Parts. This reveals the deleted regions as darker sections in the timeline and crossed-out text in the transcript. The deleted content doesn't play back — the playhead simply jumps over it — but now you can see exactly what the AI did and decide whether to adjust or restore any of it.
Adjust and Trim Deleted Regions
This is where precision editing really starts. When you can see the deleted regions, you can fine-tune exactly where each cut begins and ends.
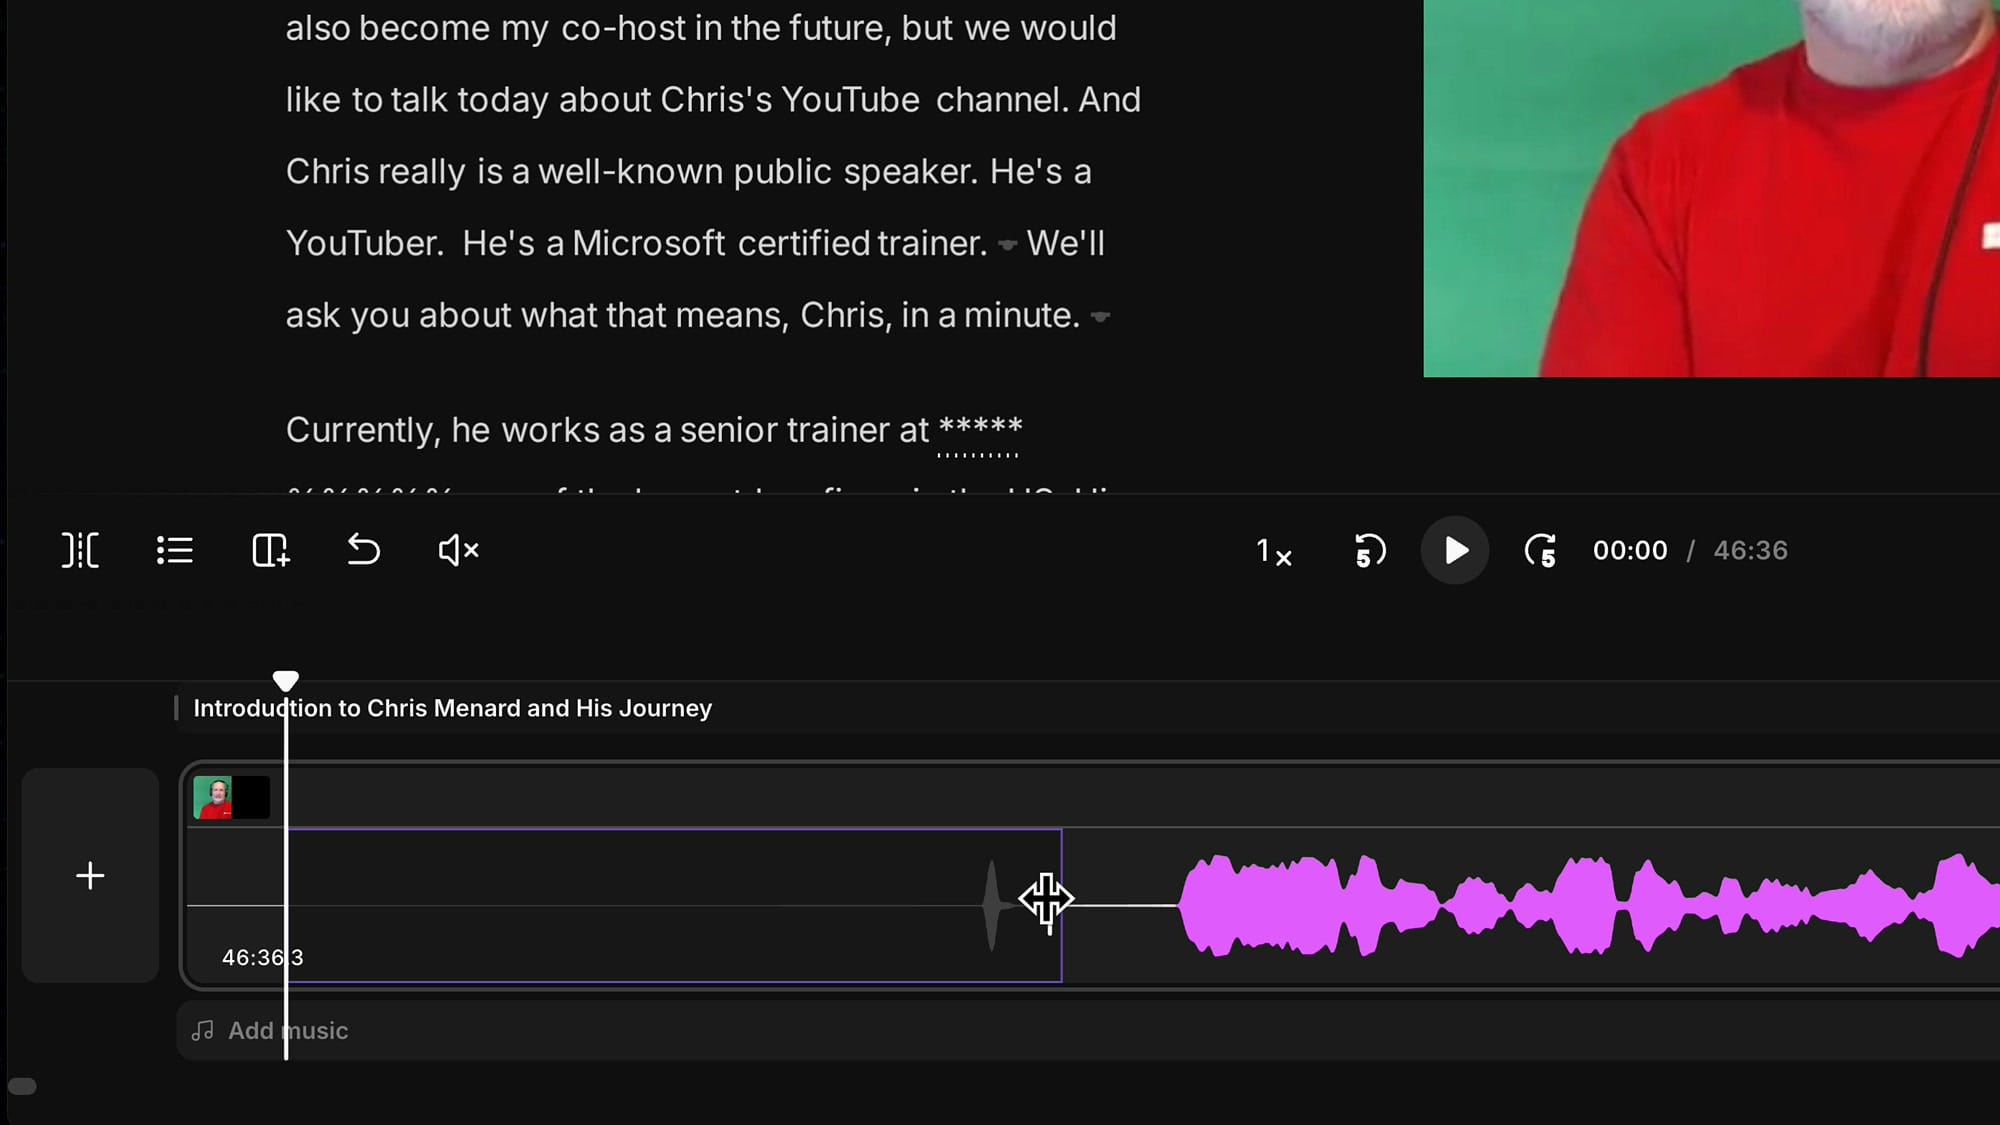
Click on a deleted region in the timeline, and you'll see white handles at each end. Click and drag these handles to expand or shrink the deleted area. This is incredibly useful when the AI cut too aggressively and clipped the beginning or end of a word.
You can zoom in very close (Command + Mouse Wheel) and position your cut at exactly the right point in the waveform. Look for where the speech waveform begins, and place your handle just before it for a clean transition.
Restore Removed Filler Words
Sometimes the AI removes a filler word that actually sounds natural in context, or it removes something that wasn't a filler word at all (this can happen with accented speakers). Restoring is easy:
- In the transcript: Click the crossed-out word, then click Restore
- In the timeline: Click the deleted region, then click Restore on the toolbar
- Keyboard shortcut: Select the region and press R to restore instantly
For example, if the AI removed the word "I" because Chris has an accent and the AI misidentified it as a filler word like "a," you just click on that region and press R. The word comes right back.
Fix Rough Transitions After Fluff Removal
The fluff removal AI is powerful, but it doesn't always leave perfect transitions. When you listen through your episode and hear a jarring jump between two sentences, here's what to do:
- Zoom into the transition point in the timeline
- Find the deleted region between the two sentences
- Drag the edge of the deleted region to add a little breathing room — a small gap before the next sentence starts
This tiny adjustment makes a huge difference. Without it, one person finishes talking and the next person starts immediately, which sounds unnatural. Even 0.3 seconds of silence makes the transition feel organic.
Cut Gaps Manually in the Timeline
If you didn't use the AI to remove pauses, or if you want to make additional cuts, you can do it manually. The technique is straightforward:
- Zoom into the gap you want to remove
- Click and drag to make a selection in the timeline
- Press Backspace or Delete to hide that section
You can also merge two adjacent deleted regions by dragging one into the other. And if you made a mistake, just adjust the handles to expand or shrink the deleted area.
Leave Breathing Room When Removing Gaps
Here's a pro tip: don't cut gaps right where the speech starts and ends. If you cut too tightly, the words get glued together and it sounds robotic. Leave a small buffer zone on each side of your cut so the speakers have a moment to breathe. This makes the conversation sound natural, even with substantial gaps removed.
Fix AI Mistakes With Misidentified Words
The AI relies on transcript accuracy to make its cuts. If the transcript is off — which happens with accents, technical jargon, or overlapping speech — the AI may cut in the wrong places. Common issues include:
- Words cut off mid-syllable (e.g., "two thousand elev—" instead of "two thousand eleven")
- Filler words incorrectly identified (e.g., "I" misheard as "a")
When you encounter these, simply adjust the deleted region's handle to include the full word, or restore the section entirely. This is why listening through the full episode after AI processing is essential.
Mute Instead of Delete for Smoother Cuts
This is one of my favorite techniques for a polished final product. When you delete a section, the video jumps — you'll see heads suddenly in a different position. For sections where the speaker is moving or gesturing, this jump can be very noticeable.
The solution? Mute instead of delete. Here's how:
- Select the region in the timeline (not by word, but precisely on the waveform)
- Click the Mute button (or press M on the keyboard)
- Choose which speaker to mute
The result: the audio goes silent for that brief moment, but the video plays continuously. When someone says "um" and is muted, they just look like they're closing their mouth — completely natural. No visual jump at all.
Fix Crosstalk With Expanded Tracks
Crosstalk — when two people talk over each other — is one of the trickiest editing challenges. Riverside records separate tracks for each speaker, which gives you a powerful advantage.
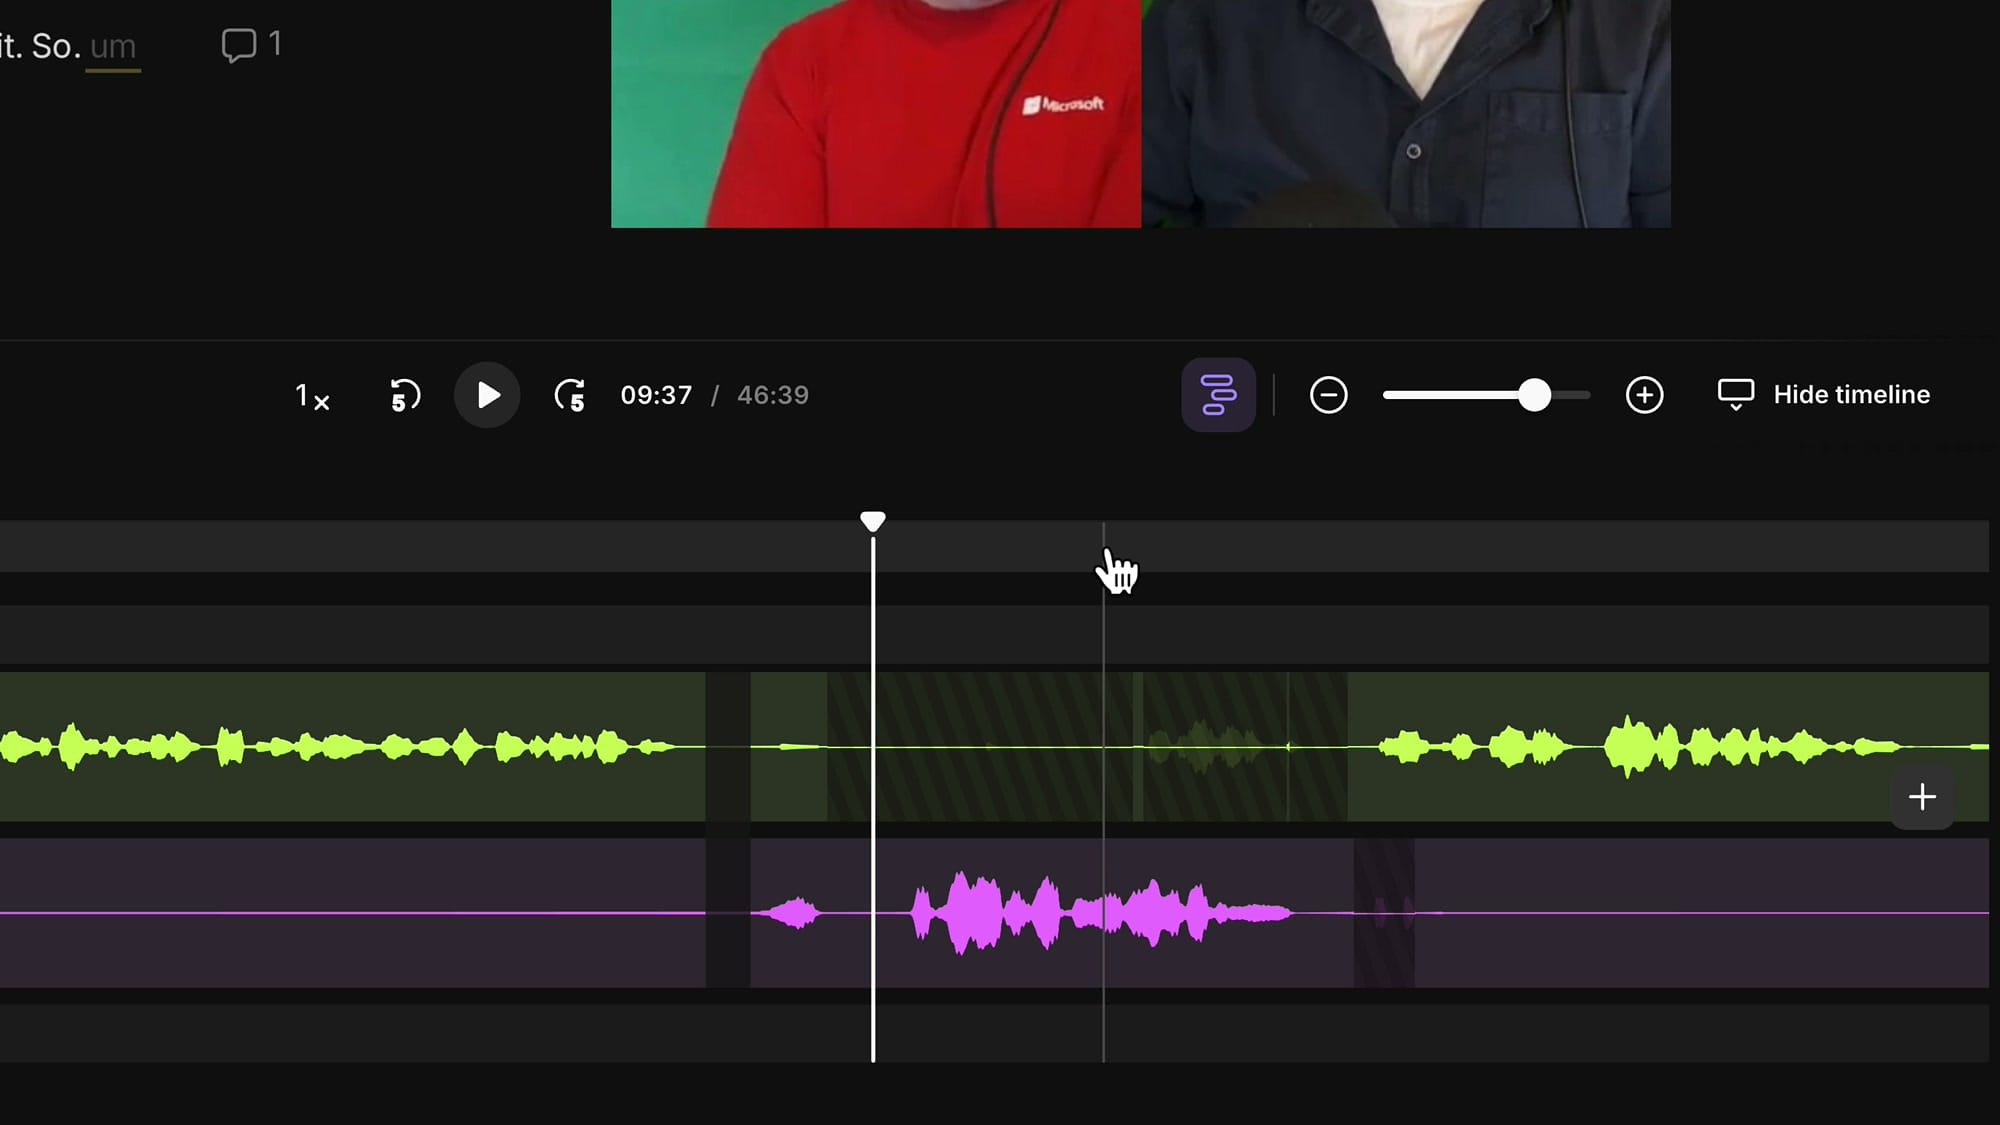
Click the Expand Tracks icon to show each speaker's audio on a separate line. Now you can see exactly who is talking (and who is interrupting) at every moment. To fix crosstalk:
- Identify the section where one person interrupts the other
- Select just that speaker's track in the interruption area
- Press M to mute them for that specific portion
You can also adjust individual speaker volumes from the Tracks panel if one person is quieter than the other.
Use Scene Changes to Hide Crosstalk
Sometimes you can't just mute the interrupting person — maybe they're saying something relevant, or maybe muting them would look odd because their mouth is clearly moving. In that case, use a scene change to switch to a single-speaker view.

Here's the technique:
- Create a scene around the problematic section (click the plus icon in the scene bar)
- Click Layout and select "Just This Scene"
- Switch to a Single Speaker view, showing only the person you want visible
When the scene ends, it goes back to the normal side-by-side view. The muted person's audio is gone (or reduced), and they're not visible during the interruption, so no one notices.
Split the Timeline and Insert Sections
Need to insert a title card, an ad break, or a B-roll clip in the middle of your recording? Riverside lets you split the timeline and add content between the halves.

- Position the playhead where you want the split
- Click Split (or press S on the keyboard)
- Click the plus icon that appears at the split point
- Choose what to insert: your media, video, music, AI voice, an empty section, upload new content, or even record something new
A common use case: clients who want a 2-second ad slot midway through the episode. Just insert an empty section, drag the handles to the right duration, and you're done. You can even add text like "We'll Be Right Back" for a professional touch.
Use Splits and Snapping to Position Text Precisely
When you add text overlays (like a speaker's name or a title), positioning them precisely in the timeline can be tricky — especially if you're still making cuts that shift things around.
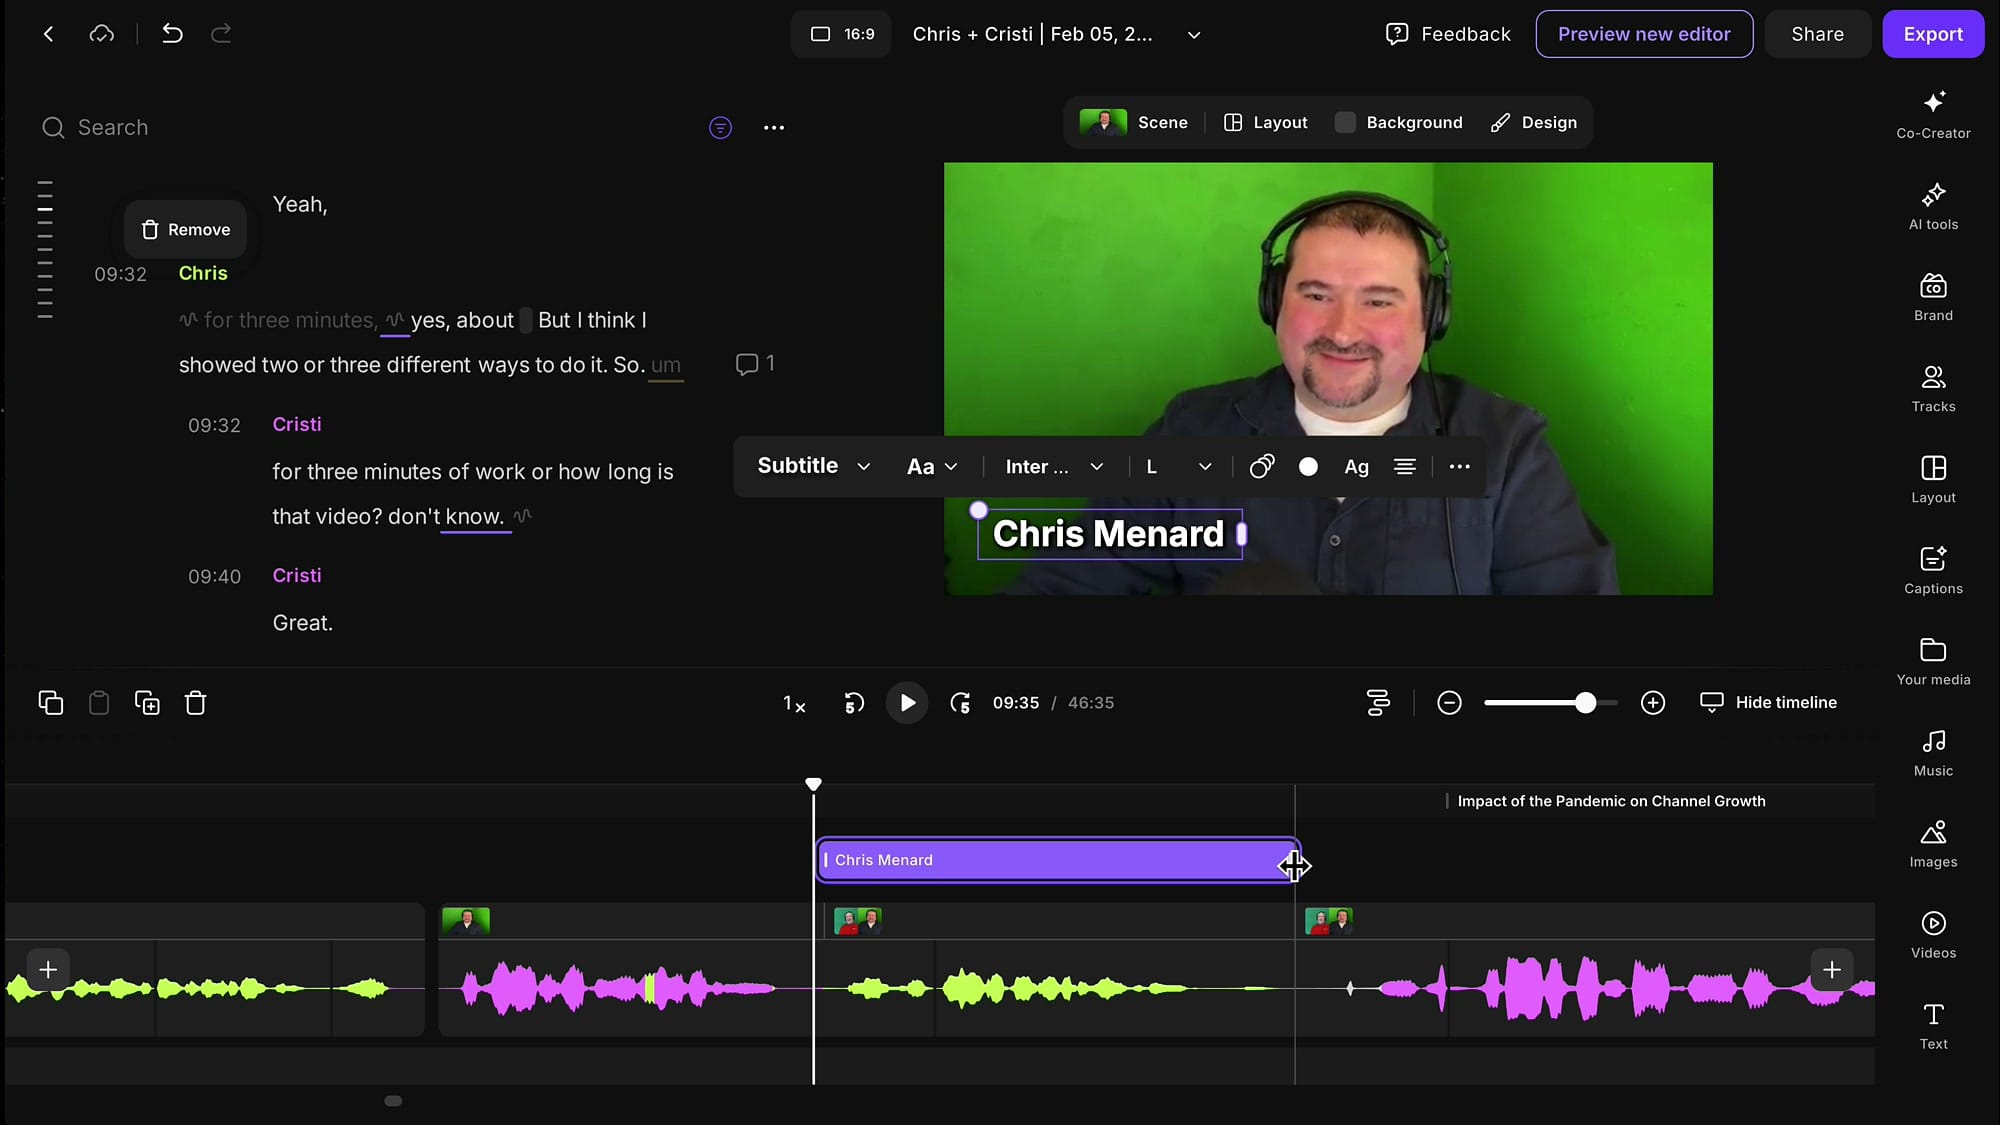
The trick is to create splits as anchor points:
- Place the playhead where you want the text to start → press S to split
- Place the playhead where you want the text to end → press S again
- Add your text element (subtitle, title, etc.)
- Drag the edges of the text element — they snap to the split points
This snap behavior is incredibly useful. Even if you make further edits that shift the timeline, you can quickly re-snap the text to your split markers. Think of splits as visual bookmarks for your timeline.
Adjust Scene Boundaries
Whether you created scenes manually or let the AI generate them, you'll often need to adjust where one scene ends and another begins.
In the timeline, look for the small vertical lines between scene thumbnails. Hover over them, and you'll see a drag cursor. Click and drag to move the scene boundary forward or backward. This controls exactly when the camera angle switches — say, from side-by-side to a single speaker.
Feature request note: Currently, elements (text, images) don't automatically stick to scene boundaries. If you make cuts inside a scene, the element may go out of sync. You'll need to manually re-position it. Hopefully this gets improved in a future update or in the new Riverside editor!
Crop and Reframe Speakers
Riverside gives you per-speaker crop and reframe controls. When you select a scene, you'll see a speaker dropdown at the top of the video preview. Select a speaker and click the Crop tool to reframe their video.
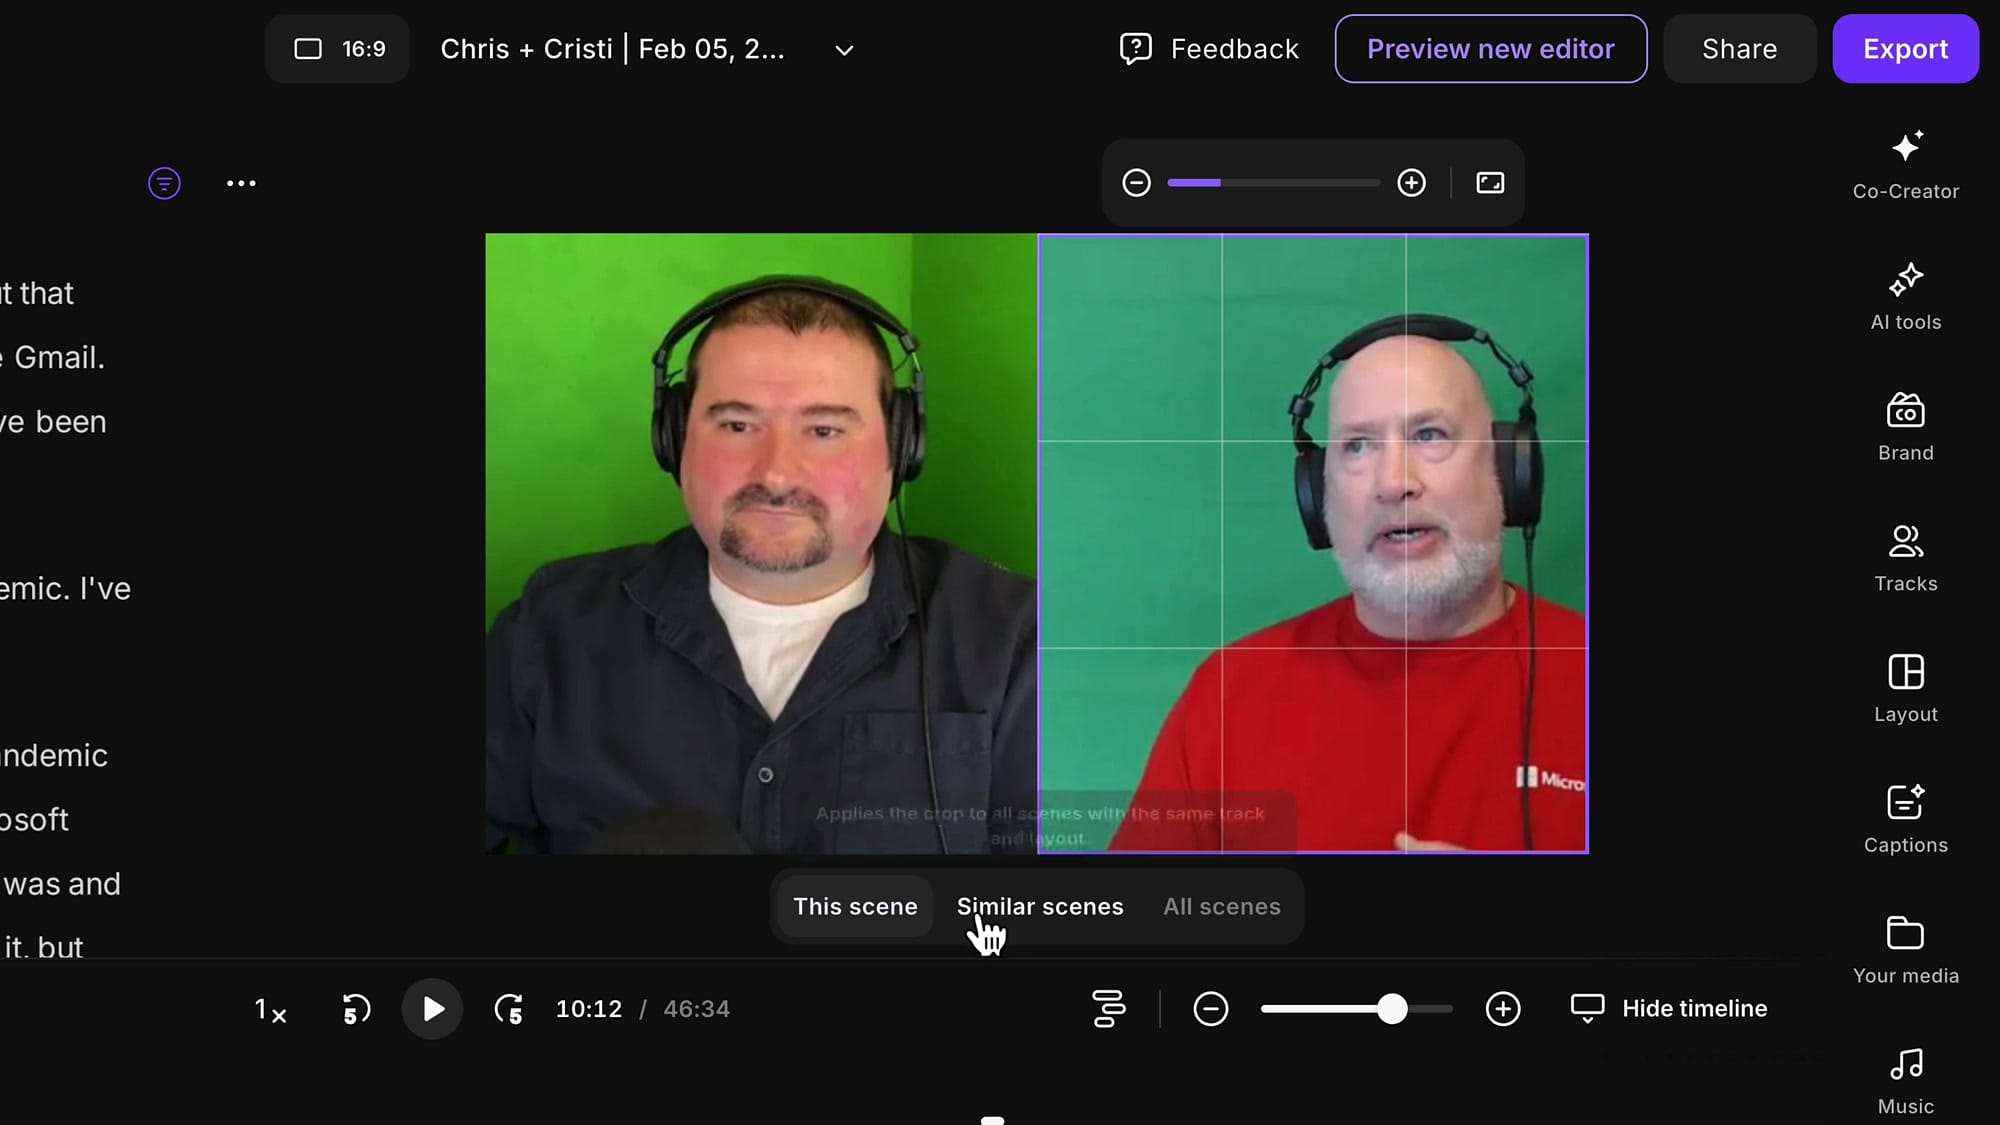
This is useful when someone's camera was positioned awkwardly, or when you want to zoom into a speaker for emphasis. You can apply different crops to different scenes, so the framing can change throughout the episode.
Essential Keyboard Shortcuts
Here are the shortcuts that will speed up your editing workflow:
- S — Split at the playhead position
- R — Restore a selected deleted region
- M — Mute the selected region
- Delete / Backspace — Remove the selected region
- Cmd/Ctrl + Mouse Wheel — Zoom in/out on timeline
- Shift + Mouse Wheel — Scroll timeline sideways
- Cmd/Ctrl + Z — Undo
Wrap-Up: The Precision Editing Workflow
Here's the complete workflow I recommend for any Riverside edit:
- Apply AI tools first — pauses, filler words, fluff removal
- Show deleted parts — so you can see what the AI did
- Listen from beginning to end — catch AI mistakes, rough transitions, and crosstalk
- Fix transitions — add breathing room, restore over-cut words
- Mute instead of delete — when you want smooth video without jumps
- Expand tracks for crosstalk — mute individual speakers precisely
- Add scenes — for camera angle changes and hiding problematic sections
- Insert sections — for ad breaks, titles, or B-roll
- Position text with splits — use snap points for precise alignment
- Crop and reframe — per speaker, per scene
The beauty of Riverside's editor is that all of this happens in your browser, with non-destructive editing. You can always undo, restore, and refine until you're happy with the result.
Related Riverside Guides


If you're eager to learn more about Riverside and wish to have a one-on-one Riverside coaching session, feel free to book a call with me. I'm here to help you with any questions you have and to guide you through the best workflows, tips, workarounds, or just answer any questions you may have!
Want to try these techniques yourself? Get started with Riverside and bring your recordings to the next level.