
How to Narrate PowerPoint Presentations Using Camtasia (Step-by-Step Guide)
You can import your slides, narrate them one by one at your own pace, enhance the audio, and organise everything with markers for easy navigation.


If you need to create a video from a PowerPoint presentation — complete with your own voice narration — Camtasia makes the process straightforward. You can import your slides, narrate them one by one at your own pace, enhance the audio, and organise everything with markers for easy navigation.
This guide walks through the entire process step by step, from importing your PowerPoint into Camtasia to exporting a polished, narrated video presentation.
Importing Your Presentation into Camtasia
There are two ways to get your PowerPoint slides into Camtasia. Both work — the choice comes down to convenience.
Option 1: Export Slides as Images from PowerPoint
Open your presentation in PowerPoint (Mac or Windows — it doesn't matter), go to File → Export, and choose PNG or JPEG as the format. You can export every slide or just the current one. PowerPoint will save each slide as a numbered image file into a folder.
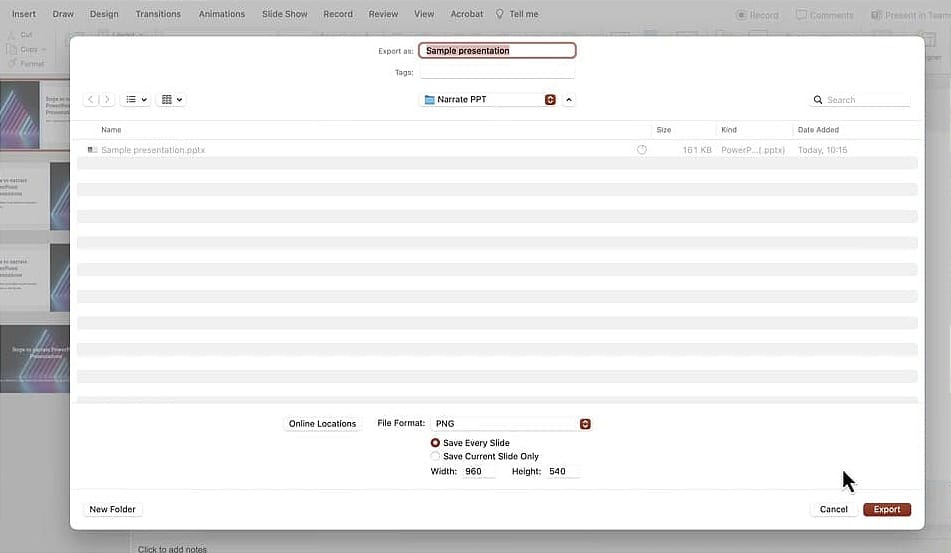
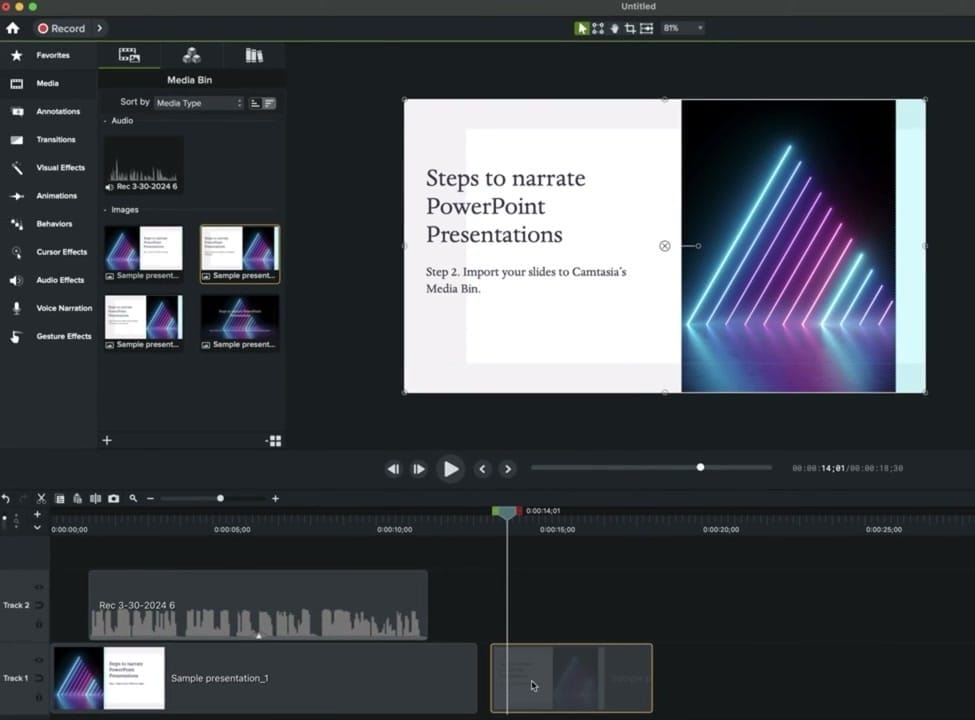
Then in Camtasia, click Import Media and select all the exported images. They'll appear in your media bin, ready to be placed on the timeline.
Option 2: Import the PowerPoint File Directly (Recommended)
The easier approach is to import the .pptx file itself into Camtasia. Camtasia is smart enough to recognise it as a PowerPoint and automatically converts each slide into individual images for you.
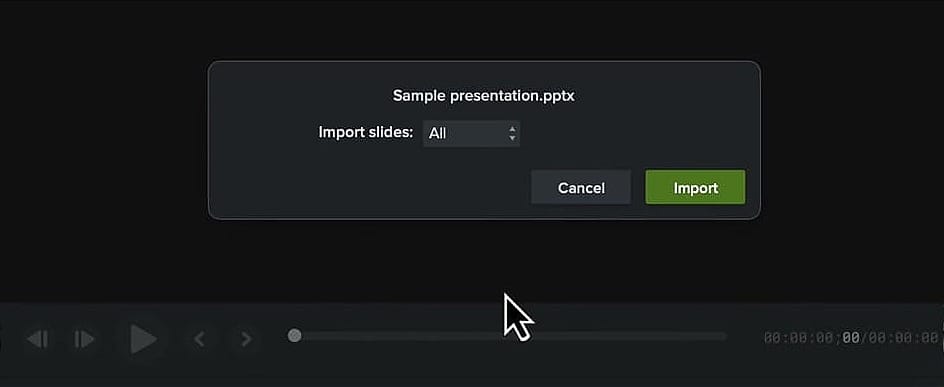
When prompted, select Import all slides. Camtasia will create PNG images at 1920×1080 (Full HD) resolution, which is exactly what you need for most video projects.

Adjusting Project Settings for Your Slides
Before you start building your timeline, check your project settings. If your default project resolution is set to 4K but your slides are 1920×1080, you'll want to match them.
Click the zoom level dropdown at the top of the canvas and select Project Settings. Change the resolution to FHD (1920×1080) — the same size as your slides — and click Apply.
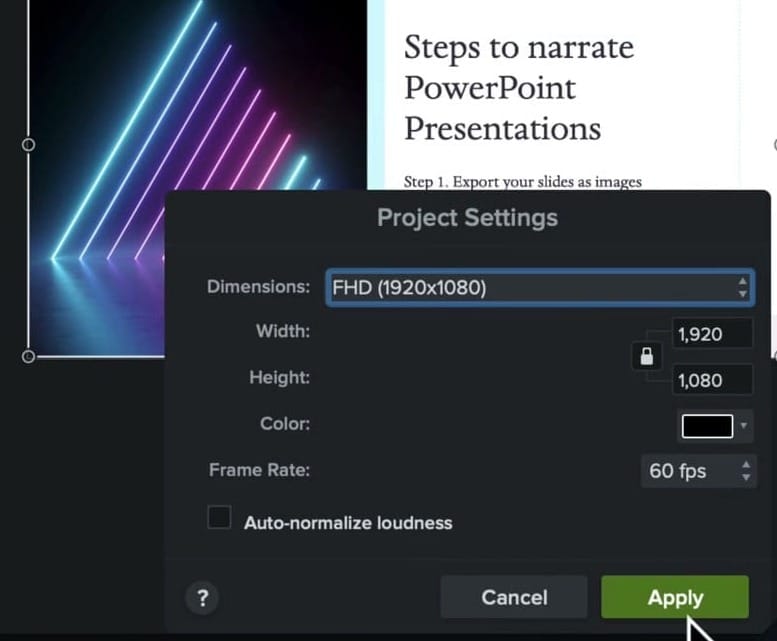
Now your slides will fit the canvas perfectly without any scaling or black borders.
Adding Slides to the Timeline and Recording Narration
Here's where the real work begins. The approach is simple: add one slide at a time, narrate it, then move to the next.
Placing Your First Slide
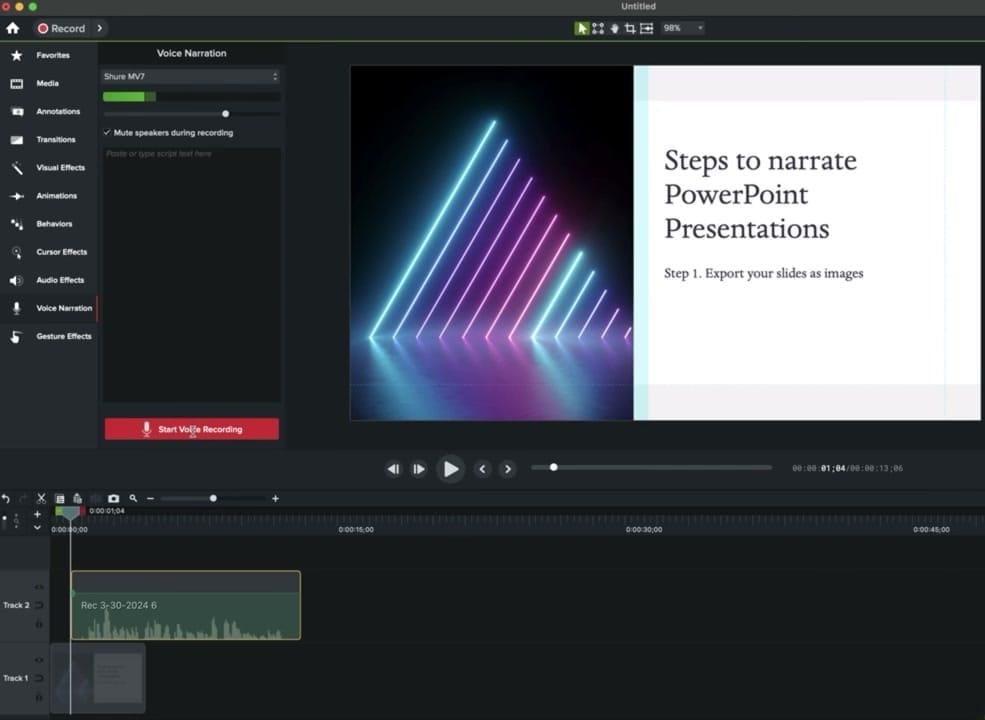
Right-click on the first slide in your media bin and select Add to Timeline at Playhead. Make sure your playhead is at the beginning of the timeline.
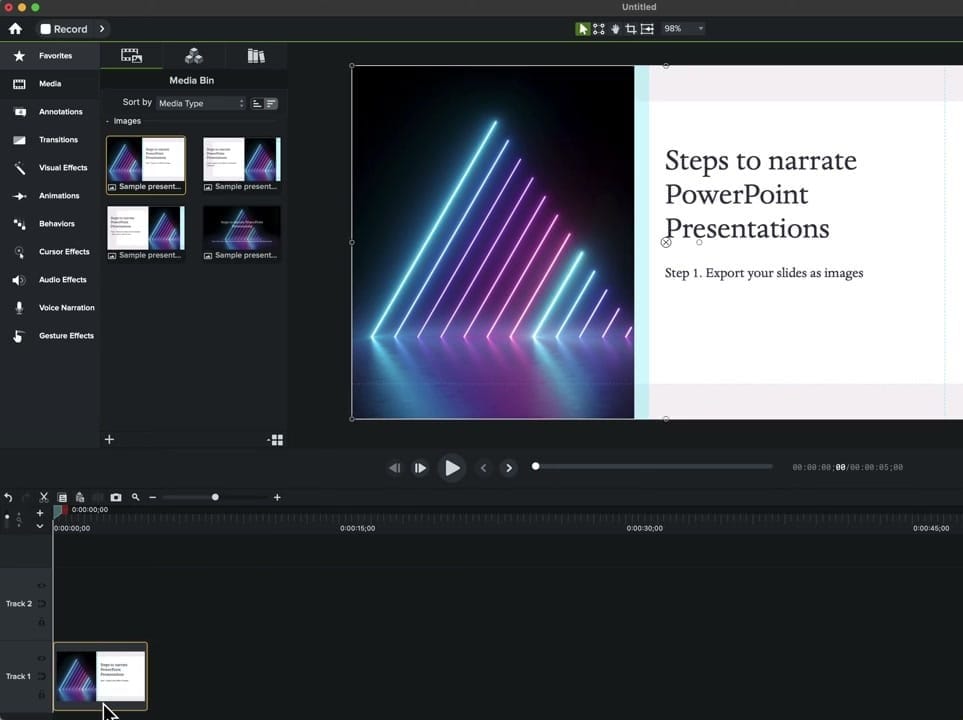
The slide will appear on the timeline with a default duration of about 5 seconds (this is Camtasia's default image duration). Don't worry about this — you can easily drag the edge of the slide to extend it to any length you need once you've recorded your narration.
Recording Your Narration
Position your playhead where you want to start speaking, then open the Voice Narration panel from the sidebar.
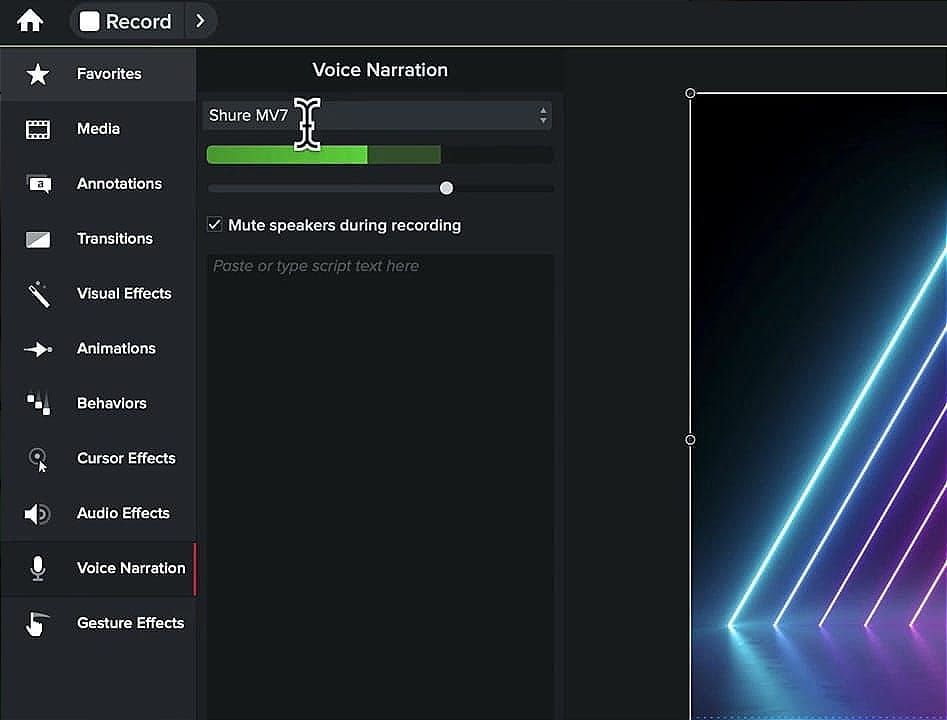
Important: Before you start talking, click the microphone dropdown to make sure the correct microphone is selected. Use the level meter to check your input — you should see it bouncing as you speak, with a healthy level that's not peaking.
When ready, click Start Voice Recording. You'll get a brief countdown, then Camtasia starts recording from the playhead position.
Adjusting Slide Duration and Trimming Audio
After you stop recording, you'll likely notice that the slide ends before your narration does. Not a problem — just grab the edge of the slide and drag it to match the length of your audio.
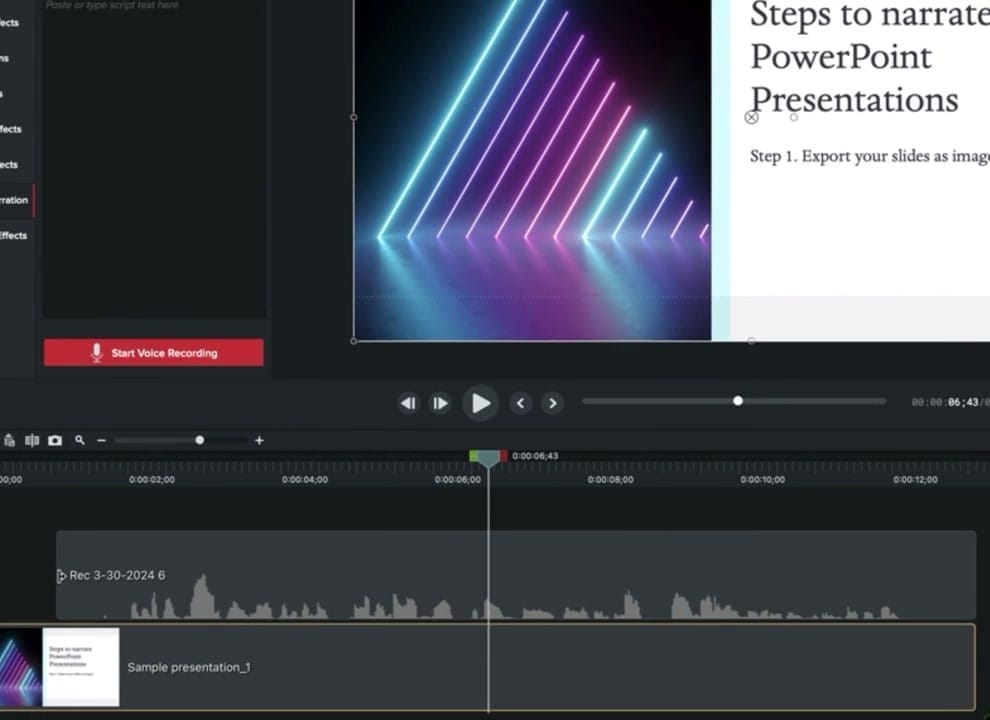
You can also trim the audio by zooming in and dragging the edges of the audio clip. Camtasia always records a few seconds of lead-in and lead-out, so trimming these keeps your narration tight.
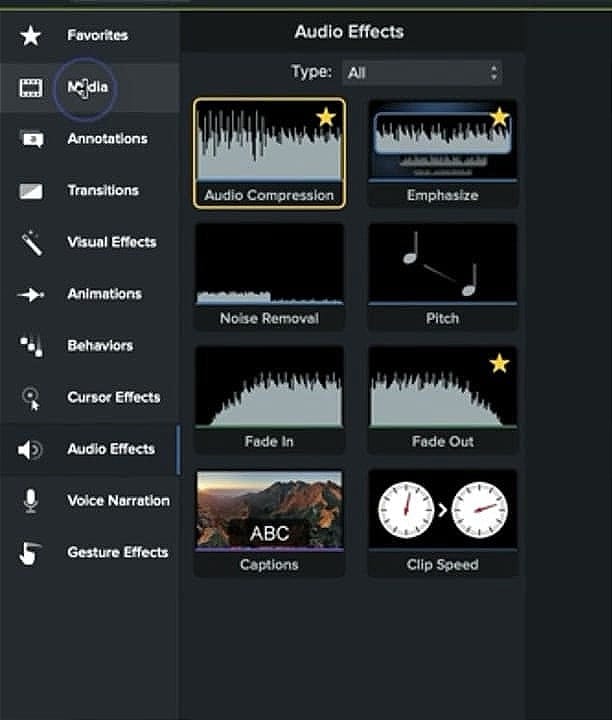
Enhancing Your Narration with Audio Effects
Once your narration is recorded, you can improve the audio quality with a couple of quick adjustments:
- Volume/Gain: Click on the audio clip to adjust the overall volume up or down
- Audio Compression: Drag the Audio Compression effect from the Audio Effects panel onto your audio clip. Compression evens out the volume, making quiet parts louder and loud parts quieter, giving you a more consistent, professional sound
- Noise removal: If needed, to clean up audio noise such as fans, etc.
If your timing is slightly off, you can slide the audio clip forward or backward on the timeline to realign it with the slide content.
If you’re wish to learn more about Camtasia and wish to have a one-on-one Camtasia coaching session, feel free to book a call with me.
I’m here to help you with any questions you have and to guide you through the best workflows, tips, workarounds, or just answer any questions you may have!
Adding More Slides: Slide-by-Slide Workflow
For the second slide (and every slide after), the process is the same:
- Move to the end of your current content on the timeline
- Drag the next slide from the media bin onto the timeline
- Close any gaps between clips
- Position your playhead and record the narration
- Apply audio compression to the new recording
- Trim the start and end as needed
This slide-by-slide approach is one of the biggest advantages over recording a full presentation in one take. If you make a mistake or don't like how a particular narration sounds, you can delete just that section and re-record it without affecting anything else. No need to start over from the beginning.
Save frequently as you go — you don't want to lose your work.
Organising Your Presentation with Markers
As your timeline grows with multiple slides and narration clips, it can become hard to tell where each slide begins — especially if some slides look similar. Markers solve this by letting you label points on the timeline.
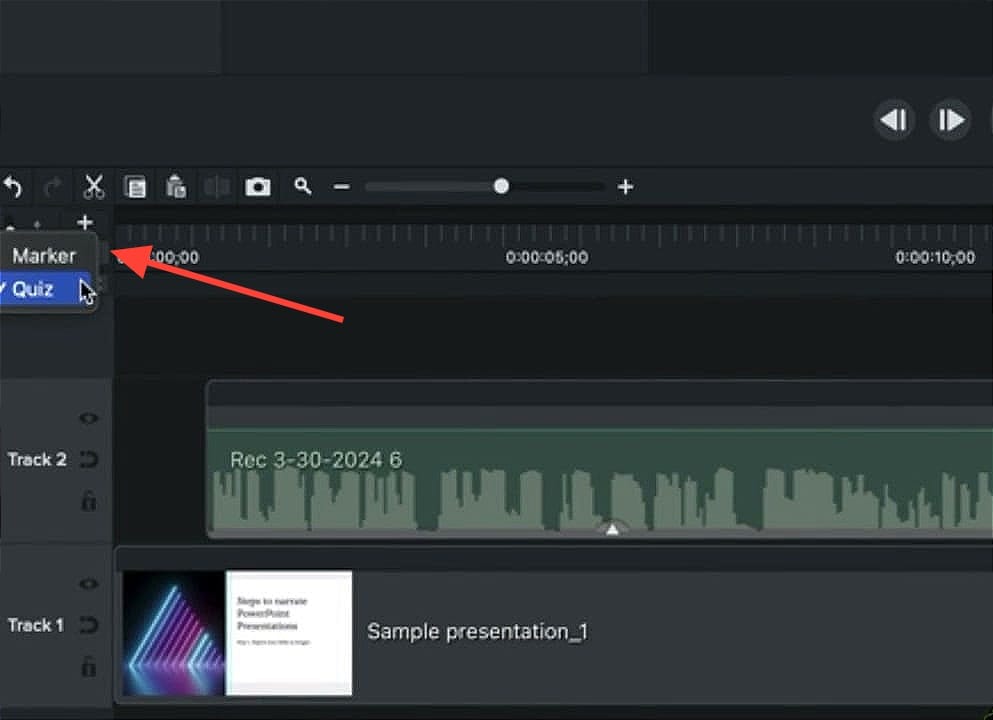
To add markers:
- Click the small arrow/dropdown near the timeline header and switch from Quiz to Marker
- Click on the timeline where a slide begins
- Name the marker (e.g., "Slide 1", "Slide 2", etc.)
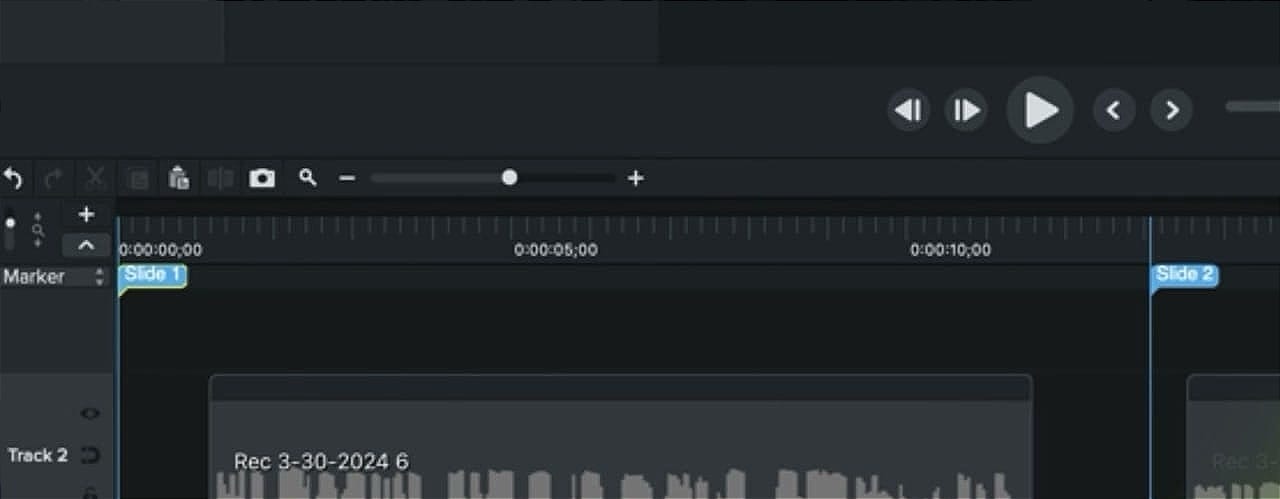
Markers make navigation much easier, especially for longer presentations with many slides. You can click any marker to jump straight to that point.
Tips for a Smooth Workflow
- Narrate in chunks — Don't try to record everything in one take. The slide-by-slide approach gives you maximum flexibility
- Re-record freely — If a take doesn't sound right, delete it and record again. Only that portion is affected
- Always apply compression — It makes a noticeable difference in how professional your narration sounds
- Check your microphone first — Before every recording session, verify the correct microphone is selected and the level is healthy
- Trim the silence — Camtasia adds a few seconds of dead air at the start and end of each recording. Trim these for a tighter result
- Use markers — For presentations with more than 3-4 slides, markers keep you organised and make editing much faster
- Save often — Save after every slide narration to protect your work
The Complete Workflow at a Glance
| Step | What to Do |
|---|---|
| 1. Import | Import the .pptx file directly into Camtasia |
| 2. Project Settings | Set resolution to 1920×1080 (Full HD) to match slides |
| 3. Add Slide | Right-click → Add to Timeline at Playhead |
| 4. Narrate | Open Voice Narration panel, check mic, record |
| 5. Adjust | Extend slide duration, trim audio edges |
| 6. Enhance | Apply Audio Compression for consistent levels |
| 7. Repeat | Add next slide, narrate, enhance — slide by slide |
| 8. Organise | Add named markers for easy navigation |
| 9. Export | Export your finished narrated presentation as video |
That's it — a complete, narrated PowerPoint presentation created entirely in Camtasia. The slide-by-slide approach gives you full control over pacing, lets you re-record any section easily, and produces a professional result with properly compressed audio and organised markers.


