All Riverside.fm Features: The Complete Review and How to Use Them
Riverside.fm features have evolved rapidly over the last couple of years. What started as a recording-first tool is now a full end-to-end production platform for podcasters, YouTubers, course creators, coaches and teams.

In this long review I break down every major Riverside capability, explain how it fits into a production workflow, show how to combine tools, and offer practical recommendations based on real-world use.
Riverside.fm features are best experienced within the context of a studio. Riverside organises everything around a virtual recording studio: branding, projects, scheduling, recording, live streaming, and exports. This review explains how the studio model works and why it matters for creators who want a reliable, scalable workflow.

Quick Verdict
If you want a single platform that can reliably record high-quality local audio and video, provide modern text-based editing and AI tools, handle live multi-destination streaming, and host your podcast, then these Riverside.fm features offer a compelling one-stop solution.
The platform is not perfect - some UI areas could be clearer, and advanced post-production tools still require external editors - but the overall feature set is cohesive and purpose-built for creators who want to record, edit and publish faster, without having to download and upload files from one tool to the other.
What Riverside Does
At its core, Riverside.fm features are designed around high-quality content creation. The platform provides:
- Local-first multi-track recording (audio and video recorded on each participant's device)
- A modern editor with text-based editing and AI-powered cleanup
- Branding controls and bulk assets generation for social repurposing
- Live streaming to multiple platforms while also recording separate tracks
- Podcast hosting and distribution (recently added)
Think of Riverside as a production suite that spans from "hit record" to "publish to platform". The rest of this review breaks down each piece in detail and includes practical notes on limitations, best practices and tips.
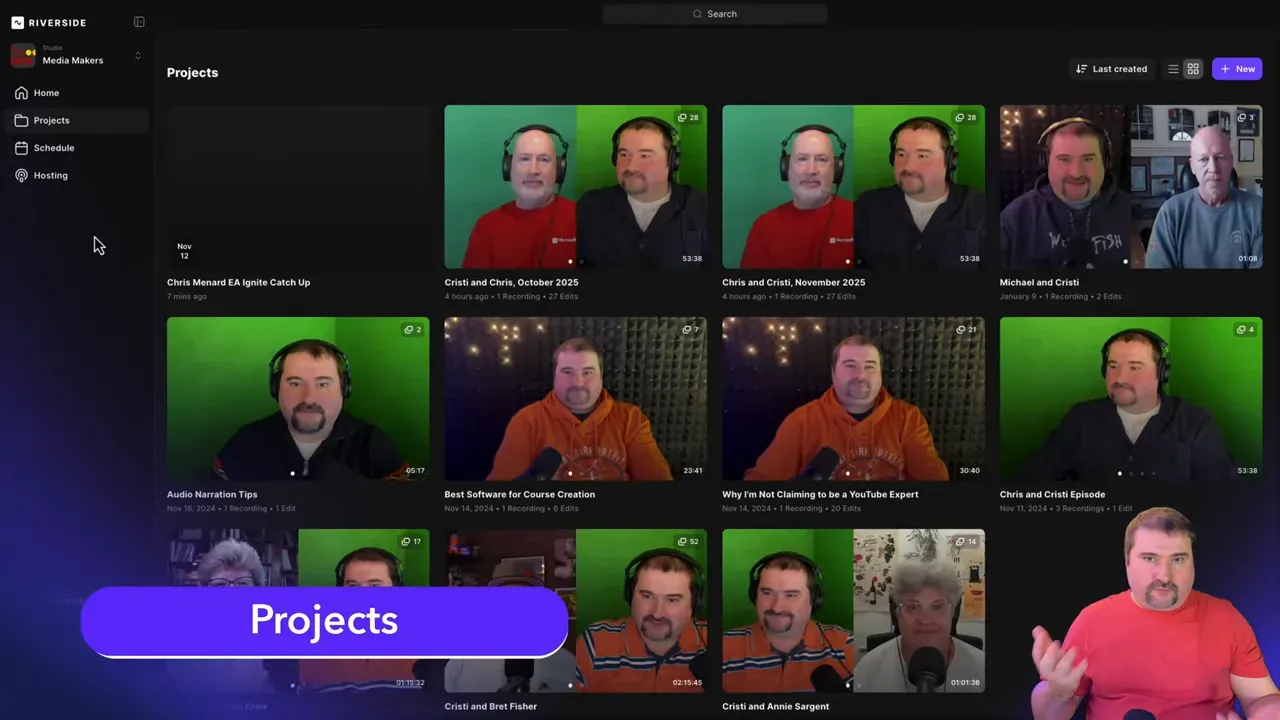
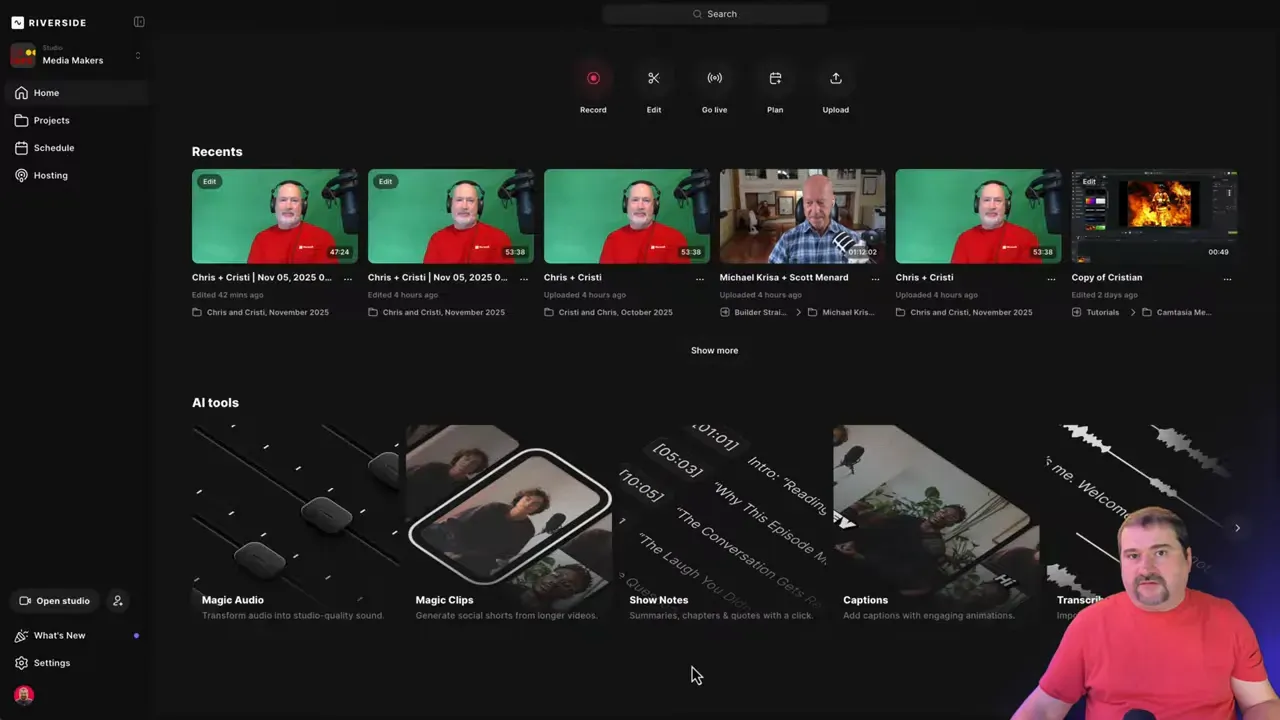
Studio, Projects and Scheduling
The Riverside studio is the central organisational unit. When you sign up you create a studio (the Pro plan gives you one; Business plans allow multiple studios and additional team features). Inside a studio you create projects, which behave like enhanced folders: projects can start from a recording, a single uploaded file, or multiple uploaded files assembled into a multitrack edit.
Riverside.fm features for scheduling are robust: you can schedule unlimited sessions, send invitations, and integrate with calendars.

Riverside integrates with Google Calendar and also supports scheduling through external booking tools like Calendly or Cal.com. When someone books, they get the unique Riverside recording link to join your studio. This link doesn't change.
Practical scheduling tips
- Use Calendly (or your preferred scheduler) to automate invitation delivery; add the Riverside link as the meeting join URL.
- Add a buffer before and after sessions to avoid rushed uploads or missed backups.
- Label projects clearly - but don't worry if you don't, you can always rename pretty much anything later.
Recording: Local-First, Multi-Track Reliability
One of the core selling points of Riverside is the recording architecture. The platform records audio and video locally on each participant's machine (desktop app or mobile apps), then uploads those files to the cloud in the background. That means the final high-resolution files are independent of the live internet quality during the session.
Because the recording is local-first:
- Final exports are high quality even if the live feed looks pixelated.
- If a guest loses internet, their recording still takes place locally and uploads later when back online.
- Uploads can be resumed; guests can continue uploading days later via an upload link.
This local-first approach is the reason many creators choose Riverside: reliable, recoverable, high-resolution tracks for every participant.
How the actual recording looks and what you get
When you hit record, Riverside simultaneously starts a recording on every participant's device. Each participant's audio and video is saved as separate files and later assembled into a synchronized multitrack timeline in your project. That provides massive flexibility in post-production: you can equalise voices individually, swap camera angles, fix lip-sync issues per track and export separate audio stems.
In-Person & Hybrid Recording
Newer Riverside.fm features include hybrid recording options where you can add in-person guests via audio interfaces or secondary cameras. This lets you blend remote participants with local studio recordings while preserving separate tracks for each person. Riverside supports second-microphone inputs and mobile devices as additional local recorders, which is useful in hybrid interviews or live panel formats.
Use cases
- One host in a studio, one guest remote - both recorded individually.
- Two people in the same room on separate inputs - useful for in-person interviews that still require isolated tracks.
- Mobile guest joining via the iOS or Android app while you record from the desktop.
Automatic Assets: Transcripts, Show Notes, Magic Clips
After recording, Riverside automatically generates a transcript and a set of derivative assets. These Riverside.fm features save you hours of manual work:
- Free automated transcription for the entire session (speaker‑labelled)
- AI-generated show notes, summary, takeaways and suggested episode title
- Magic clips: short clips optimised for social platforms with auto-generated titles and layouts
- Magic segments: longer sections extracted as standalone parts suitable for republishing
- Hooks and suggested social copy

These auto-created items are not final copy, but they provide a polished starting point. You can edit the show notes, tweak titles and choose which magic clips you want to use. You can also create your own manually, from the main episode edit.
How to make the automated assets useful
- Scan the transcript for accuracy and correct speaker assignments.
- Review suggested titles and hooks; treat suggestions as inspiration rather than finished headlines.
- Use magic segments for republishing longer highlights or bonus episodes.
The Editor: Text-Based Editing and AI Tools
Riverside provides a modern, web-based editor that blends timeline editing with text-based editing - you edit by changing the transcript directly, which removes the corresponding audio and video segments from the timeline.

Transcript-first editing
Editing with text makes a familiar workflow for podcasters and video editors who want to rapidly remove filler and tighten dialogue. You can select words or phrases in the transcript, delete them and the editor performs the edit in the timeline. This is completely non-destructive because Riverside keeps a record of deleted parts so you can restore sections later if required.
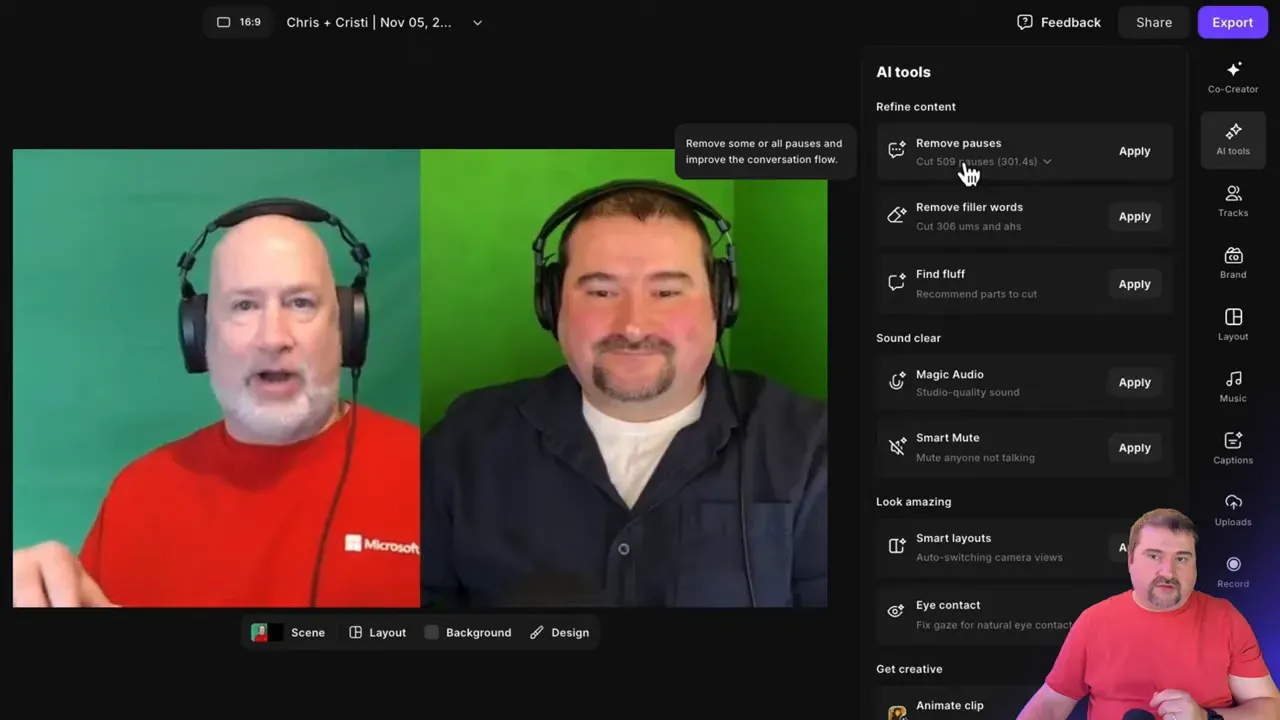
Major AI tools inside the editor
Some of the most useful editor-level AI tools are:
- Remove Pauses: Detects long pauses and shortens or removes them, shaving minutes off your episode.
- Remove Filler Words: Removes "ums", "uhs" and filler tokens with multiple handling modes.
- Find Fluff: Detects internal chatter and technical interruptions and suggests removal.
- Magic Audio: AI-based noise reduction and audio levelling that can be applied per-track with adjustable intensity.
- Smart Mute: Helps reduce mic bleed and cross-talk by automatically muting silent participant segments per-track.
These tools run across the entire episode, so the recommended workflow is to run the AI passes first to save time and then manually review the episode to ensure no unintended cuts were made. No AI is perfect: the transcript can miss nuances and edits can create awkward transitions if not reviewed.
Smart ways to apply AI tools
- Run Remove Pauses with conservative thresholds, then listen to flagged sections.
- Apply Filler Word removal, but keep a fallback by viewing deleted parts - Riverside lets you restore easily.
- Use Magic Audio per track: if your guest has noisy audio, apply stronger cleaning to their track only.
Co-Creator: Your AI Assistant
Riverside’s Co-Creator is an AI assistant that has access to your project and can generate thumbnails, captions, magic clips or summaries on demand. It works at both project and edit levels, and you can prompt it with tasks like "generate a 150-word blog post from this recording" or "create 5 social captions".
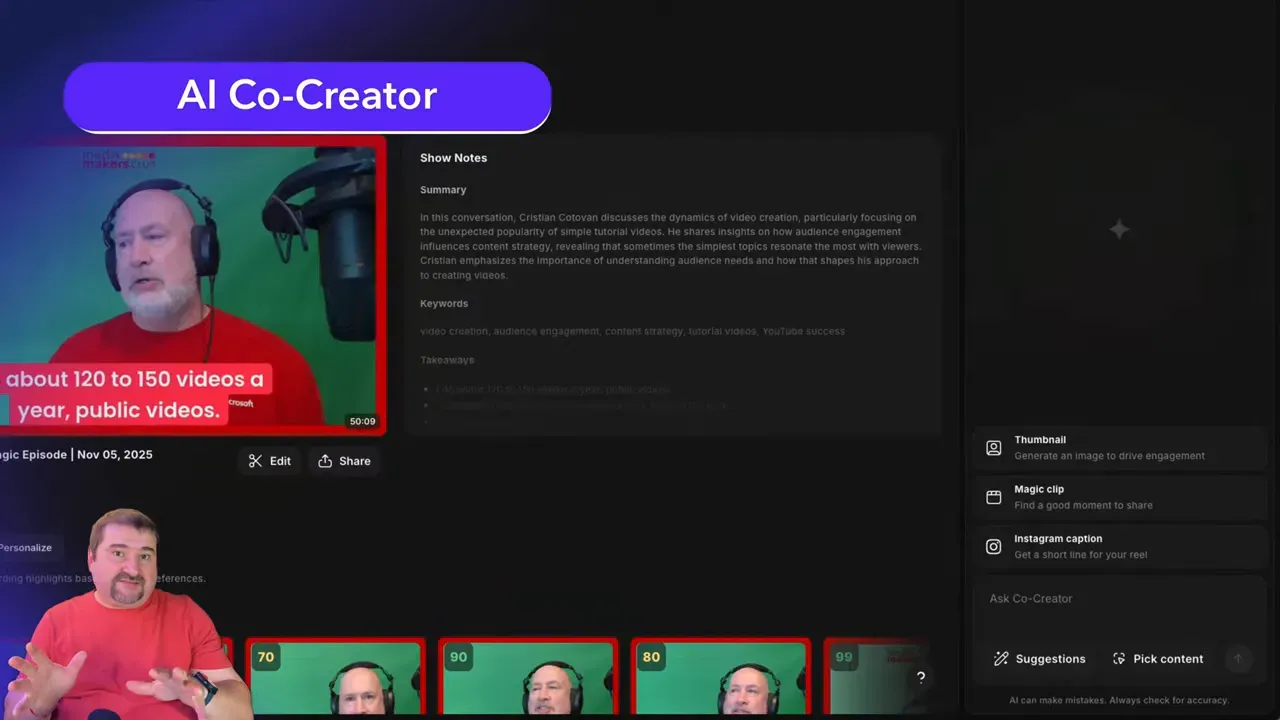
At the time of review, the co-creator is a helpful automation but still feels like a beta: prompts can be inconsistent, and the ability to save commonly used prompts would be a welcome improvement. Treat the co-creator as a productivity assistant rather than an autopilot editor.
If you’re eager to learn more about Riverside and wish to have a one-on-one Riverside coaching session, feel free to book a call with me.
I’m here to help you with any questions you have and to guide you through the best workflows, tips, workarounds, or just answer any questions you may have!
Brand Kit and Bulk Styling
One of the standout Riverside.fm features is the Brand Kit. This studio-level tool lets you upload logos, define brand colours, pick caption styles, and add intros/outros for multiple aspect ratios (16:9, 9:16, 1:1).

Once configured, the brand kit can be applied to multiple assets and bulk-generated clips so your social content keeps a consistent look.
When you apply the brand to an edit, Riverside automatically inserts the logo, caption style and brand background into the export. This is a single-click way to turn raw footage into branded content - hugely valuable if you repurpose content across platforms.
Practical brand kit tips
- Prepare three versions of your intro: short (for reels/shorts), medium (for social) and long (for full episodes).
- Design caption styles for each aspect ratio
- Use background colour options sparingly; test contrast with captions to preserve readability.
Scenes, Layouts and Smart Layouts
Riverside’s layout tools let you control how tracks appear visually. You can manually select grid, split-screen, picture-in-picture or full-screen views and create scenes that split your timeline into camera-angle sections.
Alternatively, Smart Layout automates camera switching using conversation rhythm and speaker activity. Of course, after Smart Layout is applied, you can still tweak scenes and layouts to your own taste.
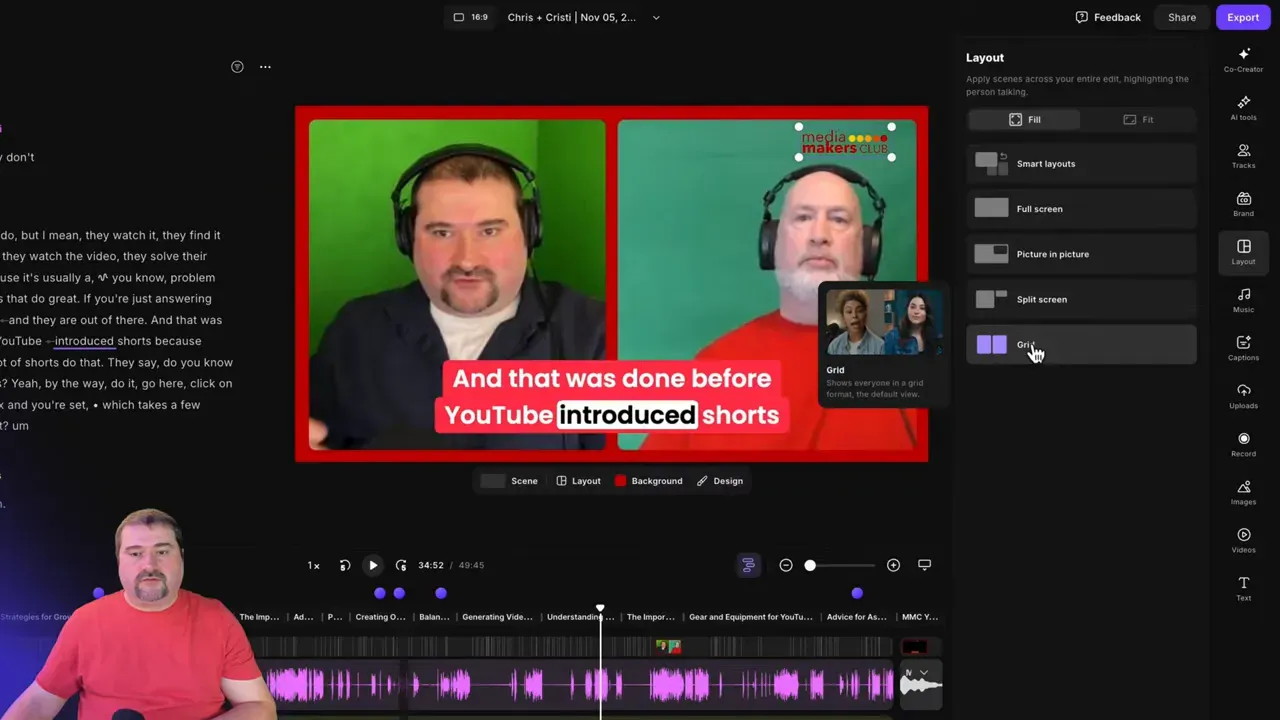
Smart Layout analyses speech and decides when to switch to full-screen for a single person or keep side-by-side views during fast exchanges. You can set the rhythm - conservative or aggressive - to avoid too many cuts.
How to use scenes effectively
- Apply Smart Layout first, then make changes to the layouts or scene boundaries when you review the entire episode.
- Create side-by-side scenes for conversational sections and full-screen for longer monologues.
- Use scene cuts (Shift + S) to split and refine camera changes manually where auto-switching doesn’t produce the desired effect.
- You can create specific scenes with picture-in-picture and full screen screen share if you share your screen or run a presentation during your recording.
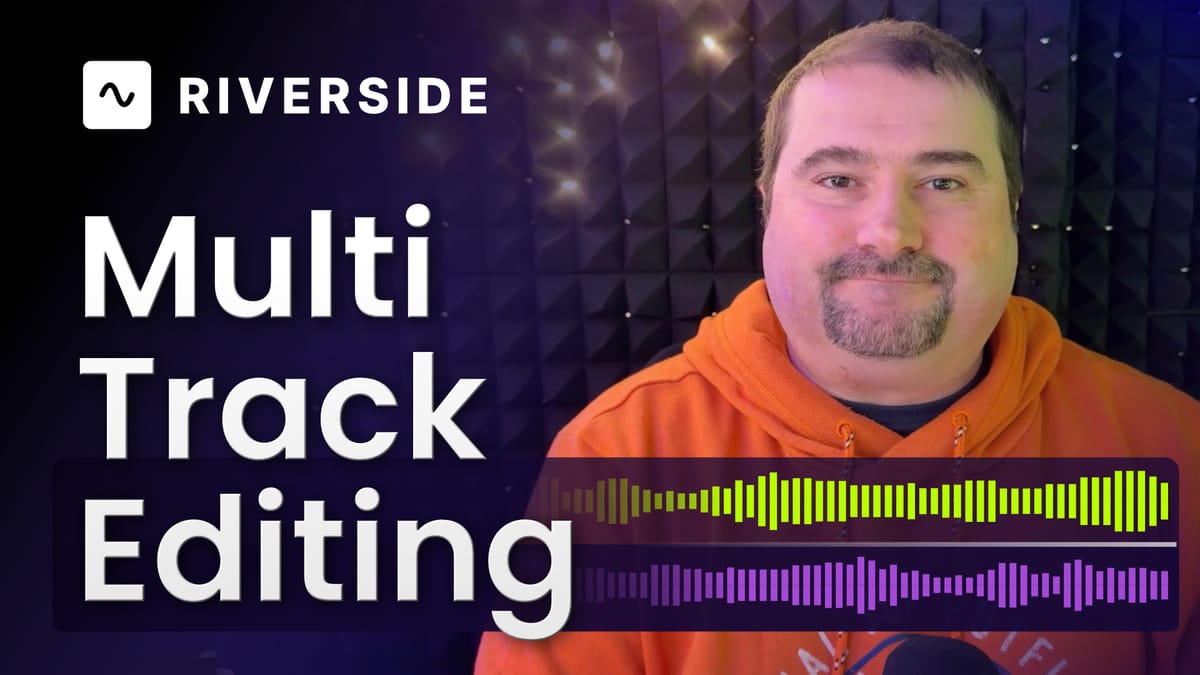
Per-Track Controls and Audio Editing
Because Riverside records separate tracks, the editor exposes per-track controls:
- Volume sliders and trims
- Per-track Magic Audio cleaning and equaliser with custom curves
- Smart mute and isolation options to reduce background noise
- Per-track eye contact correction and lip-sync offset adjustments
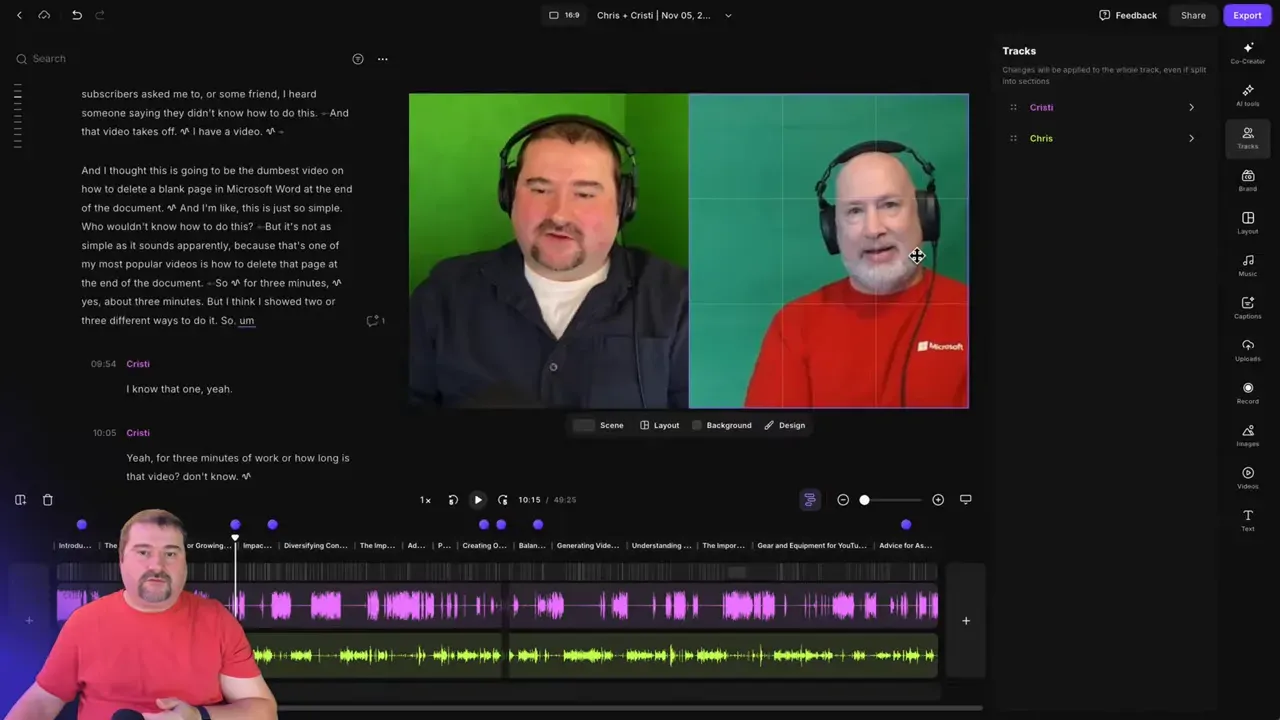
The ability to fix lip-sync by nudging audio a few milliseconds is invaluable. Differences in sample rates or hardware can introduce small delays; being able to correct them per track avoids complex exports to external editors.
Captions, Titles and Text Overlays
Riverside’s caption system ties into the transcript and Brand Kit. You can design caption presets, choose fonts, set animations, and control the number of lines of text. Caption styles can be applied globally or per project, and Riverside renders them both for full-length exports and for social clips.

Text overlays (titles, speaker names, body text) are flexible and can be recreated across scenes and exports.
Uploads, Stock Library and AI Enhancements
The Uploads section acts as a media library inside your studio. You can store logos, intros, outros, music files and b-roll. Riverside also includes a searchable stock media library for B-roll images or video that you can import directly into projects.

Riverside offers AI-based features that convert images into video or generate B-roll from scratch. These features require AI credits - a separate purchase - so if you plan to use AI generation heavily, budget for credits on top of your subscription.
Music Library and Audio Fading
There is a built-in music library with mood tags. The player lacks a robust search in some parts of the UI, but you can preview and add tracks to your timeline, adjust volume and apply fades. I’d like to see better filtering and search in future iterations.
Exporting, Integrations and XML Timeline Export
Riverside supports exports in high quality up to 4K. You can export composite videos, audio-only (MP3/WAV), and a normalized audio master with background noise removal.
There’s also a useful XML export that carries timeline cuts, markers and basic metadata to external editing systems - valuable if you prefer colour grading or advanced effects in another NLE.
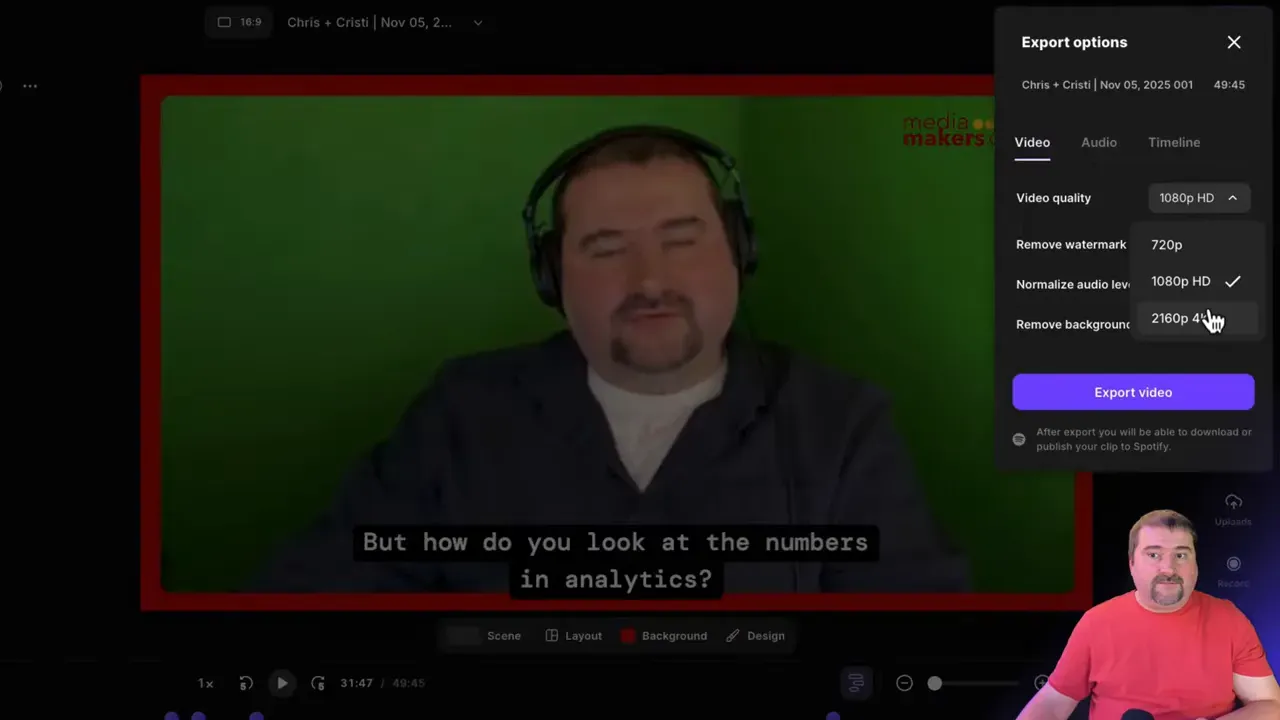
Note: XML timeline export is available only on certain plans (Business), so check your plan if you need to round-trip edits into DaVinci Resolve, Premiere Pro, Final Cut or similar.
Direct Uploads to Platforms
Riverside gives you direct-publish capabilities. After exporting a final file, you can upload directly from Riverside to a number of platforms and create drafts on YouTube automatically. This removes one step in the publish pipeline and helps speed up distribution.
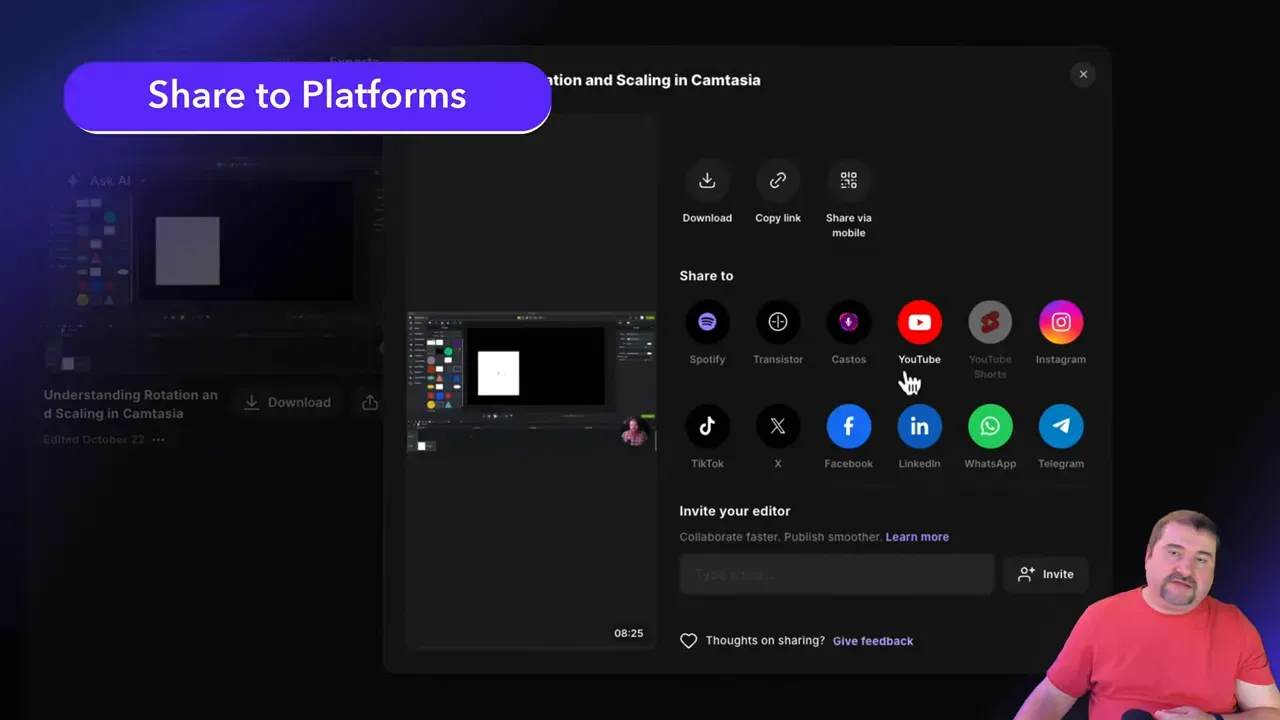
Live Streaming: Multi-Destination and Studio Chat
Live streaming is one of the major differentiators in Riverside.fm features. With the live package you can stream to multiple destinations simultaneously - YouTube, Facebook, LinkedIn, X (Twitter), Twitch, TikTok and Custom RTMP endpoints. You can also stream to Riverside’s own “public streaming” page where viewers can chat and call in.
Important aspects:
- Simultaneous multi-destination streaming plus local recording of multi-tracks.
- Incoming chat consolidation for supported platforms - chat messages show inside the studio so you can interact without switching dashboards.
- Custom RTMP is useful for platforms that don’t have an integration or for streaming into scheduled events on YouTube.
Because Riverside records local, high-quality tracks while streaming, you get the immediacy of live video plus the flexibility of post-production - a significant workflow advantage over many streaming-only systems. I use this all the time, for example to repurpose live Q&A Sessions into separate polished videos for my membership.
If you’re eager to learn more about Riverside and wish to have a one-on-one Riverside coaching session, feel free to book a call with me.
I’m here to help you with any questions you have and to guide you through the best workflows, tips, workarounds, or just answer any questions you may have!
Podcast Hosting and Distribution
A recent addition to Riverside.fm features is native podcast hosting. You can create a podcast, upload episodes, and have Riverside distribute to podcast directories. The platform also allows importing existing podcasts so you can migrate feeds.
Podcast hosting integrated with recording and editing removes the need to stitch together multiple tools for recording, editing, and publishing. If you want fewer logins and a single billing relationship, this can simplify operations.
Pricing, Plans and What You Actually Get
Riverside’s pricing tiers typically include a free trial or limited free version, a Pro plan, and Business-level tiers with additional seats, productions, and enterprise-level features.
Add-ons like Live streaming and Webinar functionality require different plans or separate purchases; AI credits are bought separately for advanced AI generation. Exact pricing can change, so always consult the latest plan matrix.
Pricing advice:
- If you record regularly and need reliable multi-track archives, Pro is usually a good value.
- If you manage teams, client projects, or need productions across multiple brands, consider Business for its multi-studio and team features.
- Buy AI credits incrementally to test workflows before committing to heavy usage.
Pros and Cons - Honest Assessment
Pros
- Reliable local-first recording: I never lost a recording in years. I also recommend it to my clients.
- Integrated editor: Transcript-based editing plus per-track control reduces the time from raw to publishable content.
- Brand kit and smart asset generation: Fast, consistent social repurposing and bulk branding.
- Live streaming with local recording: Stream to multiple platforms while preserving high-quality tracks. Opens up possibilities for repurposing.
- Podcast hosting: Simplifies end-to-end publishing.
Cons
- AI imperfections: The co-creator and some auto-edits still need human oversight.
- Search and media management: Music and stock search and discovery could be improved.
- Advanced post-production: For colour grading or motion graphics you may still need an external NLE; XML export is plan-limited.
Who Should Use Riverside?
Riverside.fm features fit different creator profiles. Here’s a quick guide:
- Podcasters - Especially interview-based shows. Isolated tracks, transcript editing and podcast hosting make Riverside a smart choice for end-to-end production.
- Video producers and YouTubers - If you do talk shows, interviews or long-form content and want time savings with editing and auto assets.
- Online coaches and educators - Hybrid recordings, multi-destination live streaming and repurposing clips for courses add value.
- You can easily ditch Zoom for your meetings and get much higher quality video, not to mention the separate video tracks, join with a single link, AI summaries and integration with your scheduling platform.
- Small agencies and teams - Business features like productions and team roles support collaborative workflows.
- Live streamers who need post-production - If you stream but want the ability to repurpose a high-quality recorded archive, Riverside offers the best of both worlds.
Recommended Workflow for Most Creators
Below is a practical workflow that makes the most of Riverside.fm features:
- Plan and schedule: Create a project in your studio, schedule the session and send the Riverside invite through your calendar or booking tool.
- Record locally: Use the desktop app for best quality; ask guests to use headphones to reduce bleed if they have poor acoustics.
- Run the AI passes: After recording, run Remove Pauses, Remove Filler Words, and Magic Audio to save time. Fix the audio/video sync if you need to.
- Manual polish: Listen through the edit, restore any parts removed in error, tidy the scene changes.
- Branding and assets: Apply your Brand Kit, assemble your final episode with intro, outro. Generate Magic Clips and Magic Segments, and tweak thumbnails and captions.
- Export and publish: Export masters in the required formats; upload directly to platforms via Riverside or download and publish from your podcast host.
Practical Tips and Gotchas
- Prefer everyone using headphones if possible: This will avoid echo, even though Riverside has echo cancellation built in. Headphones + echo cancellation off ensures nobody is 'silenced' when interrupted.
- Ask guests to upload if they leave: If a guest disconnects before upload completes, send them the resume upload link so the files finish later.
- Review AI edits: Always listen through the episode before publishing - AI saves time but human oversight prevents awkward cuts.
- Test camera layouts: Smart Layout is great, but tweak the rhythm to avoid overly frequent switches on rapid-fire conversations.
Final Recommendation
Riverside is a strong contender for creators wanting an integrated recording-to-publish workflow. Reliability is the headline: local-first, multi-track recordings combined with a powerful editor and built-in branding tools create a smooth path from session to publishable asset.
If you are a solo podcaster, a small production team or a creator who values time-saving automation and consistent branding, Riverside will likely reduce friction and increase output.
If you rely heavily on advanced colour grading, VFX or an elaborate NLE pipeline, you will still need to download the raw recordings from Riverside or export into those tools for final polish - but Riverside will accelerate the upstream parts of production and keep your raw files organised.
Closing Thoughts
Over the past few years, Riverside.fm features have matured from a reliable recording platform into an integrated production suite. The biggest wins are reliability of recording, the productivity gains from transcript-based editing and the brand automation that makes finishing your edited work a two-click process, and repurposing efficient.
The platform is not a replacement for every single advanced tool in your post-production chain, but for most creators producing interviews, lessons, coaching sessions and talk shows, it is perfect!
Try the platform with small projects first, confirm which plan aligns with your needs, and integrate it into your publishing workflow for the fastest gains.