
How to Clean Up Audio in Camtasia Using Descript Studio Sound


If you have ever recorded video tutorials or screencasts in Camtasia, you know the struggle of dealing with background noise. Air conditioning hum, room echo, keyboard clicks — all of those little sounds that creep into your recordings. Camtasia does include a built-in noise removal filter, but it is quite limited. When you push it hard enough to make a real difference, voices start sounding metallic and unnatural.
Fortunately, there is a much better solution: using Descript's Studio Sound AI to clean your audio, among others, and then bringing it back into Camtasia for final editing.
In addition to Descript's Studio Sound, you can also use Auphonic, Adobe Voice Enhance and other AI-based noise reduction and speech enhancing platforms. The workflow below will work with all of them.
This workflow takes just a few extra minutes and the difference in audio quality is dramatic. Studio Sound uses AI to isolate your voice and remove everything else — noise, echo, hum, and even music. The result is clean, professional-sounding audio that you can then fine-tune in Camtasia.
Exporting Audio from Camtasia
The first step is getting your audio out of Camtasia as a standalone file. Go to File → Export → Export Audio Only and save it as a .wav file. WAV is an uncompressed format, which means you are not losing any quality in the export — important since the audio will be processed and re-imported.
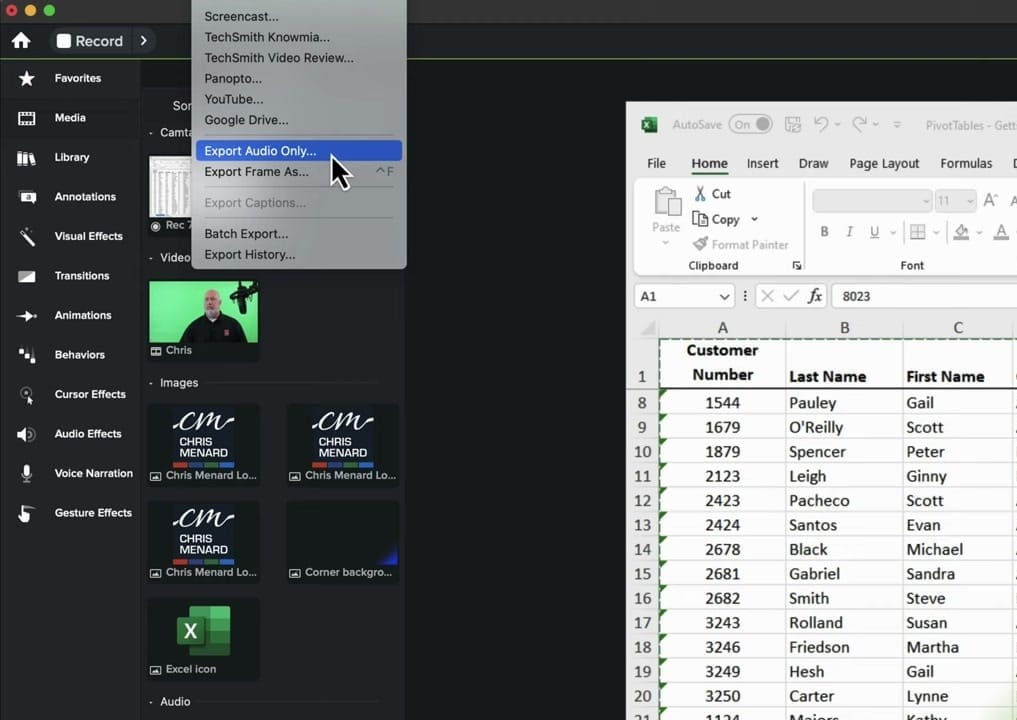
This exports the entire audio from your timeline. If you have multiple audio tracks, Camtasia mixes them down into one file. Keep the original project open — you will need it later when you bring the cleaned audio back.
Applying Studio Sound in Descript
Open Descript and create a new project. Import your exported .wav file into the Media bin. Next, you need to create a sequence from this file — right-click the file and choose to add it to a new multi-track sequence. This places the audio on the timeline where you can apply effects.
With the sequence open, look at the right sidebar and find Audio Effects. Toggle on Studio Sound. When you enable it, Descript uploads your audio to its cloud servers for AI processing. Depending on the length of your file, this may take a minute or two. You can see the progress as it uploads, processes, and downloads the enhanced version.
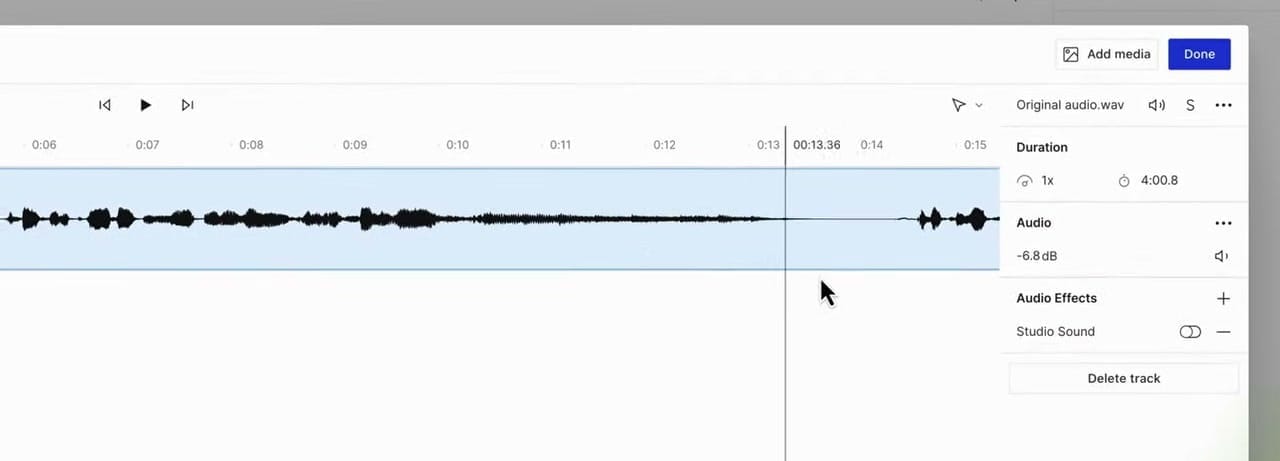
An important detail: Studio Sound is applied at the file level, not the clip level. This means once the file is processed, every instance of that file in your project uses the enhanced version. If you want to learn more about how Studio Sound works and its settings, check out How to Apply Studio Sound in Descript.
Studio Sound is free to use for files up to 60 minutes, which covers most tutorial recordings comfortably.
What Studio Sound Actually Does
Studio Sound is not just a noise reduction filter. It is an AI model trained to isolate human voice from everything else. That means it removes:
- Background noise (fans, air conditioning, street sounds)
- Room echo and reverb (up to a point)
- Music stingers and background music
- Keyboard clicks and mouse sounds
- Any non-voice audio
This is a key insight: Studio Sound removes everything that is not voice. If you have intro music or sound effects on the same track as your voice, those will be stripped out too. Plan accordingly — keep music on separate tracks in Camtasia before exporting, mute them during the export, and re-enable them after cleaning.
The flip side of this is that Studio Sound is exceptionally good at making voices sound clean and present, even in recordings made in untreated rooms with lots of echo.
Downloading the Clean Audio from Descript
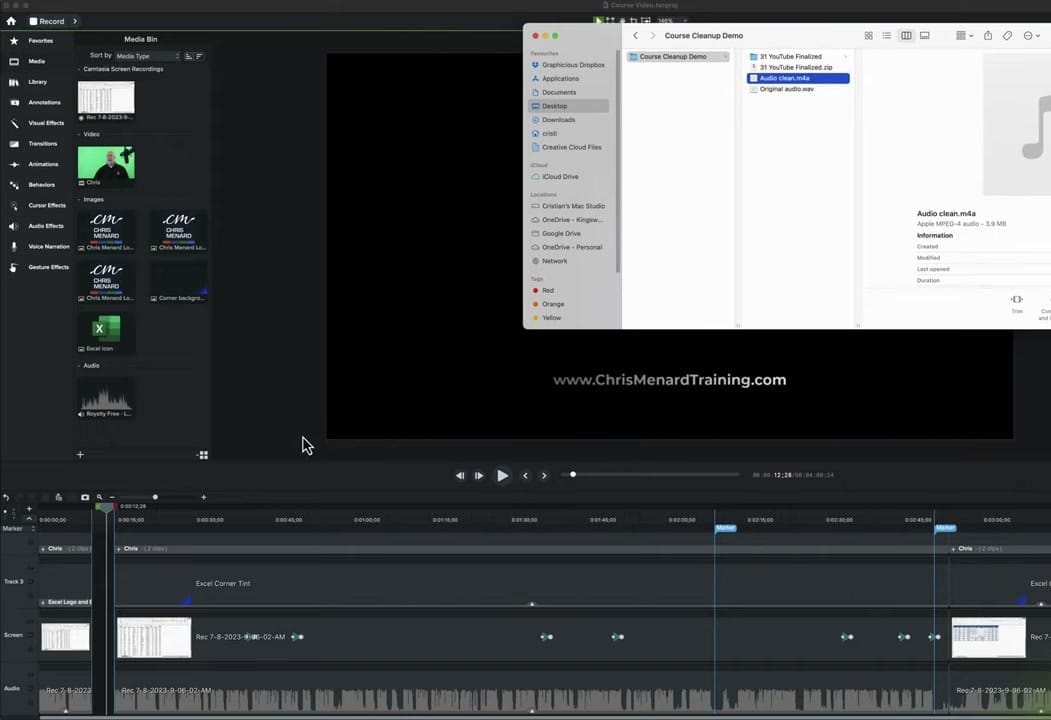
Once Studio Sound has finished processing, you need to get the enhanced file out of Descript. In the Media bin, click on your file, then click the three dots menu and select "Copy file to Finder" (or the equivalent on Windows). You will see an option to download the "Studio Sound enhanced audio file" — this is the cleaned version, saved as an .m4a file.
UPDATE: This download has been disabled now, in later Descript versions - instead, you have to create a composition from that sequence and EXPORT it.
If you work with multi-track compositions in Descript, the export process for individual tracks follows a similar pattern through the Media bin.
Save this file somewhere accessible — you are about to bring it into Camtasia.
Importing Clean Audio Back into Camtasia
Back in your Camtasia project, you will now add the cleaned audio alongside your original. Create a new audio track below your original audio track. Then simply drag the .m4a file from Finder (or File Explorer) onto this new track.
Use the magnetic track feature (or snap to start) to make sure the clean audio aligns perfectly with the beginning of your project. Since you exported the full timeline audio, it should match up exactly — same duration, same timing.
Muting the Original Audio the Right Way
Now that you have both the original and the clean audio on separate tracks, you need to silence the original. But here is a critical detail: do not lock or hide the original track.
Why? If you lock a track and then make cuts to your video later, the locked track will not follow those cuts. It stays frozen in place while everything else shifts, and your audio goes completely out of sync. This is one of those mistakes that can ruin hours of editing work.
Instead, use this method:
- Right-click on any clip on the original audio track
- Select "Select All on Track" to highlight every clip
- Press Shift+S to Silence Audio on all selected clips
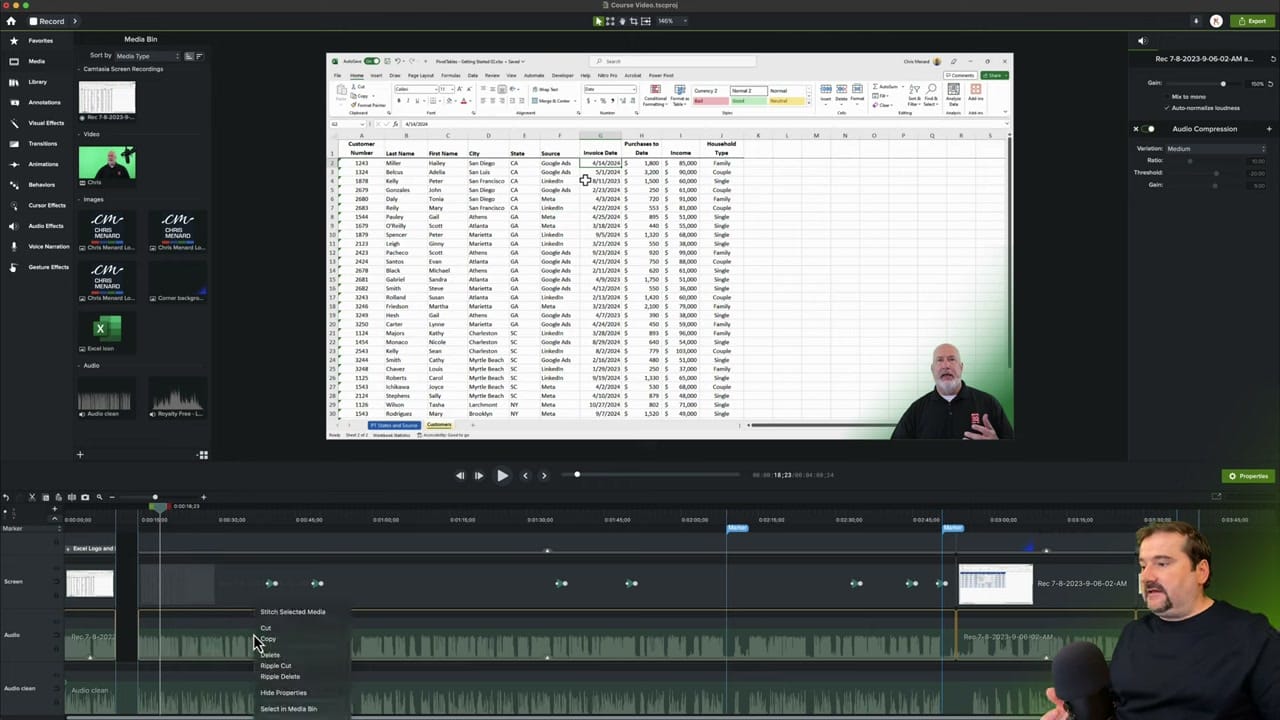
This silences the audio without removing the clips. The original track stays fully editable, moves with cuts, and remains in sync. You simply will not hear it anymore because its volume is at zero.
Post-Processing in Camtasia
With the clean audio in place, you may notice it sounds a bit quieter than the original. Studio Sound focuses on clarity rather than volume, so you will likely need to boost levels.
Apply the Audio Compression effect to your clean audio track. This normalizes the volume — bringing up quiet sections and taming loud peaks.
You can also adjust the gain (try 150-200%) to bring the overall volume up to a comfortable listening level. Listen back and adjust until it sounds natural and consistent.
Tips and Warnings
Studio Sound intensity: By default, Studio Sound runs at 100% intensity, meaning maximum AI cleanup. You can lower this to blend some of the original ambient sound back in, which can sound more natural in certain contexts. A setting around 75-80% preserves a touch of room tone or some of the original audio where the person speaking might speak a little softer, while still removing most noise.
Signal-to-noise ratio matters: Studio Sound works best when your voice is clearly louder than the background noise. If you have sections where your voice drops to a whisper or trails off, the AI may cut those parts out — it cannot distinguish between quiet speech and quiet noise. If your recording has significant volume variations, consider normalizing or compressing the audio before sending it through Studio Sound. Auphonic is great at that.
Multi-source normalization: One often-overlooked benefit of Studio Sound is that it normalizes audio from different sources to sound consistent. If you are editing a project with clips recorded in different rooms or with different microphones, running all the audio through Studio Sound helps everything sound like it was recorded in the same space. This is particularly useful for projects that combine screen recordings, webcam footage, and separate voiceover takes.
Related guides

Do you need help or wish to learn Descript the right way? Join me on a one-on-one Descript coaching session. Book a call with me.
I'm here to help you with any questions you have and to guide you through the best workflows, tips, workarounds, or just answer any questions you may have!


