Riverside Markers and Chapters: A Complete Workflow Guide
Markers and chapters do different jobs in Riverside. Here's how to drop markers while recording, manage them in the editor, shape chapters in the transcript and on the timeline, and export a chapter list to YouTube and Spotify.

Markers and chapters are two of the quietest features in Riverside, and they end up touching every phase of a project: recording, editing, and publishing. They look similar, they get talked about interchangeably (I do it myself), but they behave very differently — and once you know which one to reach for, long recordings stop feeling like a wall of waveform.
Here's the whole workflow: how to drop markers while you're still rolling, what happens to them in the editor, how chapters get created, how to rename, move, delete and add your own, and how to push the finished chapter list out to YouTube and Spotify.
Markers vs. chapters: what's actually different
Markers are timestamps you create during a recording. They're notes to yourself — "clip this," "we messed that up," "great answer." Once the recording lands in the editor, they show up as comments.
Chapters are something else entirely. They're named sections of your episode that live in the transcript and on the timeline, they carry a timestamp, and they're what you export to give your audience a clickable table of contents. Markers do not turn into chapters automatically. If you want a chapter, you add it yourself — but a well-placed marker from the recording session is the perfect hint for where one belongs.
Add markers while you record
You don't need to wait until editing. Open your project, hit Create → Record, and once you're rolling, look at the bottom of the studio toolbar. There's a button called Mark, with M as its keyboard shortcut.

This feature has been in Riverside for ages, but it was reworked recently after a lot of user feedback, and the improvement is the part that matters: you can now attach a note to the marker instead of just a bare timestamp.
Press M once and you get a silent marker at that moment. Press M (or click Mark) and a small input pops up at the top of the screen where you can type a comment. Hit Enter and it's saved.
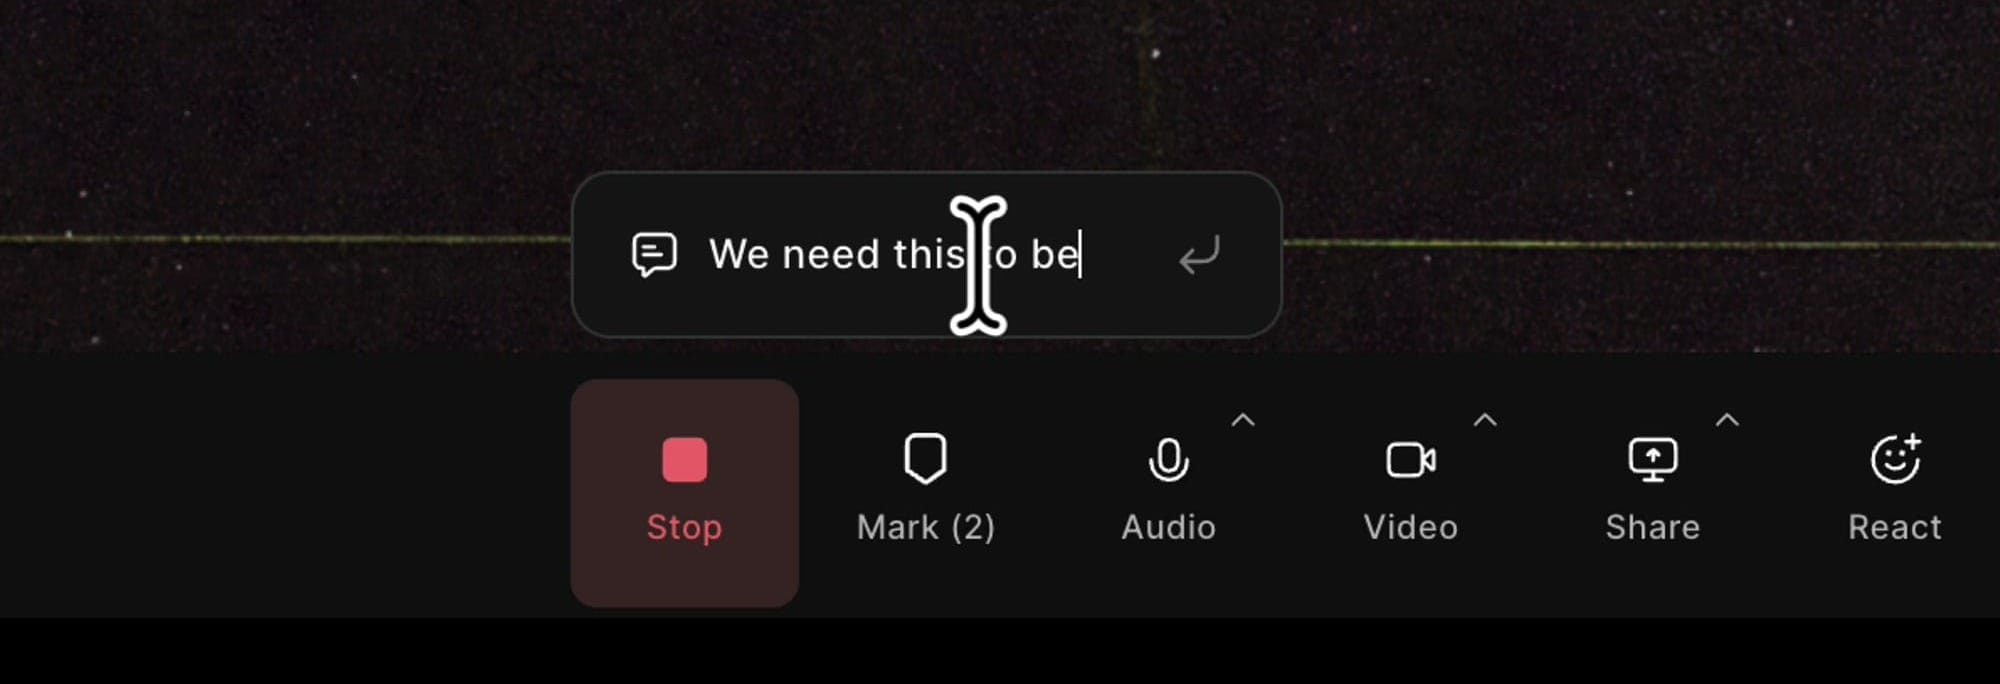
That's the whole interaction. You're back in the conversation in about three seconds. In practice I use it for exactly two things: flagging a moment I want pulled as a social clip, and flagging something I'll need to fix in the edit.
Markers stay attached to the recording files. Every edit you create from those recordings inherits them.
Where markers show up in the editor
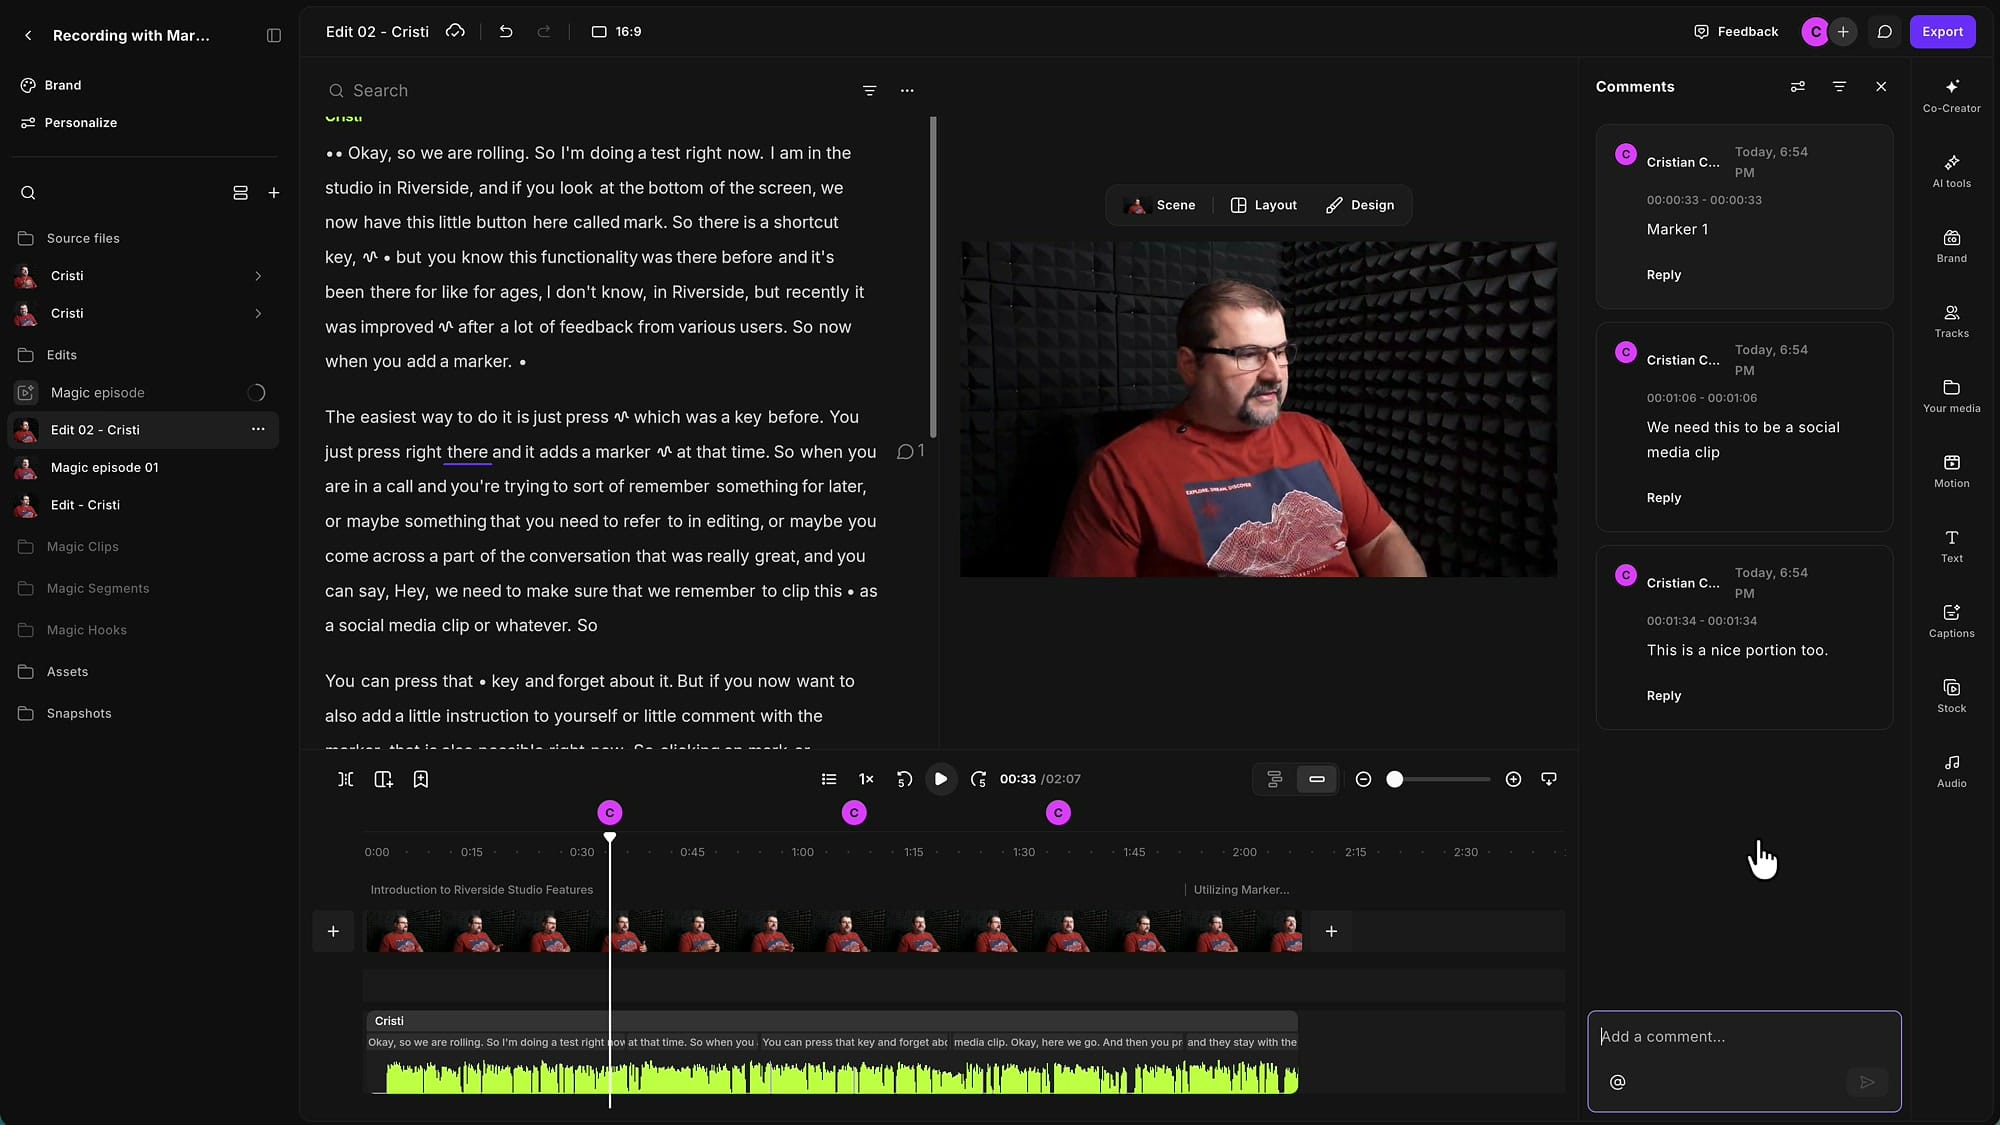
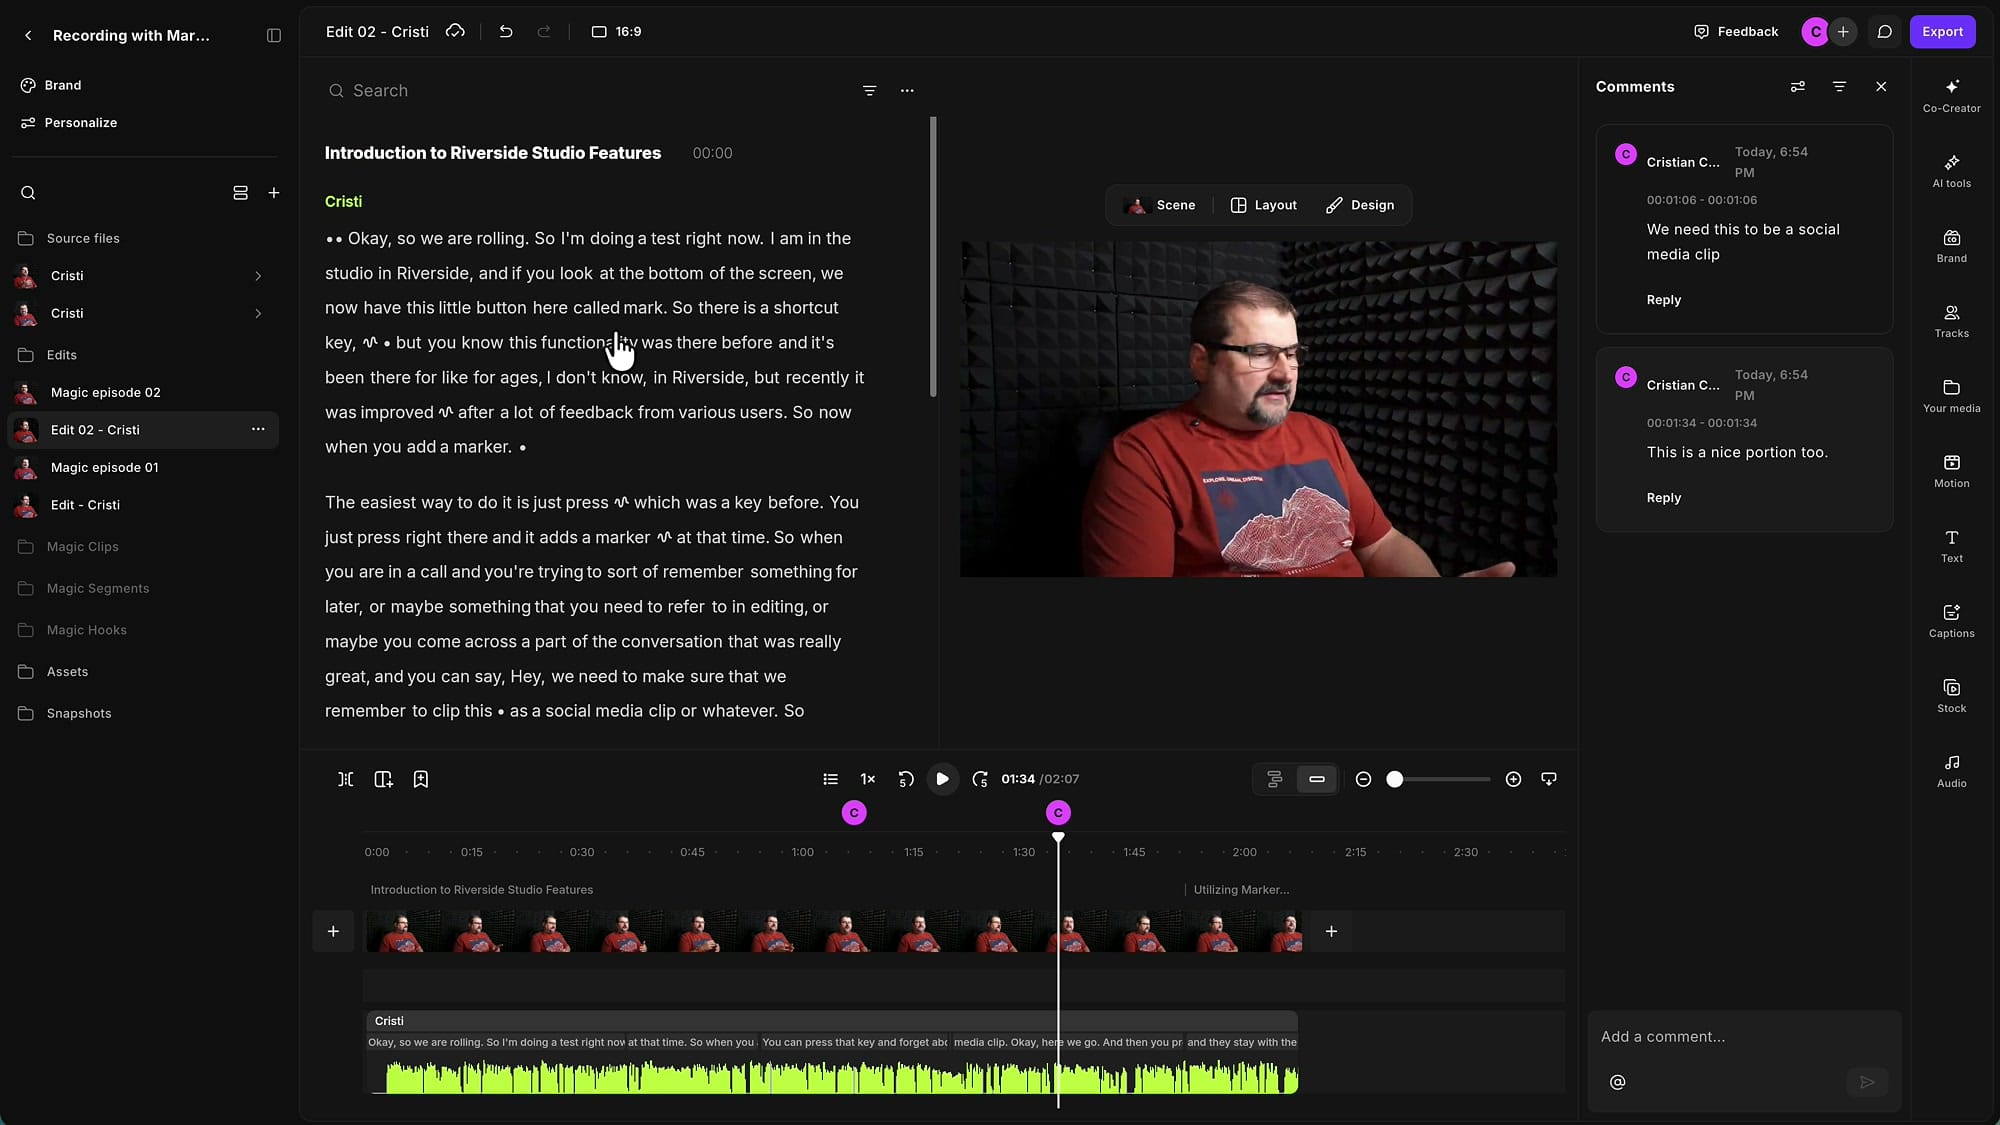
Open an edit from that recording and the markers are waiting for you in three places at once: as coloured circles above the timeline (each one stamped with the initial of whoever added it), inline in the transcript at the exact word, and in the Comments sidebar on the right.
Two things worth knowing here.
You can resolve them. Once you've acted on a marker — or decided you don't care about it — tick it off as resolved and it disappears from the timeline. This is how you keep the marker layer meaningful instead of letting it pile up.
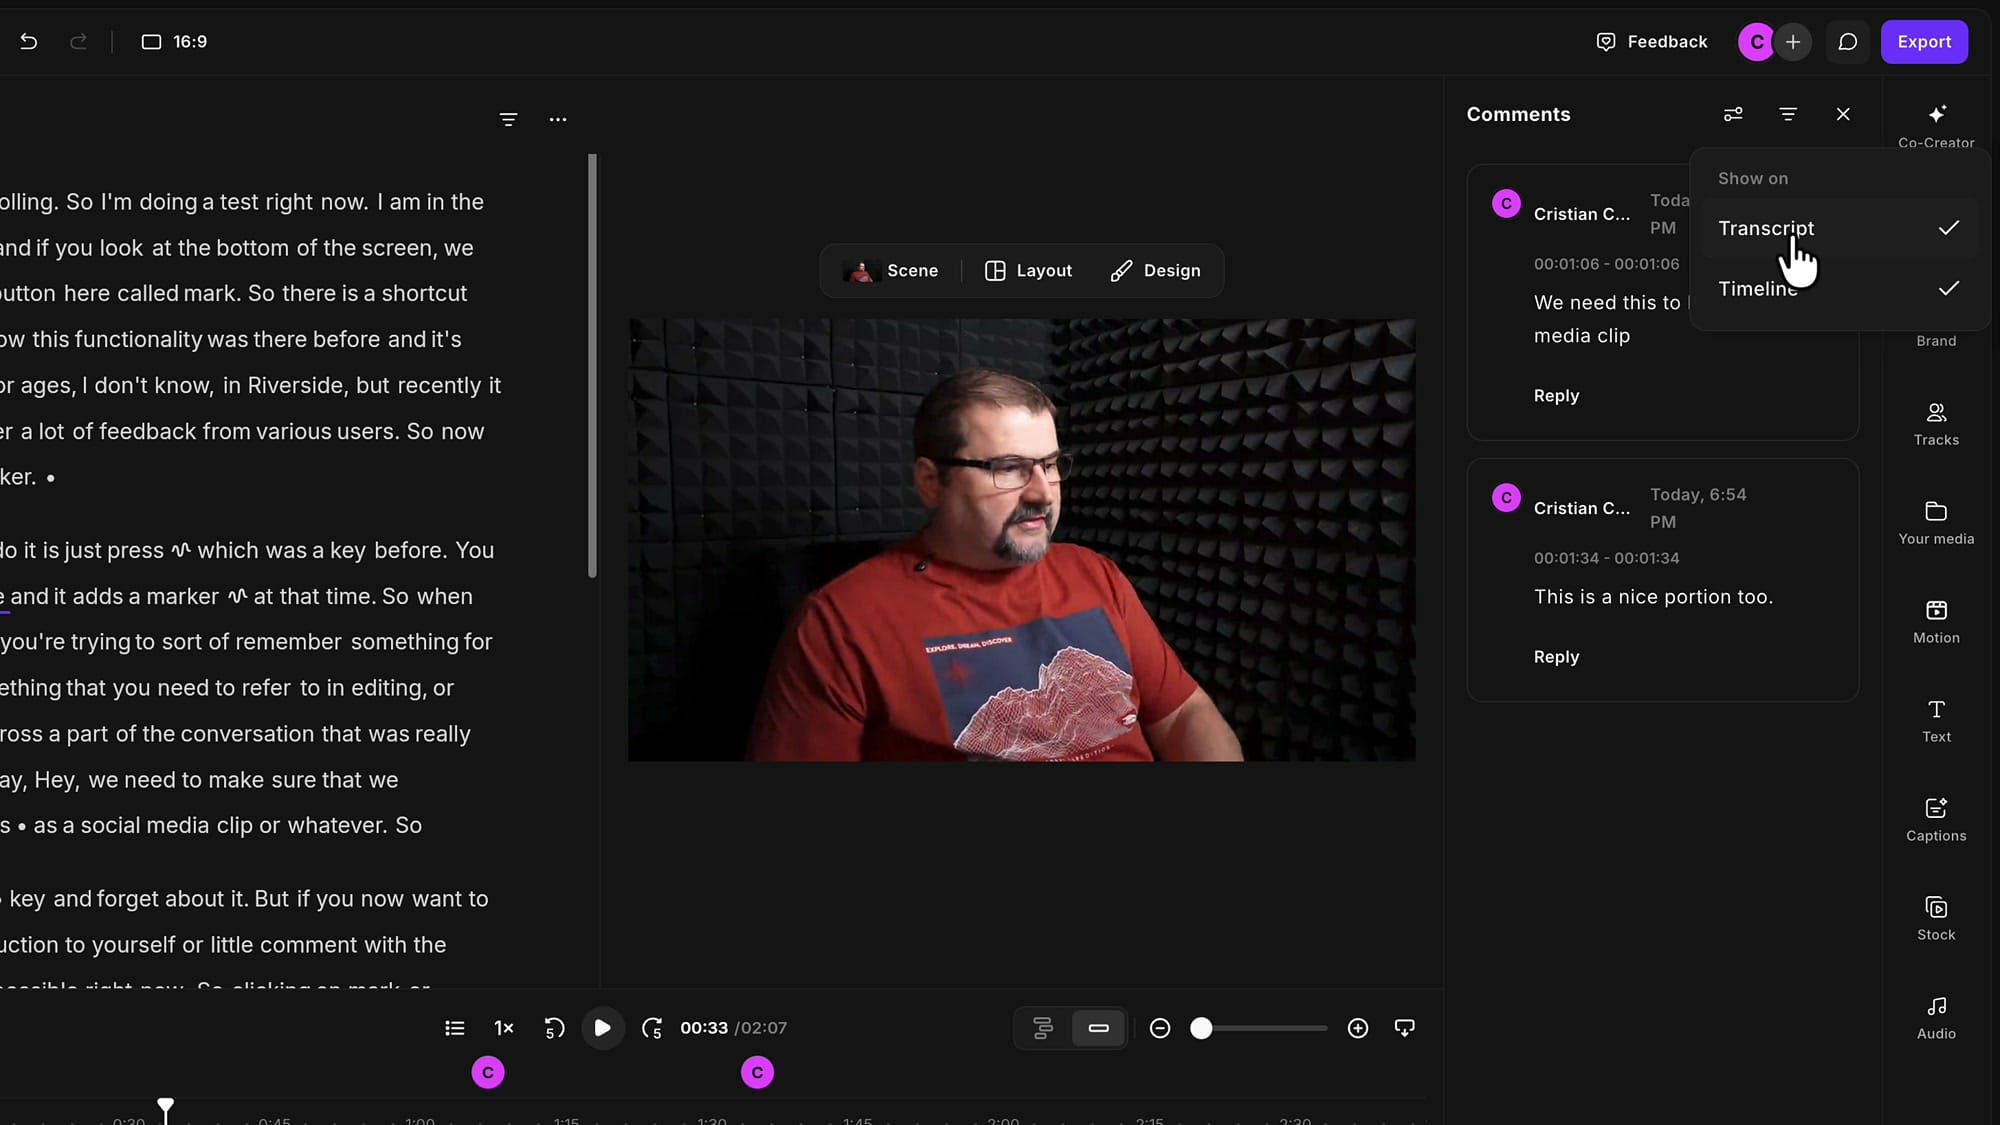
You can hide them without deleting them. If the timeline gets busy, open the options at the top of the Comments panel and toggle Show on → Transcript and Show on → Timeline independently.
Because these are comments, they're also conversational: you can reply to them. If a co-host left the marker, or you've invited an editor into your account, you can go back and forth on a specific moment instead of trading messages elsewhere. This is the same comment stream that review-link feedback lands in, so everything about a given timestamp collects in one place.
Chapters get created automatically
When you finish recording or uploading a project, Riverside runs an AI pass over it and writes chapters into the transcript.
Scroll through the transcript of any project and you'll see them: short bold headings with a timestamp next to them, breaking the episode into phases.
On a short recording you'll get two or three. On a full hour-long interview you'll get twenty-plus, and that's where they start earning their keep.
Navigate a long episode with the chapters index
Open the chapters navigation and you get the entire episode as a clickable list with timestamps. Click one and the transcript, the playhead, and the preview all jump to that point.
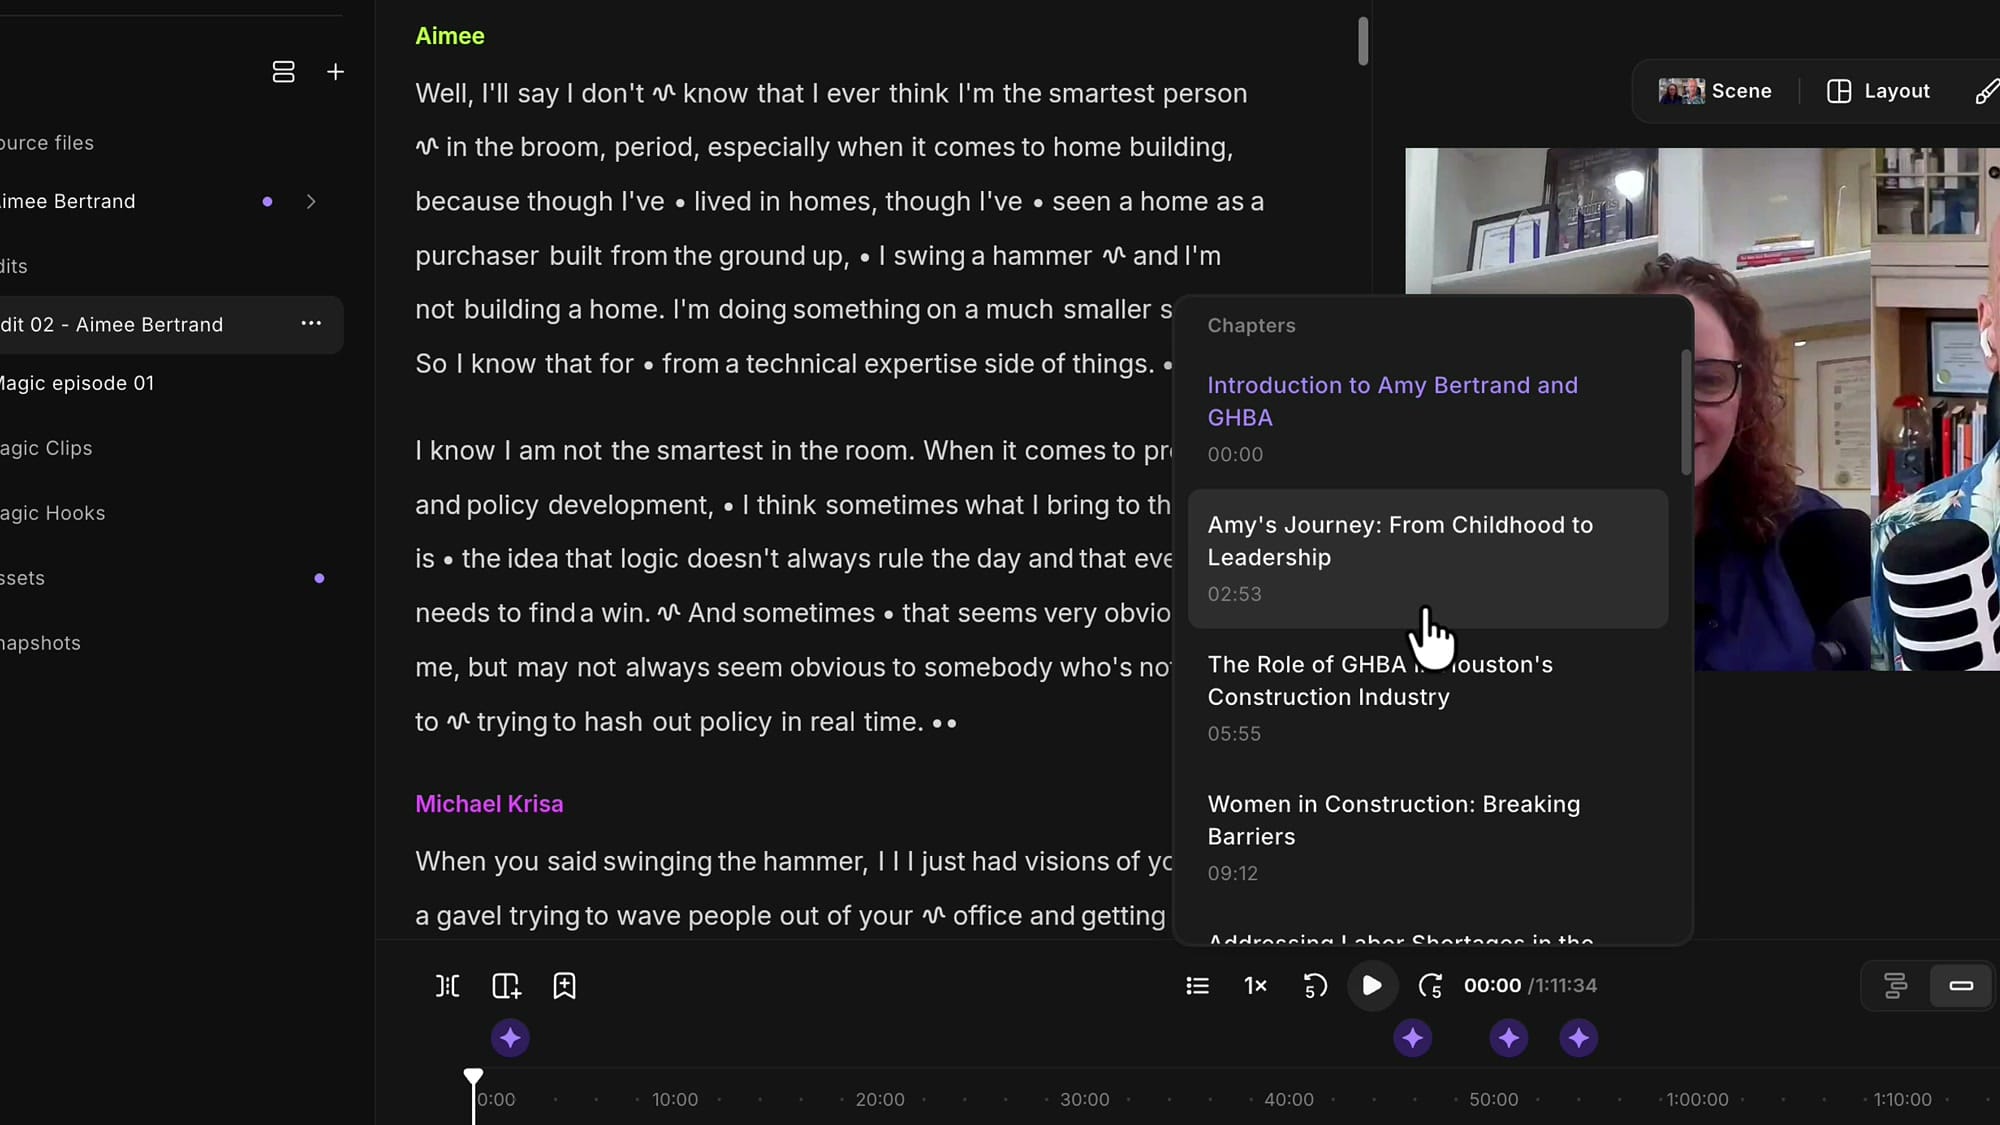
If you spend a lot of time hunting for a specific moment, pair this with the other navigation shortcuts in the editor — between the two you rarely need to scrub the timeline at all.
If chapters don't appear, ask Co-Creator
In my experience Riverside generates chapters every single time. But if you're working with an older recording, or a file you uploaded rather than recorded, they might not be there. In that case just ask for them.
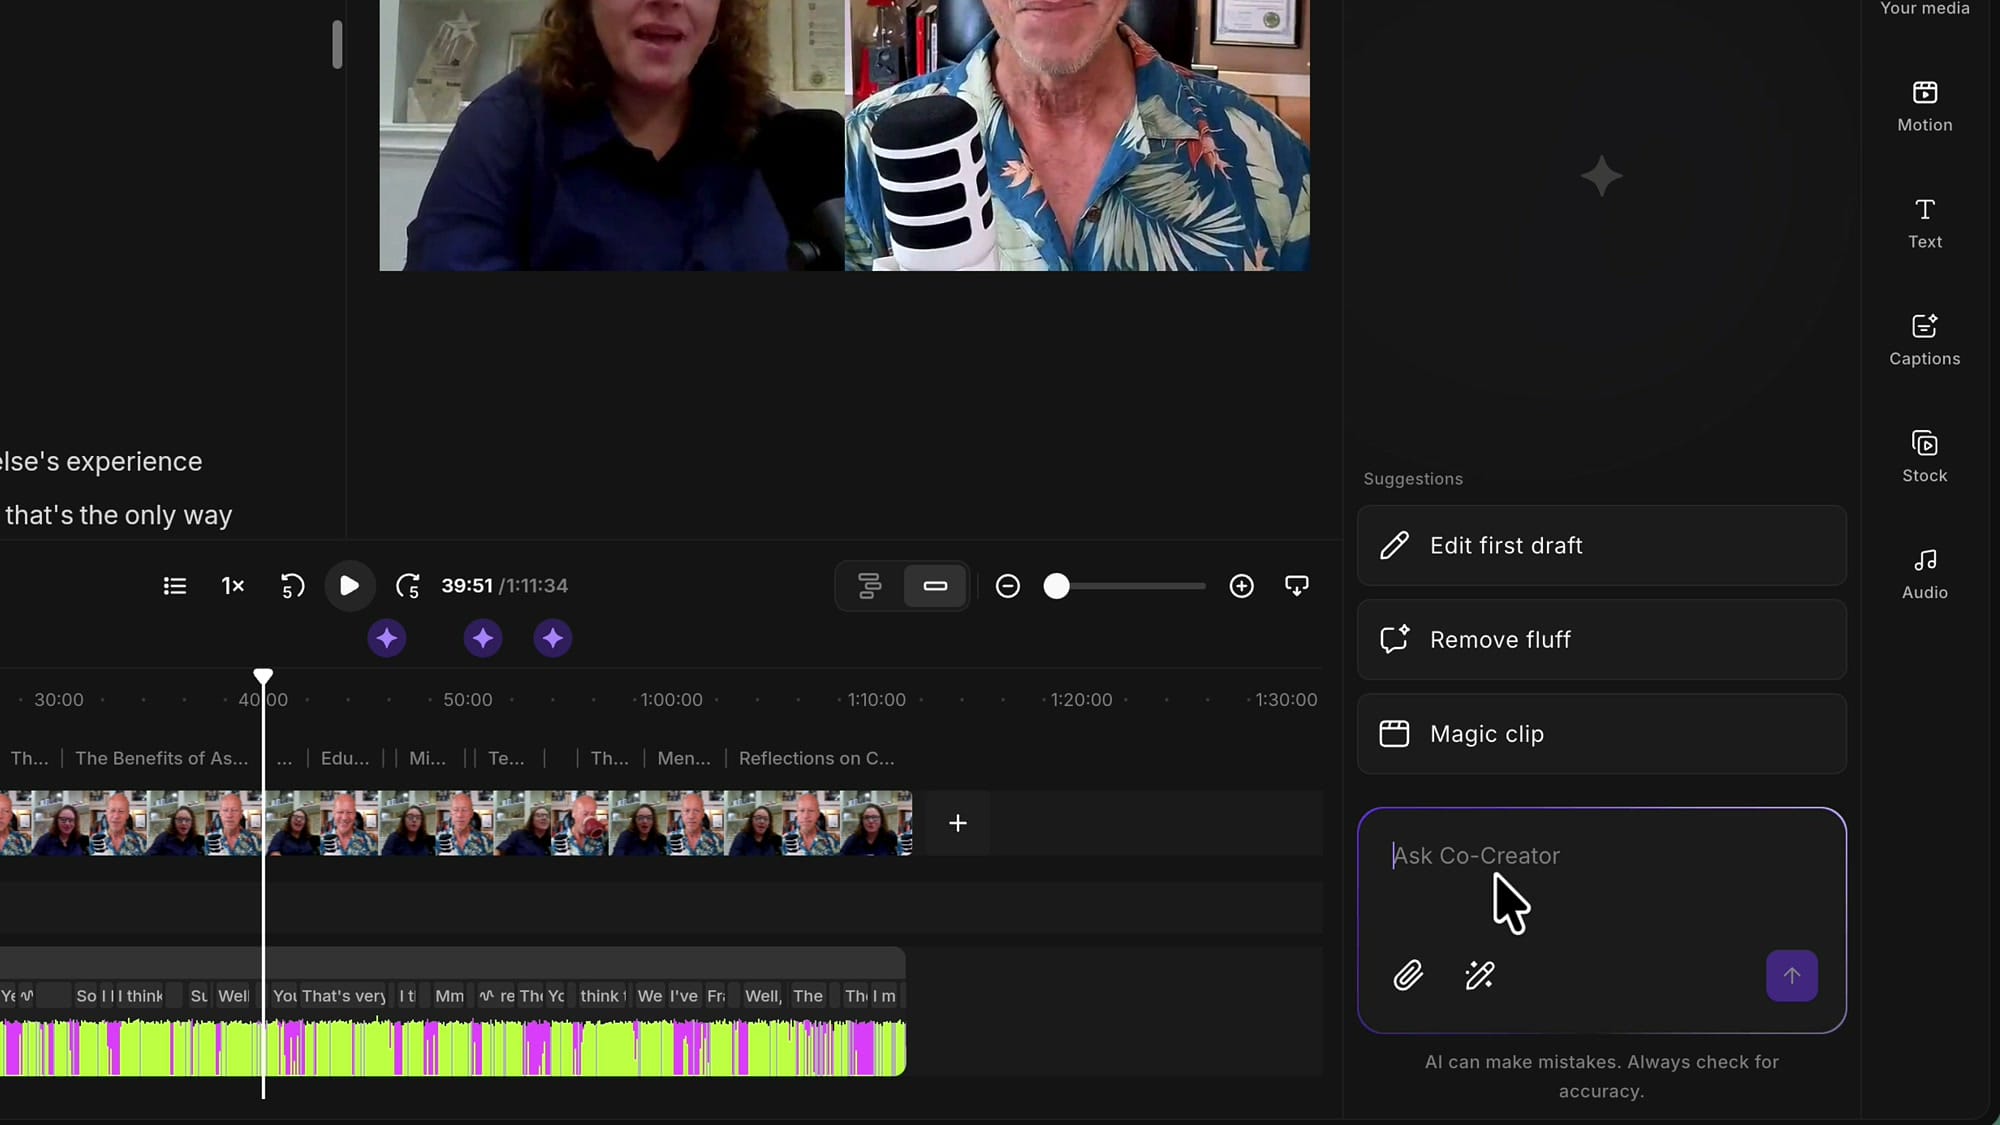
Something as simple as "Please create chapters for this episode" is enough. You can also steer the density — ask for 10, 15, or 20 and it'll try to break the episode down at that granularity. If you already have chapters, expect it to add more rather than replace what's there. Worth knowing if you've already curated the list. (If you use Co-Creator often, it's also worth telling it how you like your outputs so you're not re-explaining yourself every session.)
Edit chapters in the transcript
AI chapters are a good starting point, not a finished product. I always end up rewording some, moving some, and adding my own. All of it happens right in the transcript.
If you’re eager to learn more about Riverside and wish to have a one-on-one Riverside coaching session, feel free to book a call with me.
I’m here to help you with any questions you have and to guide you through the best workflows, tips, workarounds, or just answer any questions you may have!
Rename a chapter
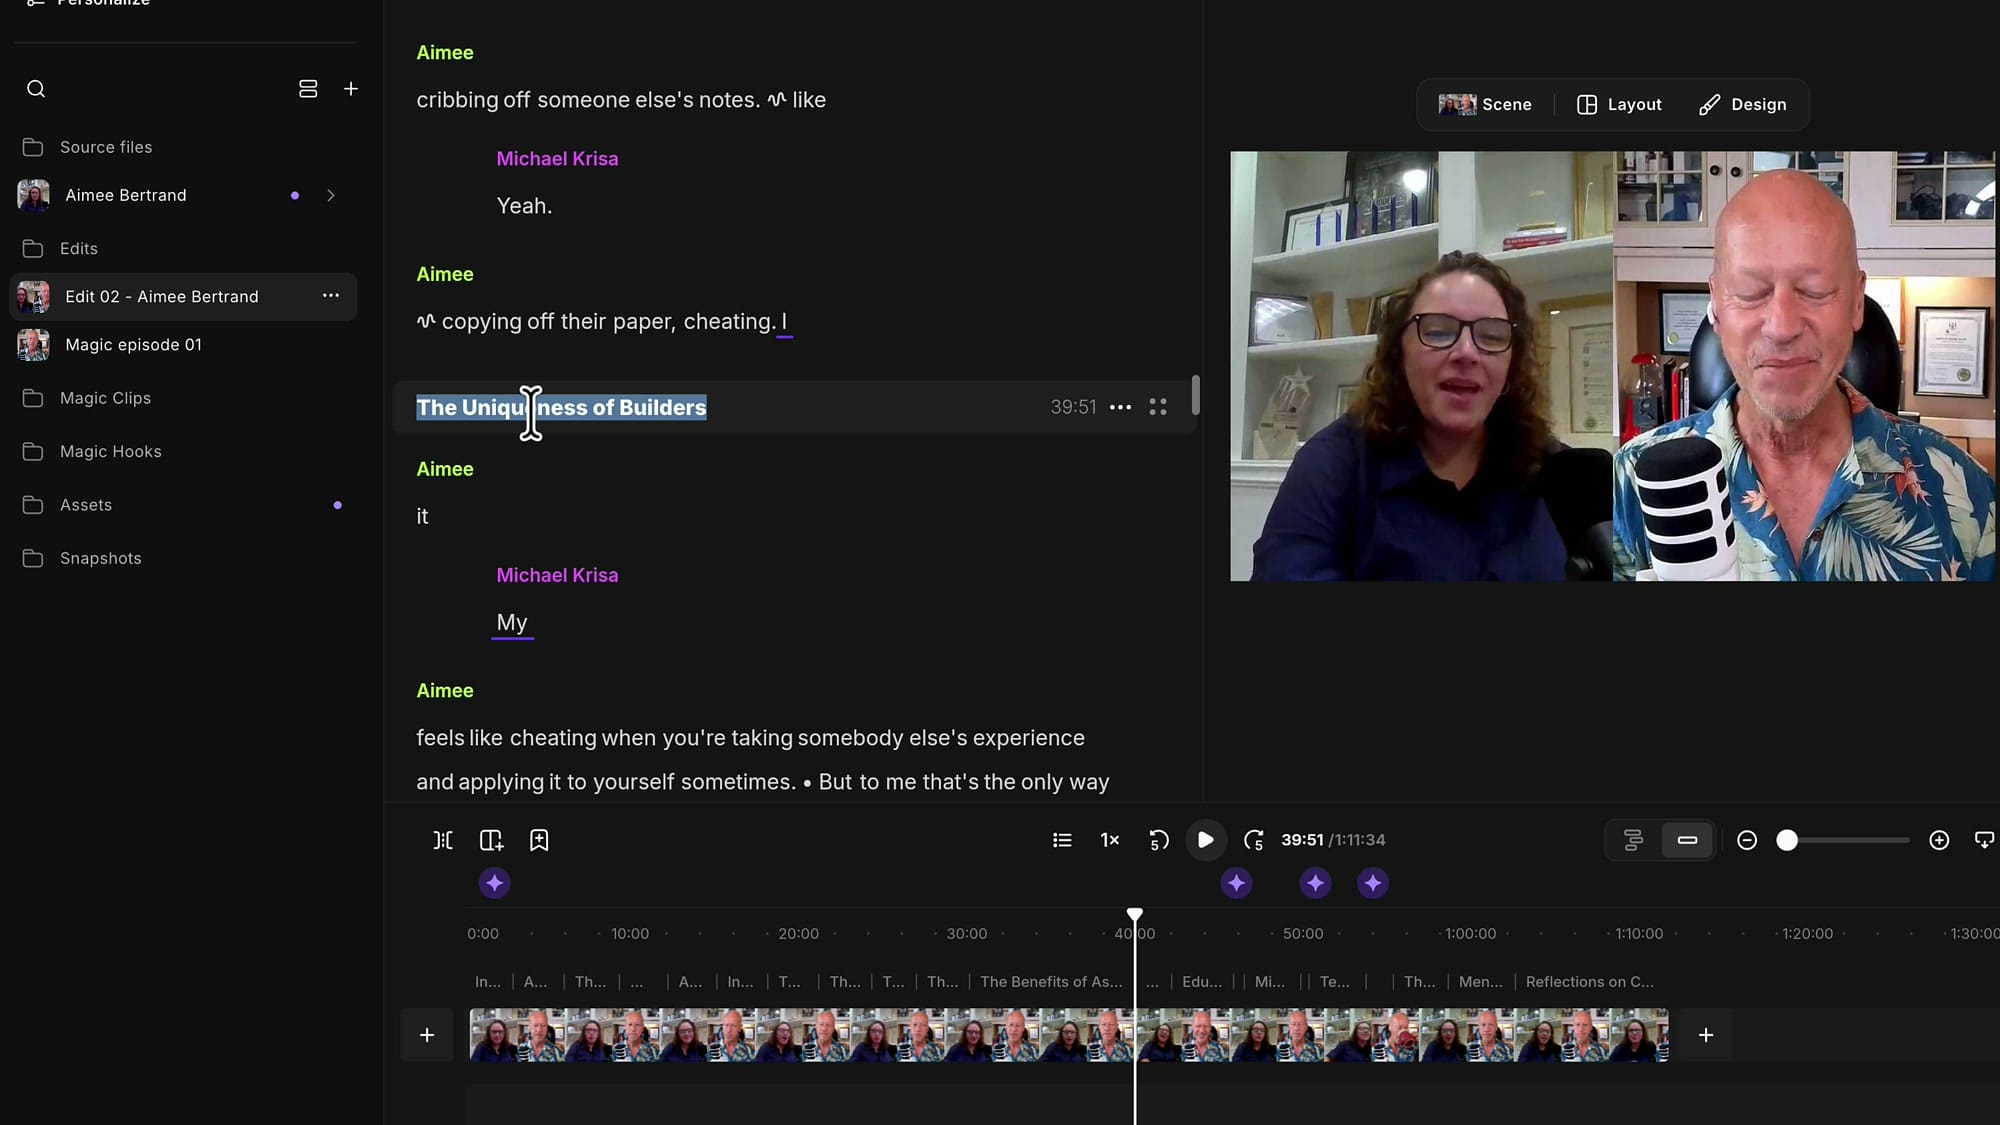
Click the three dots on the chapter row and choose Rename — or, much faster, just double-click the title. It becomes editable immediately with the text selected.
Move a chapter
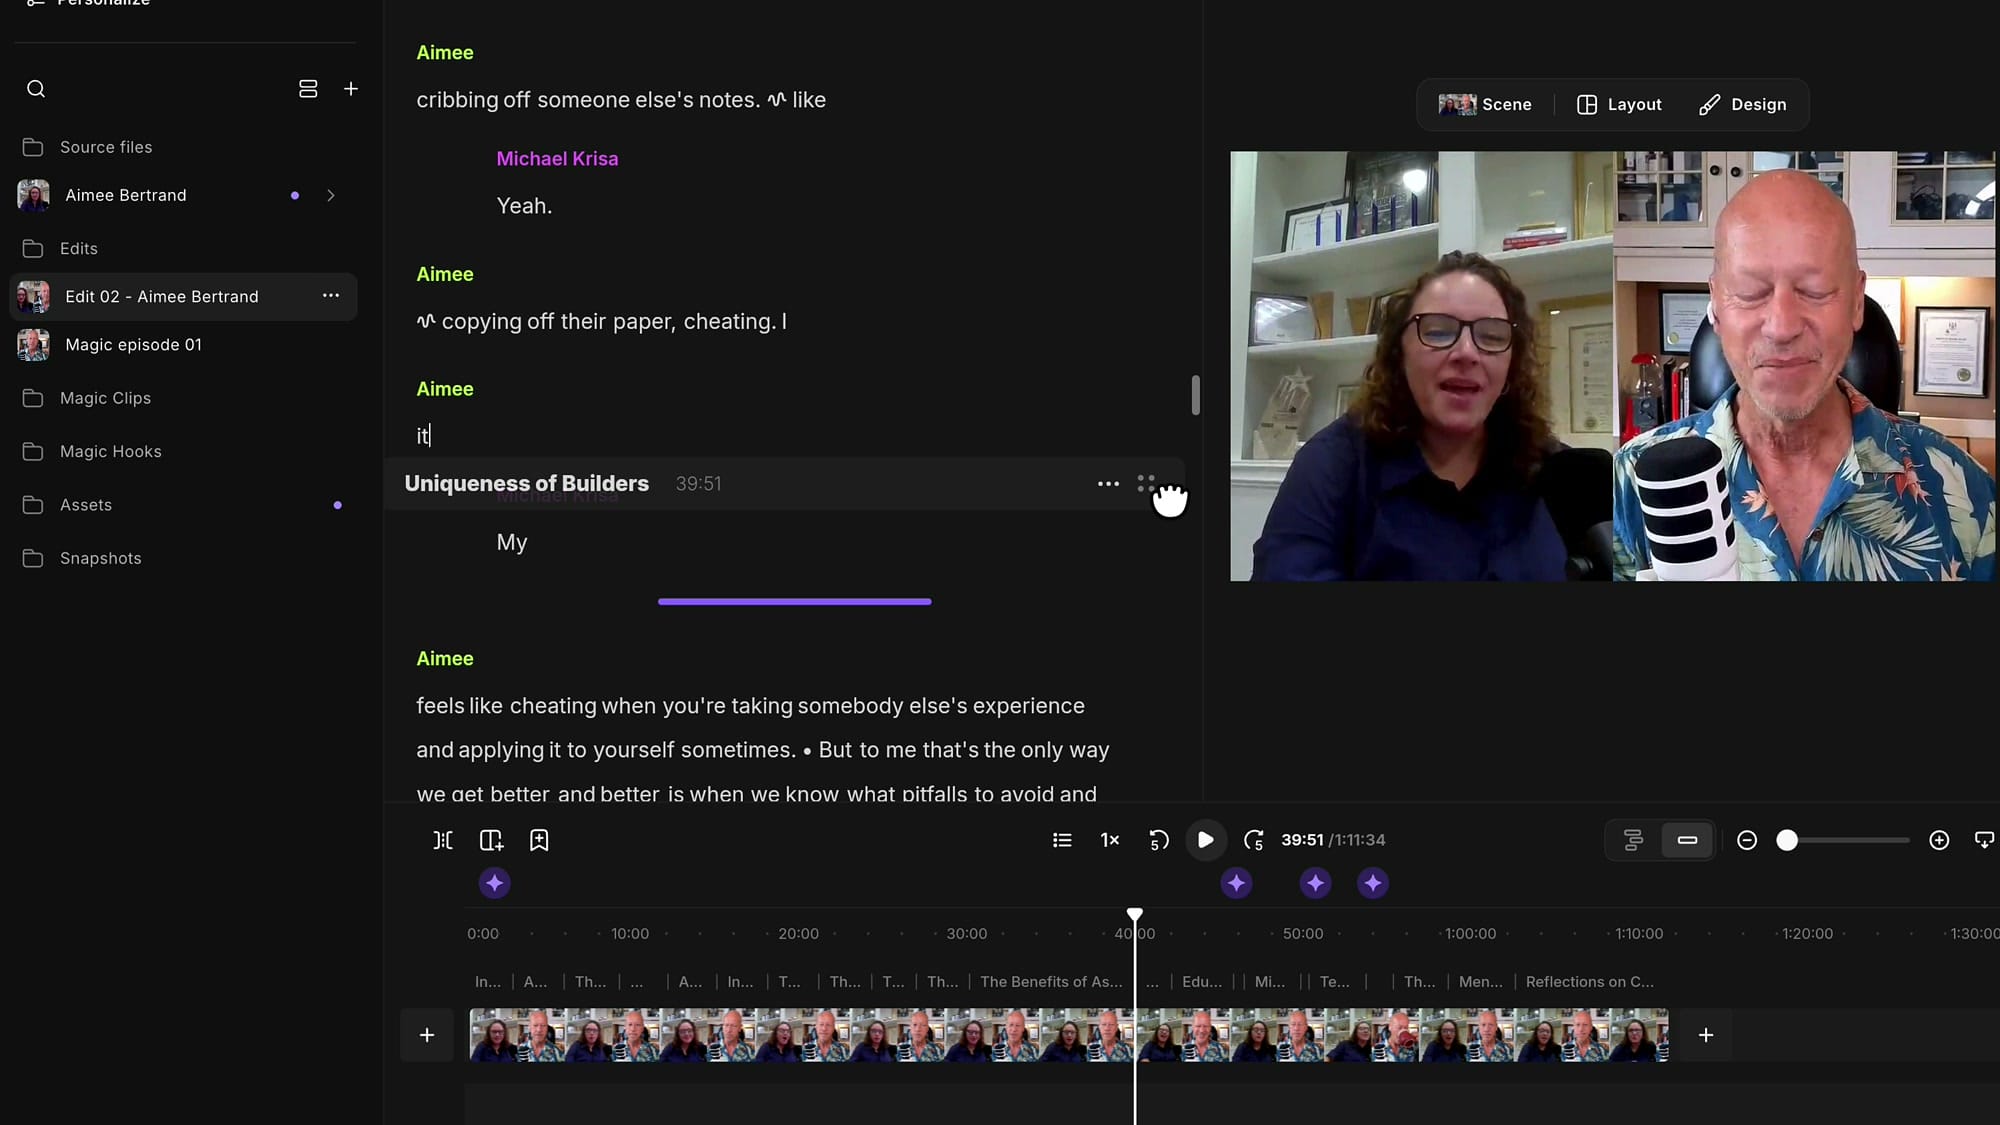
AI break points are usually close but not exact — often a sentence or two early. Grab the four-dot handle on the right of the chapter row and drag. A purple line shows you where it'll land, and you can drop it between any two paragraphs.
Delete a chapter
Three dots → Delete. Gone from the transcript, the timeline, and the exported chapter list.
Insert your own
Hover between two paragraphs in the transcript and a thin line with a + appears. Click it and you get the insert menu — the same one you'd use to drop in a new scene, stock footage, music, or text. One of the options is Add chapter.
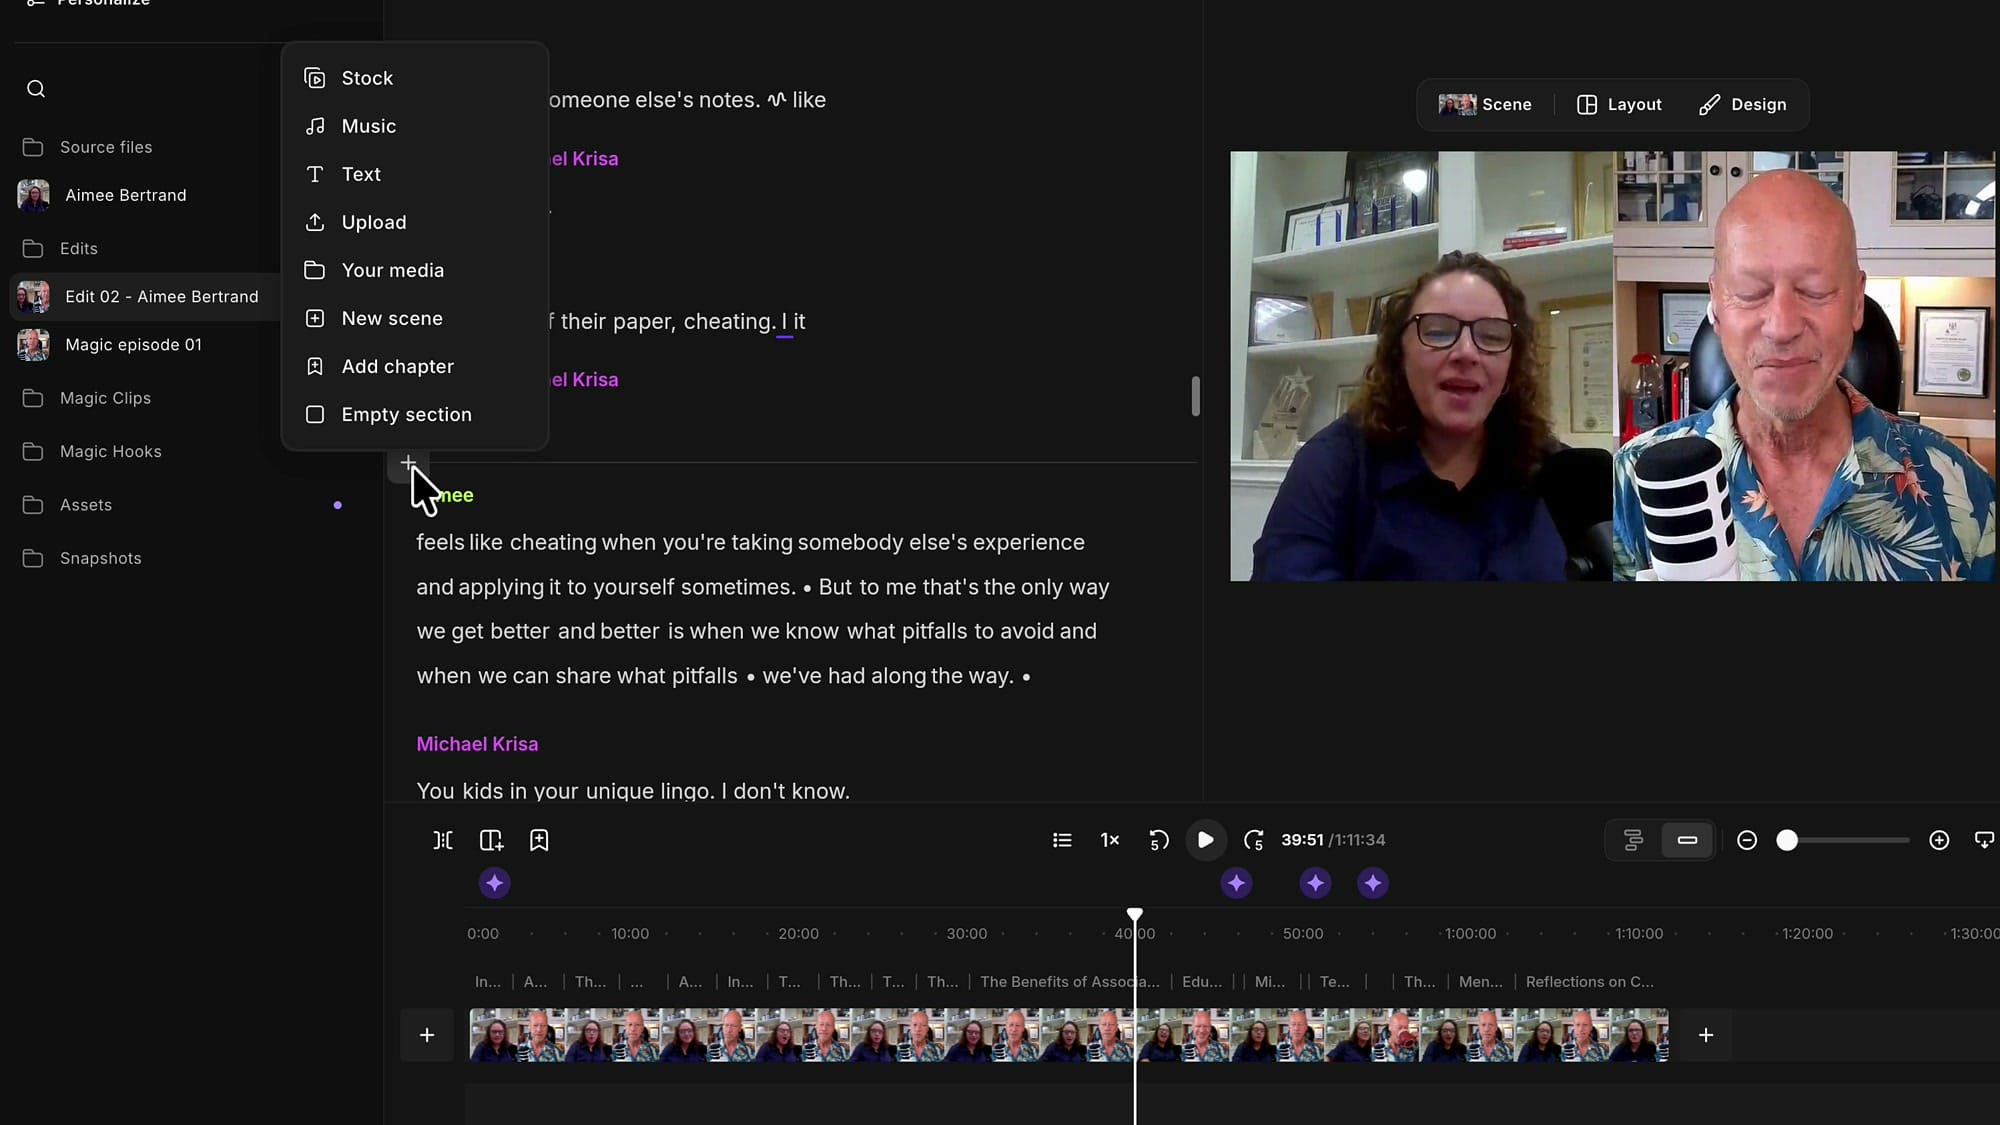
Type your title, press Enter, and it's placed exactly where you clicked.
Work with chapters on the timeline
If you're a timeline editor — waveforms, tight trims, precision work — you don't have to go back up to the transcript to manage chapters. There's a dedicated chapter rail running along the top of the timeline.
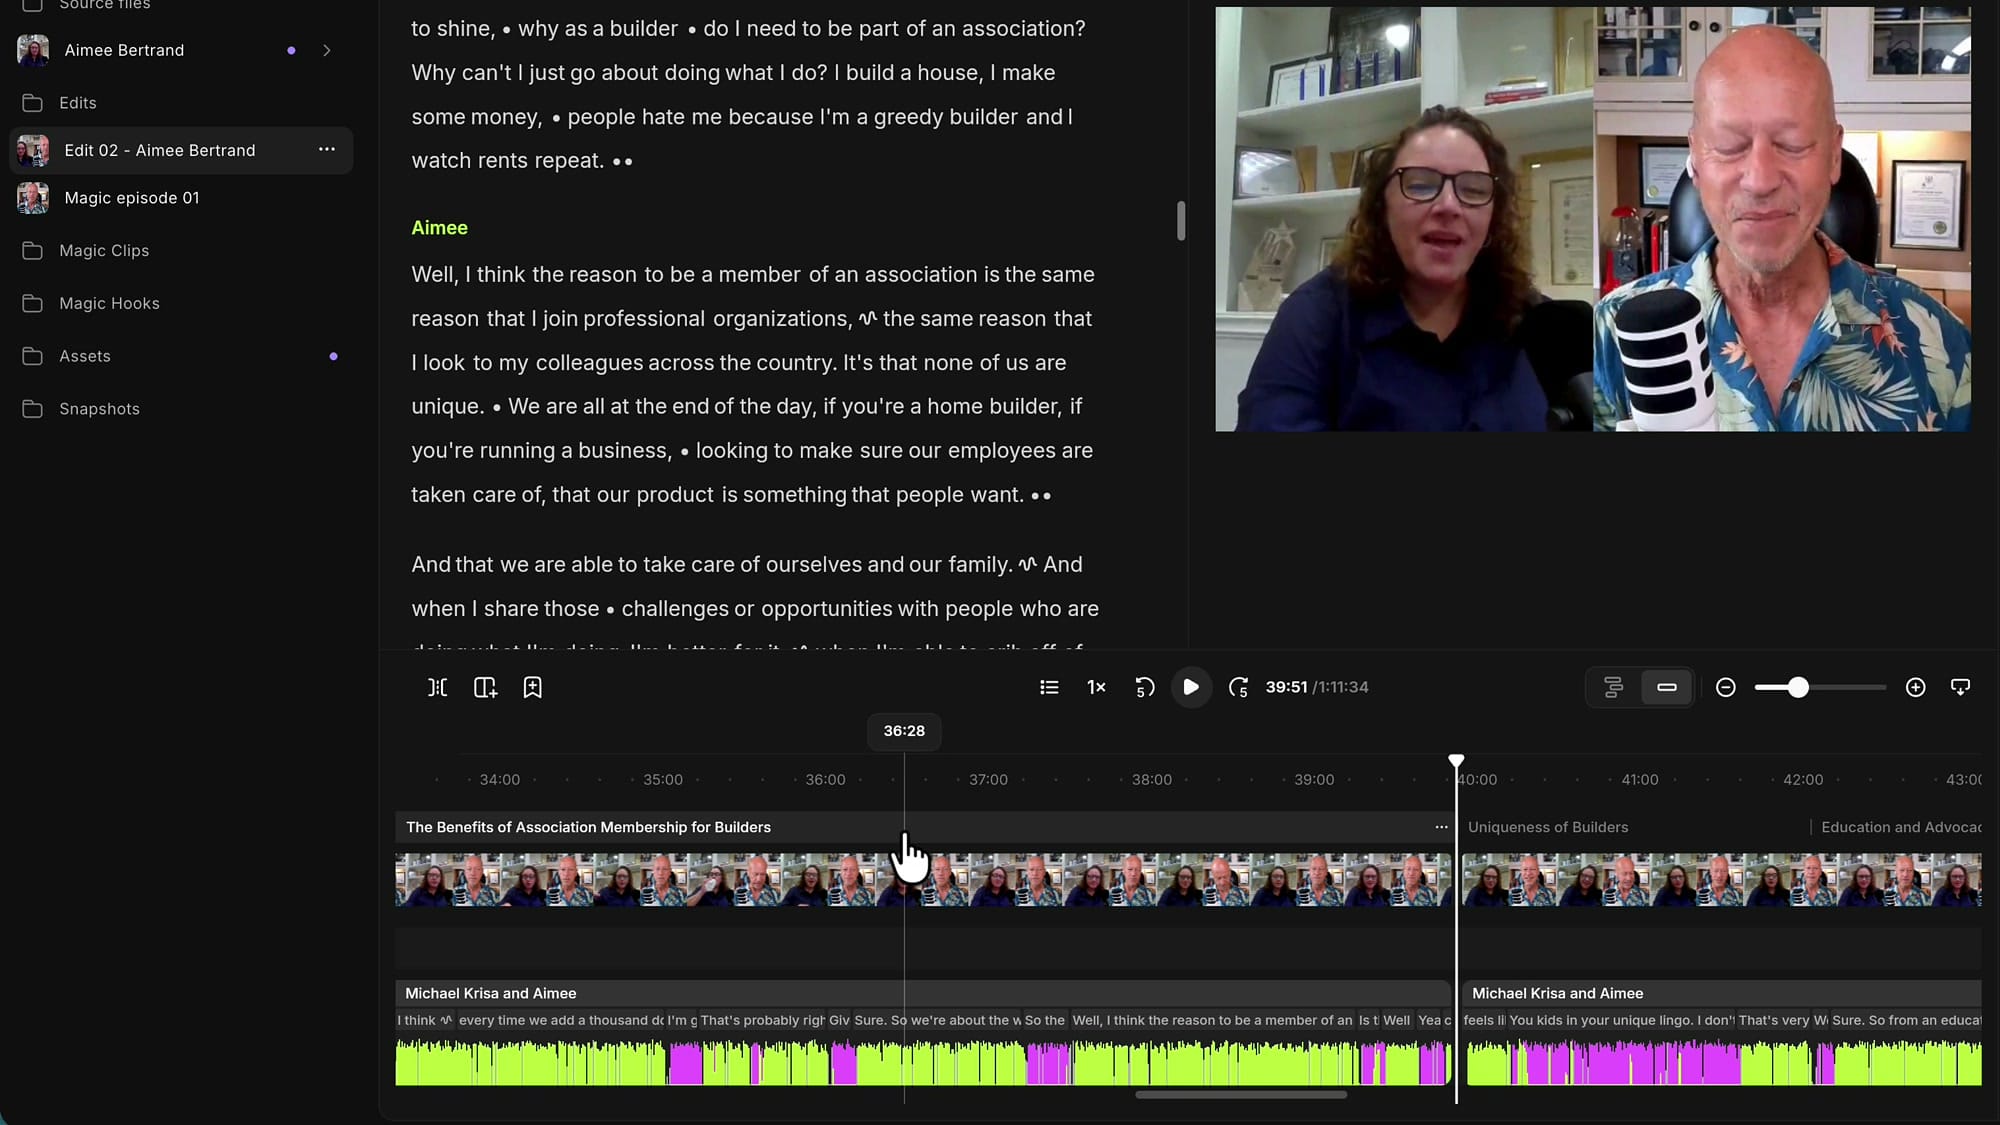
Everything you can do in the transcript works here too: three dots for rename and delete, or double-click the name to edit it in place.
Adding a chapter at the playhead
This is where I add most of mine. Zoom in with Command and the mouse wheel, park the playhead exactly where the new section should start, and click the Add chapter button in the timeline toolbar.
One gotcha to know about first. If a chapter block on the rail is currently selected — you'll see it highlighted in purple — the Add chapter button won't be available.
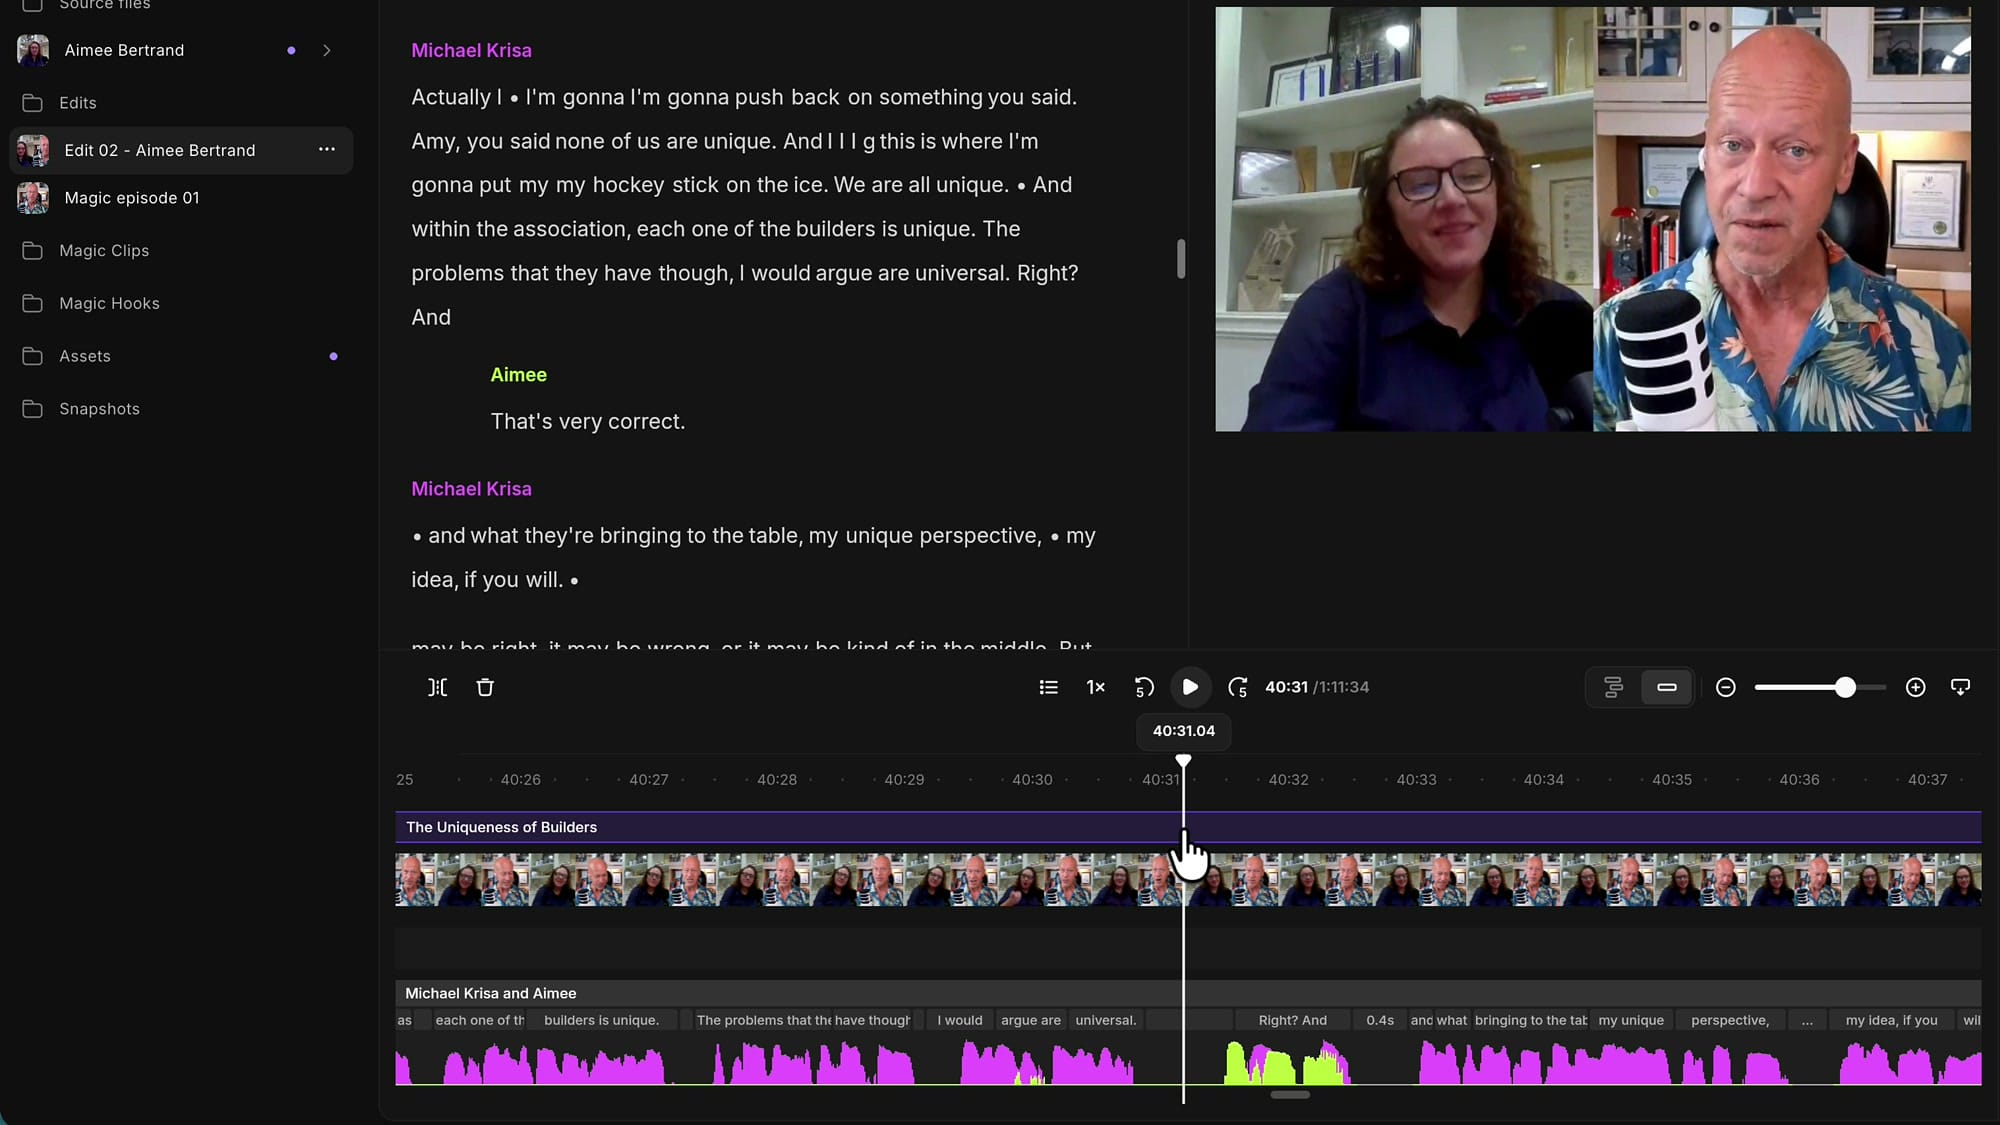
Click somewhere empty above the timeline to deselect, and the button reappears.
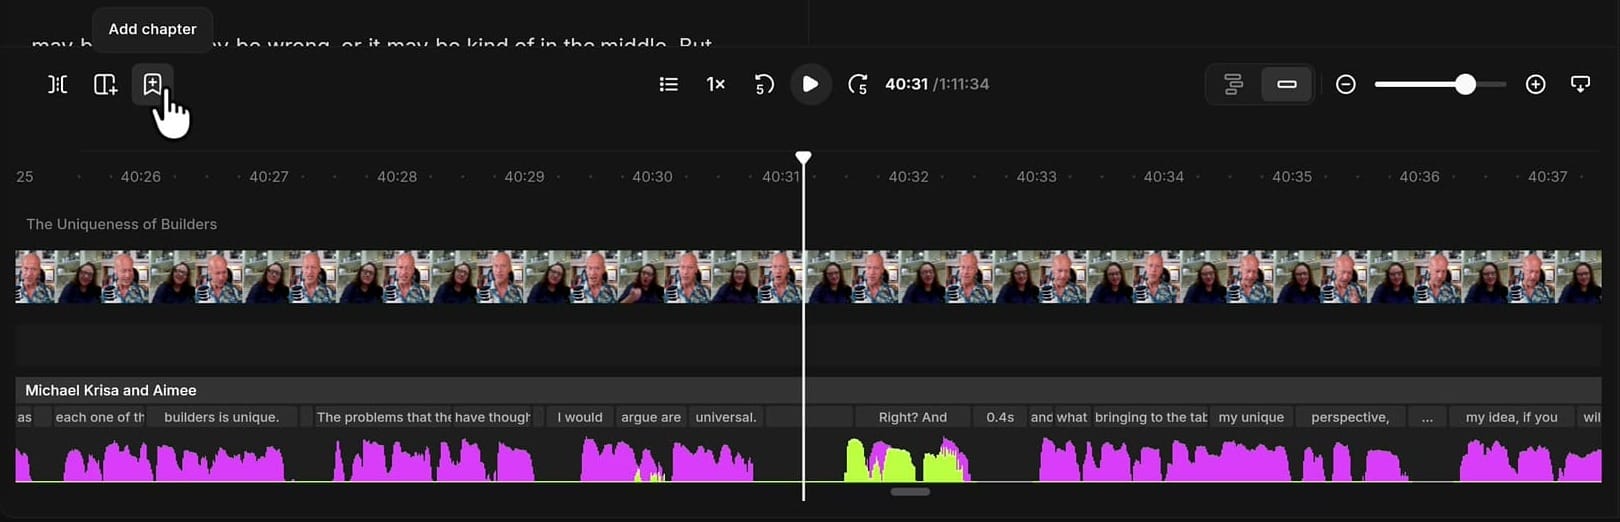
The chapter lands exactly at the playhead. It doesn't snap to paragraph breaks or respect the transcript's structure — it goes precisely where you put it. Then double-click to name it, and it shows up in the transcript at whatever phrase Riverside considers the matching break point.
Why chapters are worth the effort
Navigation inside the editor is the obvious payoff, but it's not my main reason. I build chapters because they publish.
YouTube, Spotify, and most podcast players read timestamped chapter lists and turn them into clickable segments in the player. Your audience gets a table of contents: they can skip to the part they came for, or jump ahead if a section isn't for them. On a long episode that's the difference between someone bouncing at 40 seconds and someone finding the one answer they needed.
There's a second benefit that's becoming more useful. When you ask AI to pull clips or summaries out of an episode, a chaptered episode gives it structure to work with. It understands where topics start and end instead of guessing from a wall of text — and the clips it picks are better for it.
Export chapters to YouTube and Spotify
Getting the list out takes one click. In the editor, open the three-dot menu above the transcript.
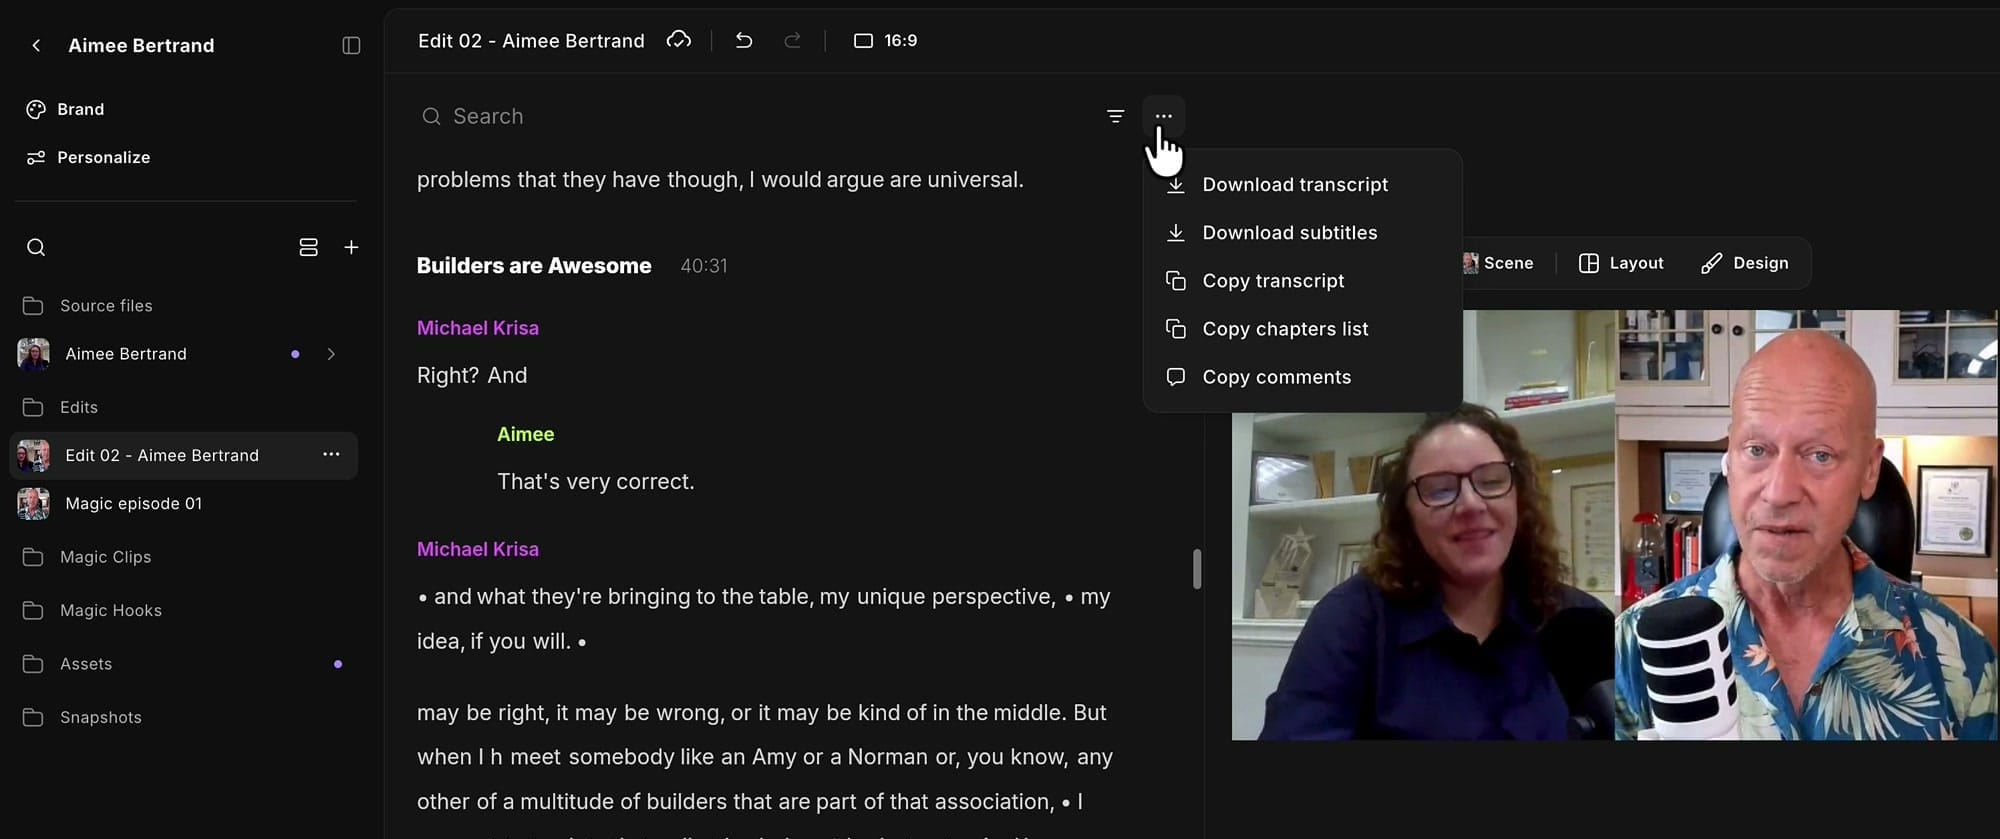
Paste it anywhere and you'll see the format is already exactly what the platforms expect — timestamp first, title after.
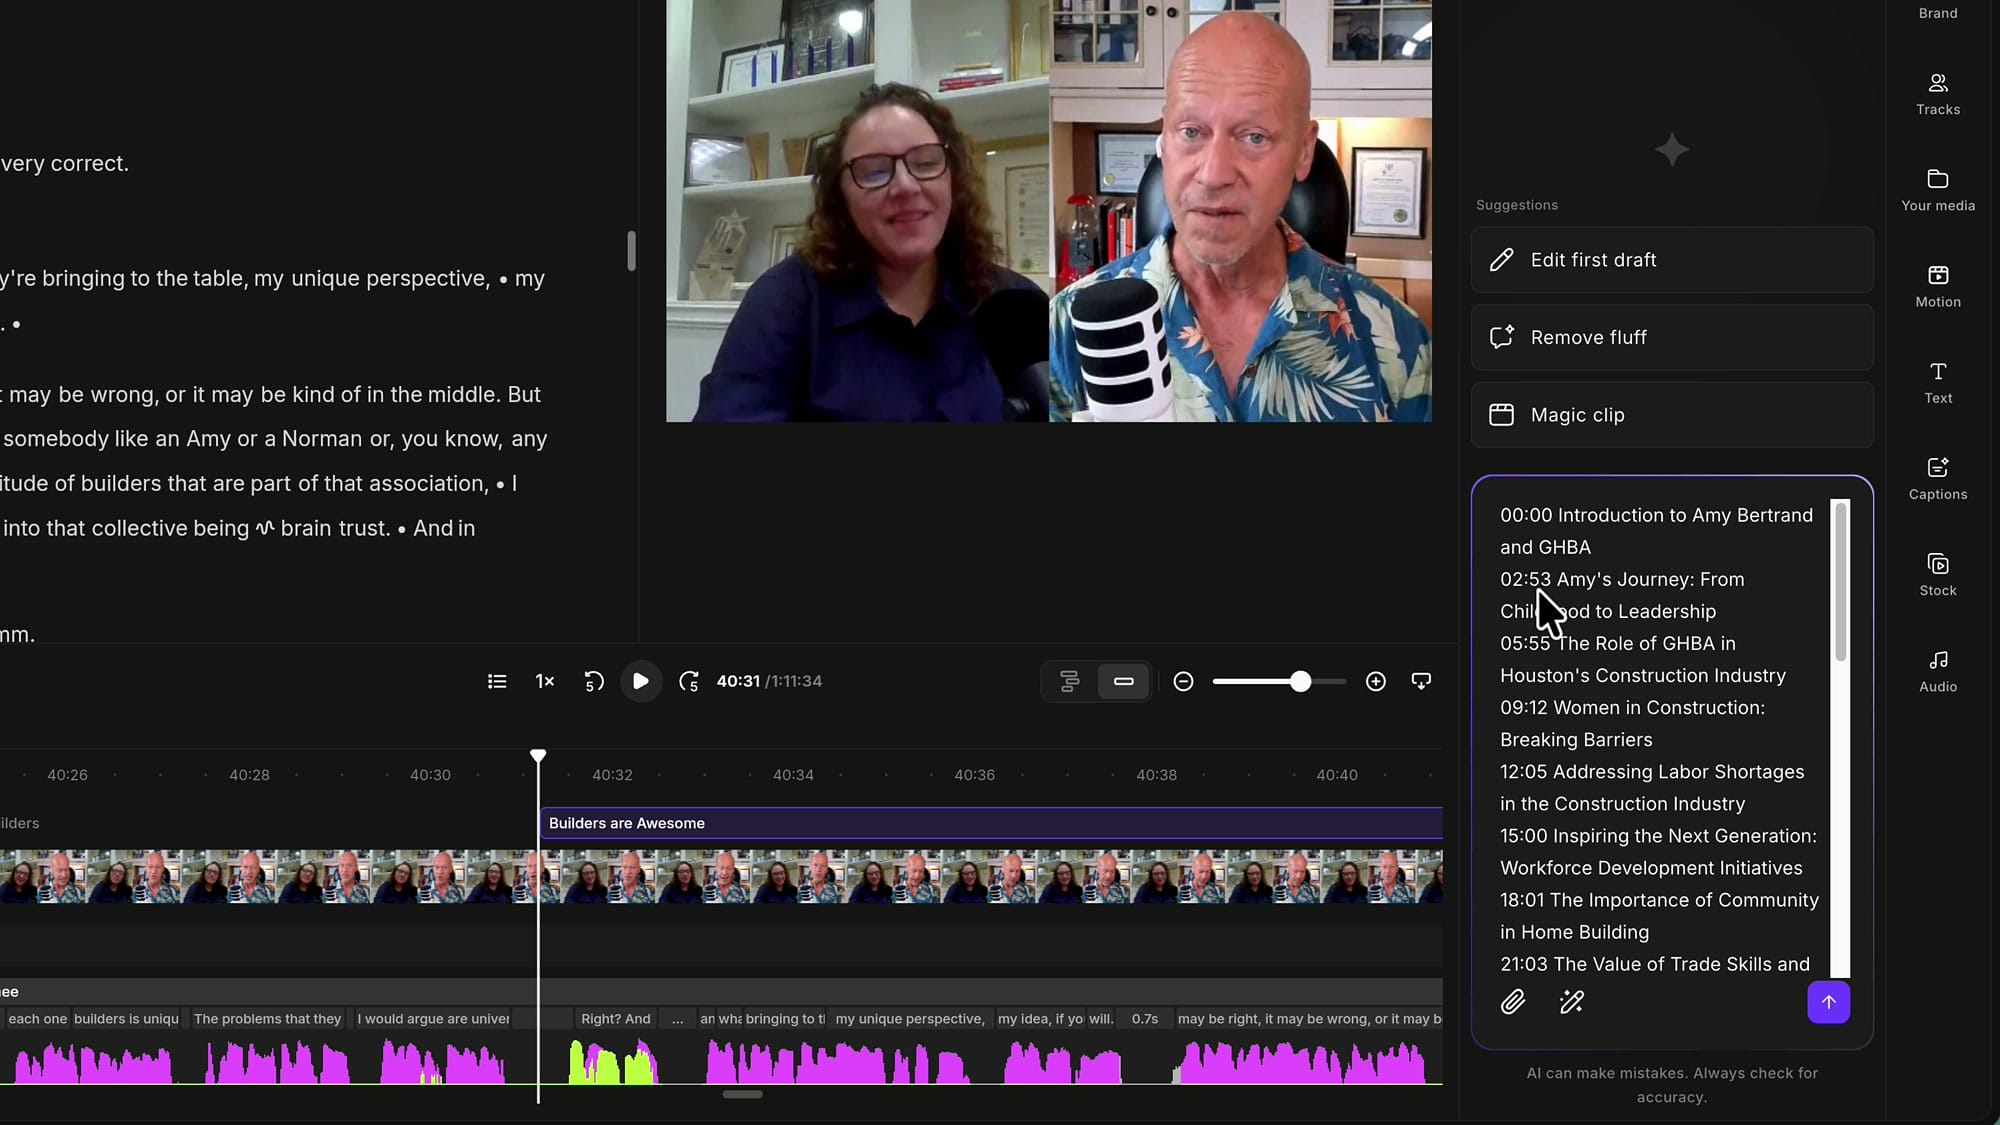
Drop that block into your YouTube description and YouTube converts it into chapters automatically. It's one of the pieces I always include when I prepare metadata for an episode.
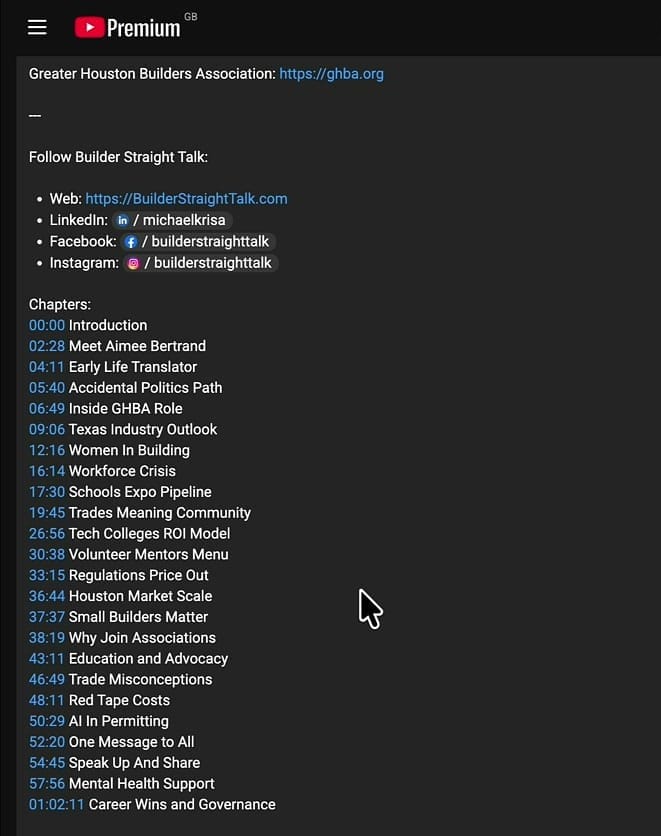
And in the player, viewers get the full chapter list with thumbnails.
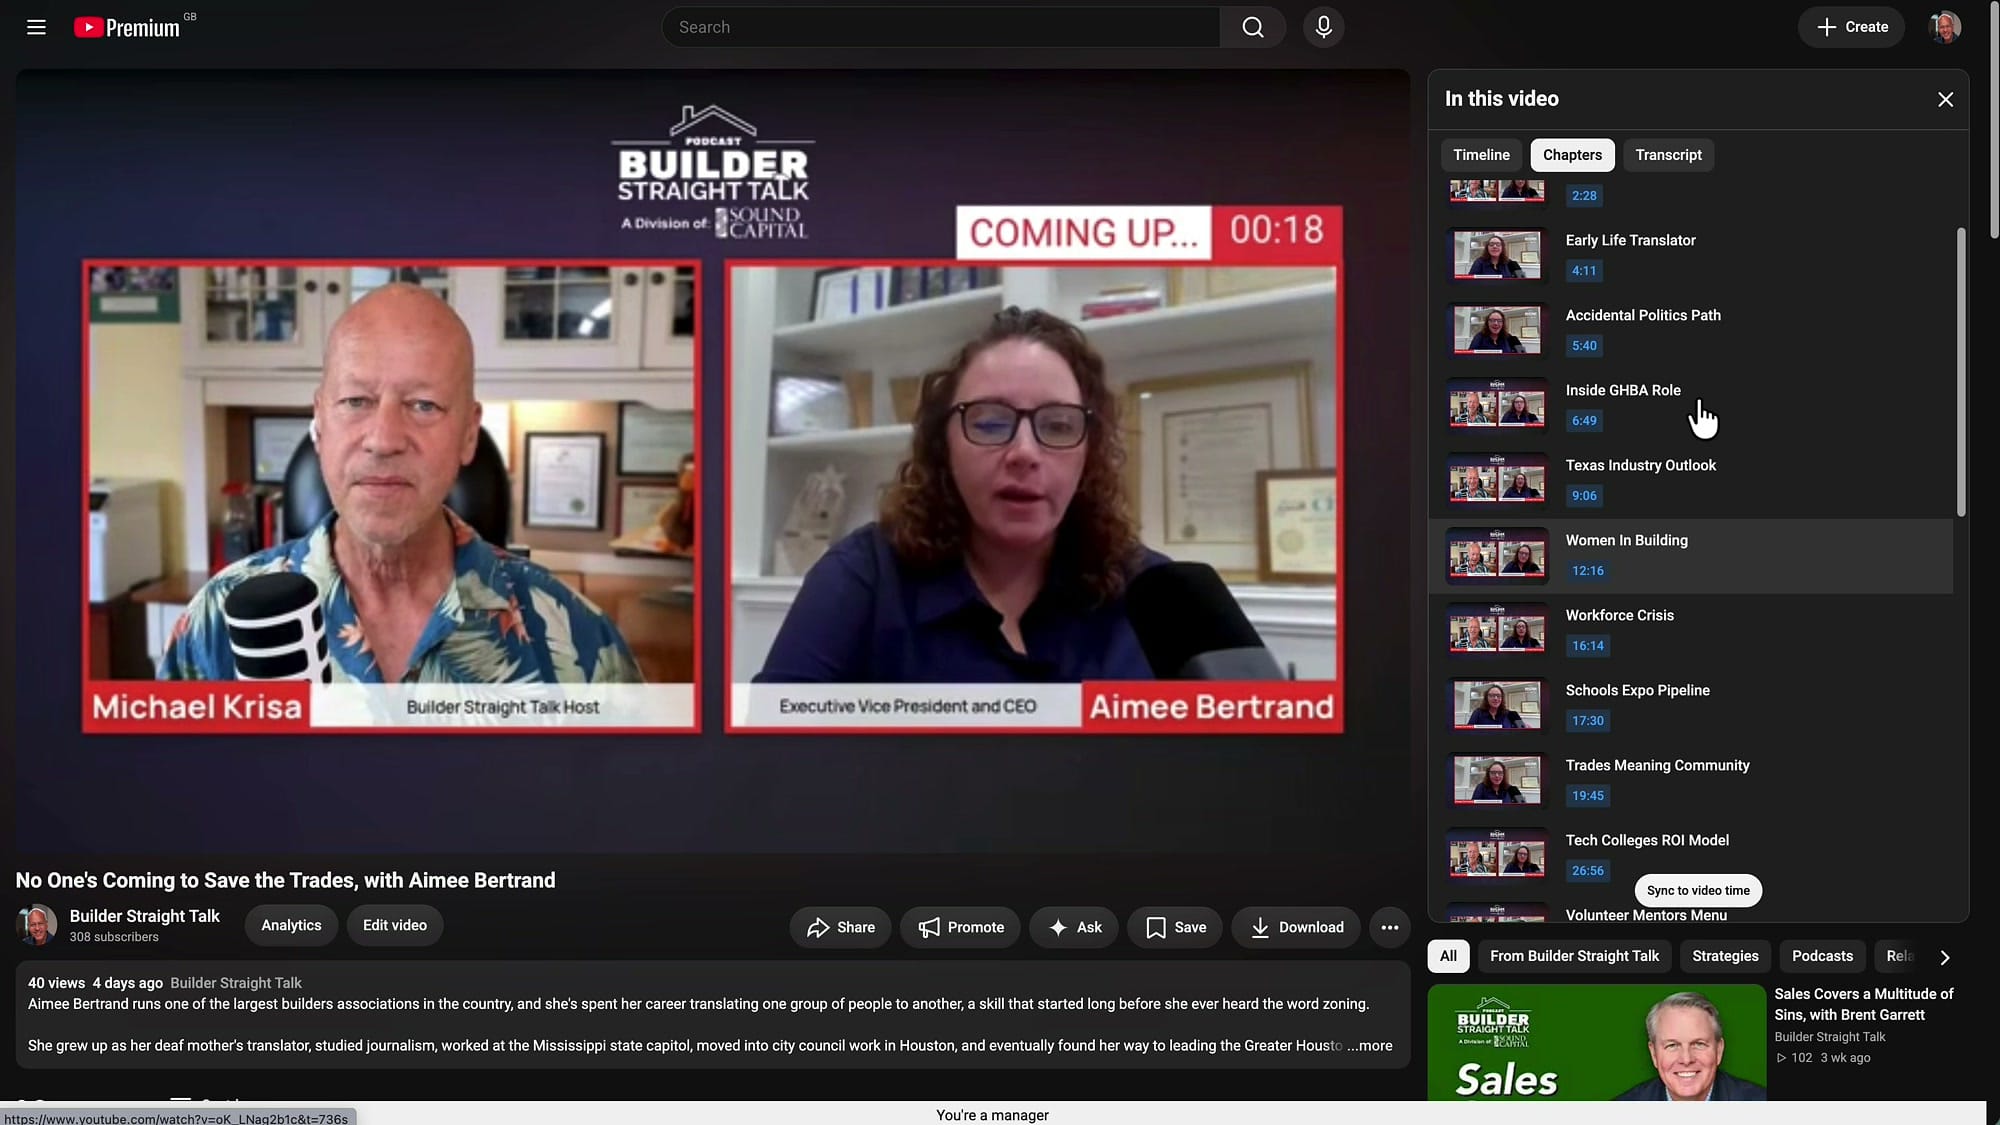
The same paste works for Spotify and other platforms that support timestamped chapters — one list, reused everywhere.
If you’re eager to learn more about Riverside and wish to have a one-on-one Riverside coaching session, feel free to book a call with me.
I’m here to help you with any questions you have and to guide you through the best workflows, tips, workarounds, or just answer any questions you may have!
The workflow, end to end
Put together, this is how the two features hand off to each other:
- While recording: press M whenever something matters. Add a note if you have a spare second; a bare marker is fine if you don't.
- In the editor: work through the markers in the Comments sidebar, resolve them as you handle them, and hide the layer when you want a clean timeline.
- Chapters: start from what the AI generated. Rename the ones that don't read well, move the ones that landed early, delete the ones that don't earn their place, and add your own — from the transcript or the timeline, whichever you're already in.
- Publishing: Copy chapters list, paste into your YouTube description and your podcast host, done.
Markers won't become chapters on their own — that translation is your job. But that's the point: the markers are the hints you left yourself while you were too busy talking to think about structure, and chapters are what you do with those hints afterwards.
The redesigned Riverside editor made this whole thing much lighter to manage. Adding a chapter used to feel like a detour; now it's a double-click and it doesn't break my flow. If you're new to the platform and want to see how the rest of it fits together, my full Riverside guides and resources are a good place to start.
Related guides
 Cristi Cotovan
 Cristi Cotovan
 Cristi Cotovan
 Cristi Cotovan
 Cristi Cotovan
If you're eager to learn more about Riverside and wish to have a one-on-one Riverside coaching session, feel free to book a call with me. I'm here to help you with any questions you have and to guide you through the best workflows, tips, workarounds, or just answer any questions you may have!